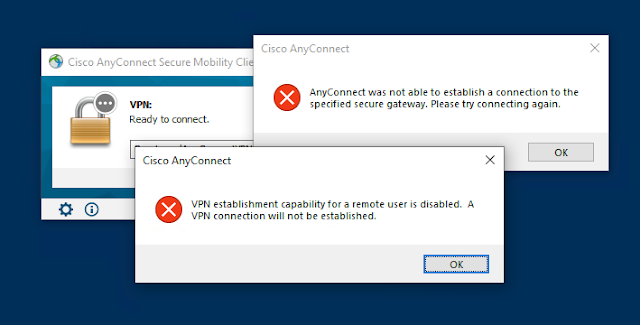
If you get the following error when connecting to a Cisco AnyConnect VPN from Windows, it's because the VPN establishment capability in the client profile doesn't allow connections from a remote desktop session.
VPN establishment capability for a remote user is disabled. A VPN connection will not be established.The client profile is an XML file that gets pushed out to the AnyConnect client every time the VPN is established. The correct way to fix this is by configuring the Citrix VPN profile on the ASA. Usually this is done by the ASA administrator using the Cisco Adaptive Security Device Manager (ASDM). If you're the ASA administrator read this article for instructions how to configure this.
But what if you're not the ASA administrator or the admin can't/won't to make this change for some reason? We can hack it! I don't normally write blog posts like this, but I honestly can't think of a single good reason to block VPN access from a remote desktop, so I don't consider this bypassing a security setting. Here's how to get around it.
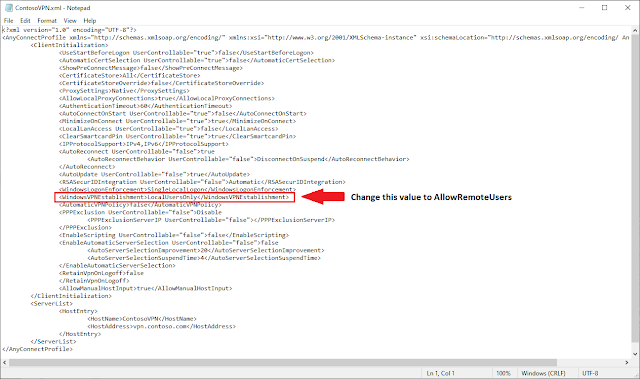
First, open the client profile XML file in Notepad. It's located in the C:\ProgramData\Cisco\Cisco AnyConnect Secure Mobility Client\Profile folder.
Edit the <WindowsVPNEstablishment> tag to use AllowRemoteUsers instead of LocalUsersOnly.

For example, change:
<WindowsVPNEstablishment>LocalUsersOnly</WindowsVPNEstablishment>To:
<WindowsVPNEstablishment>AllowRemoteUsers</WindowsVPNEstablishment>Now save the profile to your Desktop or another location with a .BAK extension. For example, if the original profile name is ContosoVPN.xml, save it as ContosoVPN.bak.
Move the modified .BAK file to the C:\ProgramData\Cisco\Cisco AnyConnect Secure Mobility Client\Profile folder. This will normally require admin rights. You should now have two client profile files there, for example ContosoVPN.xml and ContosoVPN.bak.
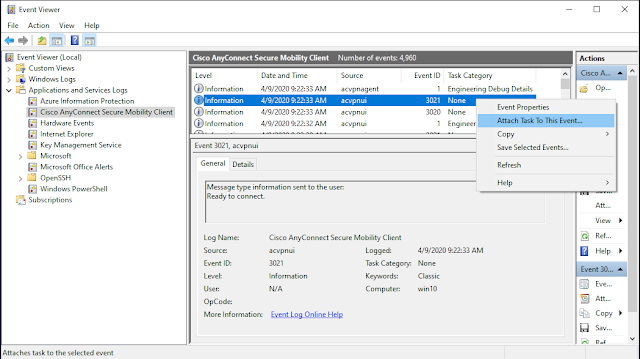
Now open Event Viewer and navigate to Applications and Services Logs > Cisco AnyConnect Secure Mobility Client. Search for Event ID 3021 from source acvpnui. It should be near the top of the Cisco logs if you just tried to connect to the AnyConnect VPN.

Right-click that event and select Attach Task To This Event. The Create Basic Task Wizard will open.
 |
| Click Next. |
 |
| Click Next again. |
 |
| Click Next again. |
 |
| Configure the program to run using the settings below, then click Next. |
C:\Windows\System32\cmd.exeArguments:
/c cd "C:\ProgramData\Cisco\Cisco AnyConnect Secure Mobility Client\Profile" && copy *.bak *.xml /yThis task tells Windows to copy the modified .BAK profile over the .XML file that the AnyConnect client downloads from the ASA whenever acvpnui logs event ID 3021.
 |
| Check the box to open the properties for the task when finished and click Finish. |
The task properties will open in a new window.
Now test it out. You should be able to connect to the AnyConnect VPN using a remote desktop (RDP).
Be aware that if things change (ports, IPs, etc.) they will be lost/overwritten by the static BAK file. If that happens you can simply delete the BAK file, attempt a connection, and edit the new XML file with the new settings again.


No comments:
Post a Comment
Thank you for your comment! It is my hope that you find the information here useful. Let others know if this post helped you out, or if you have a comment or further information.