Showing posts with label Disaster Recovery. Show all posts

How to Create and Manage an Office 365 Breakglass Account

Monday, December 24, 2018
Despite the huge investments Microsoft has made to make Office 365 both secure and highly available, there have been three major outages this year that prevented customers from accessing their cloud resources. Administrators discovered that they couldn't connect to the Office 365 administrative portals to make the changes needed to allow their users to sign in.

Just like having a house key hidden somewhere in case you get locked out, it's important to have a breakglass account that you can use to sign in to Office 365 in case DirSync, MFA, or AD FS authentication fails. In this article, I'll provide step-by-step instructions on how to properly create an O365 break glass account and how to manage it.

Before we get started it's important to understand what this account is for and how to secure it. The purpose of the break-glass account is to allow the administrator sign in to Office 365 with the highest level of privileges (i.e., Global Administrator) with the minimal number of security controls, since these security controls are most likely the reason that admins or users cannot sign-in in the first place. That means the only security controls you have for this highly privileged account are a strong password and physical security. We'll talk more about guarding this account later in this article.

Create the breakglass account

First, let's create the breakglass account in Office 365. The breakglass account should always be a tenant account - one that only exists in Azure Active Directory and is not synced from your on-premises AD. Typically, it would look like breakglass@domain.onmicrosoft.com. By using an Azure Active Directory account, you remove the reliance on ADFS, pass-though authentication, or any other third-party authentication mechanism (Okta, Onelogin, etc.) to sign in. The breakglass account also shouldn't require a hard or soft token, such as YubiKey, Duo, or RSA.

Go to the Azure AD portal at https://aad.portal.azure.com and sign-in with a Global Administrator account. Create a new breakglass account in Azure AD, making sure that the account's UPN uses the tenant domain (domain.onmicrosoft.com) to bypass any on-premises authentication. Add the new account to the Global Administrator group.


AAD will automatically create a temporary password for this account, as shown above. Copy this password and create the account. Now sign out of the AAD Portal and sign back in with the new breakglass account using the temporary password. If you've configured multi factor authentication (MFA) or self-service password reset (SSPR) for all users, or you've configured the "Require MFA for admins" conditional access baseline policy, you'll be prompted for additional information to sign-in for the first time.


Click Next and complete the MFA enrollment. It doesn't really matter if you use the Authenticator app, phone call, or text to enroll because we'll turn MFA off for this account shortly.

Next you'll be prompted to enter the temporary password and create a new password. Make the new password a complex password. Passwords for cloud accounts can't contain the user ID, and need to be 8-16 characters long, with at least 3 of the following: uppercase letters, lowercase letters, numbers, and symbols. Record this new password to store in a secure place. 

TIP: Avoid characters that can be confusing when written down (o, O, 0, 1, l, etc.) - you may not be the one who has to read the password for the breakglass account. Use Notepad or Word to print the password using the Courier New font to print it out, since this font makes it easier to discern characters and numbers.


TIP: Record the username and password on a piece of paper and store it in a sealed business envelope. Make sure the password cannot be read through the envelope when held up to the light. Write "OFFICE 365 BREAKGLASS ACCOUNT" across the front of the envelope and sign the envelope across the flap on the back so you'll know if it is ever opened. Then store this envelope in a secure location that you and other trusted individuals can access, such as a safe or locked drawer. Don't make it so difficult to access that it can't be found and accessed when needed.

Now that we've created the cloud-only breakglass account with a complex secure password, we need to remove any security controls from the account that might prevent the breakglass account from signing in.

Remove Multi-Factor Authentication

Office 365 provides MFA for all tenant admin accounts. It's not enabled by default, but you should ensure it's not configured for the breakglass account. The idea behind removing any MFA policies is to prevent any obstruction from logging into this account to manage the domain.

In the AAD Portal go to Azure Active Directory > Users > Multi-Factor Authentication and locate the breakglass account. Ensure that Multi-Factor Auth Status shows as Disabled.


There are also some conditional access policies that can enable MFA. These are managed from Azure Active Directory > Conditional Access > Policies.


The "Baseline policy: Require MFA for admins" conditional access policy, which is currently in preview, automatically enables MFA for accounts that are members of any Office 365 admin groups. Azure AD Premium customers may also have other custom conditional access policies, like "Require MFA from external networks". Azure AD Premium P2 licenses include the "Require MFA for risky actions" conditional access policy. You should exclude the breakglass account from all of these conditional access policies.

Edit each of these policies to exclude the breakglass account, as shown in the example below. Click Exclude users, add the breakglass account, then click Done and Save. Repeat for each conditional access policy.


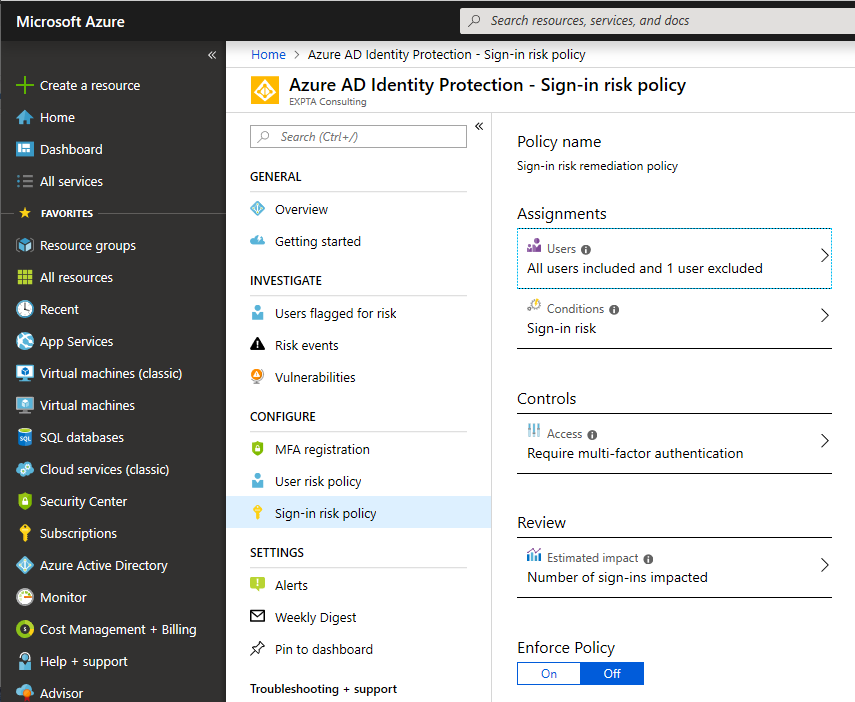
Azure AD Premium P2 users also have Azure AD Identity Protection, which provides other ways to configure MFA. You should exclude the breakglass account here, too. Go to the Azure AD Identity Protection portal at https://portal.azure.com/#blade/Microsoft_AAD_ProtectionCenter/IdentitySecurityDashboardMenuBlade/Mfa. Here, you will see the MFA registration, user risk, and sign-in risk policies.


By default, these policies are not enabled, but you should make sure that the breakglass account is excluded if and when they are enabled. For each policy click Users under Assignments and exclude the breakglass account.


If the Azure AD Identity Protection policies have not been configured yet, you'll need to fully configure them to save the exclusion, even if they're not enforced yet.


Other Tips and Important Considerations

Set the password to never expire for the breakglass account after creating the account. Connect to AAD using the Microsoft Azure Active Directory Module for Windows PowerShell using a Global Administrator account and run the following cmdlet:
Set-MsolUser -UserPrincipalName breakglass@domain.onmicrosoft.com -PasswordNeverExpires $true
If you have Azure AD Premium, do not use Azure AD Privileged Identity Management (PIM) for the breakglass account. You want to be sure that the breakglass account can sign-in using only the complex password which is stored with physical security.

Routinely check the sign-ins and admin audit logs for the breakglass account to confirm it's not being used inappropriately. From the AAD portal go to Users > Breakglass > Sign-ins and Audit logs.

Reset the password on the breakglass account every 6 months or so. Not only does this increase the security of the account, it reinforces your procedures for locating the sign-in information and accessing the account. You don't want to find out that no one remembers the combination to the safe where the breakglass account information is kept when you need it.

If you ever have to use the breakglass account be sure to reset the password when you no longer need to use it and store it away again.

Conclusion

Like other types of insurance, a breakglass account is something you never hope you need to use, but having one can be invaluable when the next outage occurs. And it will.

Read more ...

Turning a Disaster Recovery Test into a Disaster

Monday, October 27, 2014

I recently assisted a customer with a disaster recovery test for Exchange 2013 that went very wrong. I'm sharing what happened here in case the same unfortunate series of events happen to you so you know how to recover from it, or better yet maybe prevent it in the first place.

The customer's Exchange 2013 environment consists of a three node DAG, two nodes in the primary datacenter and another in the DR datacenter. The DAG is configured for DAC mode. The customer wisely wanted to test the DR failover procedures so they know what to expect in case the primary datacenter goes offline.

The failover process went smoothly. The SMTP gateways and Exchange 2013 servers in the primary datacenter were turned off and the DAG was forced online in the DR datacenter. Internal and external DNS was then updated to point to the DR site. CAS connectivity and mail flow was tested successfully from all endpoints - life was good. The customer wanted to leave it failed over to the DR site for a few hours to confirm there were no issues. 

Now it was time to fail back. The documentation says to confirm that the primary datacenter is back online and there's full network connectivity between the Exchange servers in both sites. Then login to each DAG member in the primary site and run "cluster node /forcecleanup" to ensure the servers are ready to be rejoined to the DAG.

But the customer scrolled past the part about where to run the command and ran it on the only node in the DR site. This essentially wiped the cluster configuration from the only node that held it. Instantly, the cluster failed and all the databases went offline. Since no other cluster nodes were online there was nothing to fail back to.

We fixed it by turning on the two DAG members in the primary site and starting the DAG in that site. That brought the databases online, but they were not up to date. We used the Windows Failover Cluster Manager console to evict the DR node and then add it back in. After AD replicated we saw that replication between all three nodes was working and the databases came up to date from Safety Net. We didn't even need to reseed any of the database copies. Disaster averted.

So how did this happen and what can be done to prevent it?

Human nature is to skip large blocks of text and read for the steps that need to be done. This is especially true when you're fairly comfortable with the steps or you're under pressure. For this reason, I keep my procedures pretty concise with maybe a sentence or two explaining why this step or procedure is being done.

In this case, the customer scrolled past the text explaining where to run the command and just ran it from the wrong server.

Here are my suggestions for creating disaster recovery documentation.

  • Know your audience. You need to make an assumption about who will be reading the DR documentation. Will it be the same people who manage the infrastructure in the primary site? Maybe not, if this is a true disaster. Make sure you write the documentation for the right audience. Avoid acronyms that unfamiliar users may not know, or at least spell if out once and then add the acronym the first time you use it. For example, Client Access Server (CAS).
  • Keep your DR procedures concise. People skip walls of text. Murphy's Law says that DRs happen at the worst times and people don't want to read a bunch of background information that's not pertinent to the task at hand. In a real disaster there will probably be a lot of other things going on and management asking for status. You might want to write your procedures like a cookie recipe. You don't need to be a chef to follow a recipe, but you do need to know how to fix it if something in the recipe goes wrong. Provide links in the documentation that reference TechNet concepts, as needed.
  • Highlight important steps. Use highlighting to call out important steps in the procedures, but don't overdo it. Too much highlighting will make it difficult to read. You can highlight using color or simple blocks of text, such as:
Important: The following procedures should be run from SERVER1.
  • Make sure the steps read top to bottom. Don't bounce around in the document or refer to previous steps unless it's something like, "Repeat for all other client access servers." Avoid procedures like, "Cut the blue wire after cutting the red wire." Try not to allow page breaks between important steps, if possible.
  • Use targeted commands, when possible. If a command can be targeted to a specific object it won't run if the object is unavailable. For example, the command "cluster node SERVER1 /forcecleanup" will run only if SERVER1 is up, rather than assuming the user is running it from the correct server. This particular suggestion would have prevented the unexpected outage in my example.

Read more ...

Exchange 2010 DAG Always Replicates from Active Database

Wednesday, August 29, 2012
Today's article is a tidbit of information, but important to call out for larger scale DAG deployments.

Exchange 2010 always uses the active database in the DAG as the source for log shipping during normal replication.  That means that if you have multiple passive copies in your DAG, Exchange ships transaction logs from the active copy to each passive copy, even if some of the copies are in the same site.  There is no peer-to-peer log shipping between passive copies in a DAG.

Simple four node DAG with three passive copies
In the example above we have a single DAG with the active database and one HA copy in DC1, and one DR copy and a lagged copy in DC2.  Log shipping occurs from the active database to the three passive copies, traversing the WAN twice for the copies in DC2.

This can have quite an affect on a complex enterprise deployment with multiple DAGs and many remote passive copies, so keep that in mind for your designs.

Note: Log shipping is different than seeding.  Seeding is a file copy of the database to another server.  Once seeding completes log shipping is used to keep that copy up to date. It is possible to seed a database from a specific server, perhaps one in the same site.  For more information see the "Selecting the Seeding Source" topic in http://technet.microsoft.com/en-us/library/dd335158.aspx.


Read more ...

How to Configure a Disaster Information Message in Exchange 2010 UM

Tuesday, May 15, 2012
Exchange 2010 Unified Messaging can be used to create a disaster information message for employees.  Typically you will have a dedicated phone number for this purpose and will advertise this number to employees on a regular basis.  When a disaster occurs a DR coordinator calls into Exchange UM and records a message for employees, giving them information and instructions.  You may want to visit Talking About Disaster for information and ideas about what to include in your disaster information message.

This article explains how to create an auto attendant for this purpose and how to configure Exchange to allow greetings to be recorded using the telephone user interface (TUI).  I assume that you already are using Exchange Unified Messaging and that it's configured properly. 

Let's get started.

  • Create a new enabled* Auto Attendant called “Disaster Announcement” with a Pilot Identifier for the disaster information extension.

  • Open the properties of the new auto attendant.  On the General tab, disable speech-enabled and directory enabled. 

  • Set the Business Hours Greeting and Business Hours Main Menu Prompt to use the C:\Program Files\Microsoft\Exchange Server\V14\UnifiedMessaging\prompts\en\Silence-250ms.wav file. This will set the prompts to silence.   Alternatively, you may want to use a WAV file saying, “There are no disasters right now. Call back later” for the Main Menu prompt. 

  • Set the Times tab to Always Run. 

  • Clear all the options in the Features tab. 

  • Configure a new Key Mapping called “Announcement” that runs the “Disaster Announcement” auto attendant (itself) when the user presses no key (time-out). This will cause the auto attendant to loop.  Alternatively, you can configure it to play the Silence-250ms.wav file, which will loop indefinitely until the caller gets bored of hearing nothing and hangs up. 

  • Clear all the options on the Dialing Restrictions tab and click OK to save the changes.

Then use the TUI to configure the auto attendant greeting when a disaster occurs.   Read Enable Custom Prompt Recording Using the Telephone User Interface for instructions on how to do this.
* If you create the auto attendant as disabled you will run into an interesting problem where you cannot save the AA configuration changes because the AA references a disabled AA (itself).
Read more ...

How to Use a Recovery Database in Exchange 2010

Friday, October 30, 2009
This is another in my series of articles on Exchange 2010.  In this post I'll be writing about the Recovery Database feature in Exchange 2010.

Exchange 2010 no longer has the notion of Storage Groups, which were used in Exchange 2007 and 2003 to contain logical groupings of databases.  E2010 now simply lets you create databases on mailbox servers.  E2010 Standard Edition lets you create up to 5 databases per server. The Enterprise Edtion scales up to 100 databases per server.

In Exchange 2003/2007 you could restore a database "on top" of an original database to replace the existing database, or you could restore the database "along side" the existing database to recover select mailboxes or items.  You can do the same thing with Exchange 2010.  The difference is that in Exchange 2003/2007, you created a Recover Storage Group (RSG) to restore the database into.  In Exchange 2010, you simply restore the database and connect to it as a Recovery Database (RDB).  Here's how you do it in Exchange 2010.
Note: Ross Smith IV has a great article on single item recovery in Exchange 2010.  This assumes that the item can be recovered from the dumpster.  This article covers how to restore from a backup when the item cannot be recovered from the dumpster.  For example, on the rare occasion when a user realizes he/she deleted a folder or item past the dumpster retention period.
First, you have to have a good backup that contains the item to be recovered.  Windows Server 2008 and Windows Server 2008 R2 have the built-in Windows Server Backup feature.  I cover how to use WSB to backup Exchange here.

Now you must restore the data, but redirect it to another location.  In Windows Server Backup, this is done by choosing to recover the Exchange application (detailed in my previous article) and recovered to another location.  Typically, this is a new folder on the same Exchange server:


Once the recovery is complete, the database (EDB file) and transaction logs (LOG files) will reside in the new recovery D:\Recovery folder.  Note that WSB will not create this folder, it must already exist.

Now you need to add this database to the Exchange mailbox server as a Recovery Database. Currently, this is done using the Exchange Management Shell (EMS), as there is no way to do this from the GUI.  Run the following command to create a Recovery Database:
New-MailboxDatabase -Recovery -Name RDB1 -Server EX1 -EdbFilePath "D:\Recovery\Mailbox Database 1882717321.edb" -LogFolderPath "D:\Recovery"
This will cause Exchange to create a new recovery database named RDB1 on server EX1 using the database and logs in D:\Recovery.  Once this command is run, you will see the recovery database in the Exchange Management Console (EMC), but it must be brought into a clean shutdown state before it can be mounted.

To bring the database into a clean shutdown state, use ESEUTIL /R to perform a recovery of the database.  Often, I've seen that Exchange is unable to perform a successful recovery, giving the following error:
Operation terminated with error -1216 (JET_errAttachedDatabaseMismatch, An outstanding database attachment has been detected at the start or end of recovery, but database is missing or does not match attachment info) after 11.625 seconds.
In these cases, I have run an ESEUTIL /P (repair) to force the database into consistency.  Once the database has been successfully recovered or repaired, mount the database in EMC or using the Mount-Database cmdlet.

Now we're ready to recover deleted items from the recovery database.  In order to do this, though, you need Organization Management rights in Exchange 2010.  The following are cmdlet examples for recovering items from the RDB:

This example restores a mailbox for user Keith Johnson, overwriting the existing mailbox:
Restore-Mailbox -ID 'Keith Johnson' -RecoveryDatabase RDB1
This example restores Keith Johnson's mailbox content into an Investigation mailbox:
Restore-Mailbox -ID 'Investigation' -RecoveryDatabase RDB1 -RecoveryMailbox 'Keith Johnson'
This example restores only the mail with the word "contract" in the subject and the word "CompanyABC" in the body of the message from the Inbox or Saved folders.
Restore-Mailbox -ID 'Keith Johnson' -RecoveryDatabase RDB1 -SubjectKeywords 'contract' -ContentKeywords 'companyabc' -IncludeFolders \Inbox,\Saved
There are a lot of different options in the Restore-Mailbox cmdlet and recovery databases that make it a powerful tool for recovery.  Take the time to learn them before you need to use them.
Read more ...

How to Disable Subnet Prioritization

Monday, January 26, 2009
Windows uses a scheme called "subnet prioritization" to attempt to reduce network traffic by re-ordering DNS round-robin records so that the records that are "closest" to the host are the only records used.

For example, suppose there are three A records for the same name in DNS, appserver.domain.com. One with IP 10.0.8.100, one with 10.0.15.100, and one with 10.0.26.100.


If a Windows client with the IPv4 address of 10.0.15.20 performs a DNS query for appserver.domain.com, subnet prioritization will re-order the IP addresses so that it will always use the 10.0.15.100 address.


Subnet prioritization is enabled by default in both the Windows DNS server and the DNS client.


DNS server subnet prioritization (AKA, netmask ordering) can be demonstrated using the Windows NSLOOKUP command. Repeated lookups of appserver.domain.com from the client always give the same results:


C:\nslookup appserver.domain.com
Server: dns.domain.com
Address: 10.1.1.10

Name: appserver.domain.com
Addresses: 10.0.15.100, 10.0.8.100, 10.0.26.100


Here, the DNS server is reordering the IP addresses, based on the requestor's IP address. If true DNS round-robin is working, the records would rotate in a (A, B, C), (B, C, A), (C, A, B) fashion. Subnet prioritization obviously throws a wrench in round-robin DNS if you're using that as your load balancing or fault tolerance solution.


To disable subnet prioritization on DNS servers:
  • Open the DNS Management console

  • Navigate to the DNS server and open its properties

  • Click the Advanced tab

  • Uncheck Enable netmask ordering and check Enable round robin

  • Click OK

But this only solves half the problem because the Windows client will reorder the DNS results, too. Repeated nslookups will now show that the IP address for appserver.domain.com is rotating correctly, but pinging appserver.domain.com from the client will still always resolve to 10.0.15.100. You must still disable subnet prioritization on the client.

To disable subnet prioritization on Windows DNS clients:

  • Run Regedit

  • Navigate to HKLM\SYSTEM\CurrentControlSet\Services\Dnscache\Parameters

  • Click Edit > New > DWORD Value

  • Name the new value PrioritizeRecordData (its value data will be 0)

  • Close Regedit

Note: Both of these changes go into effect immediately. There is no need to restart services or the computers.


Read more ...

Good article on the SCOM Root Management Server function

Tuesday, March 4, 2008
The Operations Manager Product Team posted a good article explaining the role and purpose of the SCOM Root Management Server (RMS).

Microsoft could do better in the business continuance/disaster recovery arena by providing a simple wizard to automate the promotion/demotion of the RMS.

In my experience, most DR scenarios usually involve a site failure (power or network) that simple clustering won't resolve. The steps required to failover to a remote site (importing the RMS keys and updating the agents) currently require someone with sufficient rights to follow a separate DR procedure document. It would be nice if this could be done from the GUI (where most of the admins live). This would facilitate the DR process when resource and time constraints are most critical.
Read more ...

Top Ten Reasons to Move to Exchange 2007

Tuesday, February 26, 2008
Here are some key features and technologies Exchange Server 2007 provides that make a good business case for its use:
  • Fault Tolerance -- Exchange 2007 offers several forms of fault tolerance, right out of the box:

    • Local Continuous Cluster (LCR) maintains a continuously updated copy of the active mailbox database on a different LUN to provide immediate failover capability if the active database becomes corrupt. The second copy is activated manually by the administrator.

    • Cluster Continuous Replication (CCR) is a local cluster model where each node maintains its own database and replication is performed using log shipping. In the event of failure of a service, the cluster services immediately failover to the passive node and continue servicing client requests, minimizing client downtime. CCR clusters can be stretched over distance, providing a geographically dispersed clusters.

    • Standby Continuous Replication (SCR) is similar to CCR, but the failover node resides in a different geographic location. It utilizes log shipping for replication and the Hub Transport servers "fill in the blanks" for messages that may not have replicated since the time the active node went offline.


  • Disaster Recovery -- Outlook 2003 and Outlook 2007, along with the fault tolerance technologies listed above, provide a quick and easy disaster recovery strategy for nearly any outage. Outlook Exchange cached mode is another key technology to making disaster recovery as seemless as possible.


  • Mailbox Server Consolidation -- As a 64-bit messaging platform, Exchange 2007 is able to accommodate much larger mailboxes and mailstore databases than ever before. This allows you to greatly consolidate the number of mailbox servers needed to support the same number of users.


  • Exchange Edge Server -- Edge Server for Exchange is a non-domain server that acts as the SMTP gateway between the Internet and SCIF's internal network. It replaces both the current SMTP gateway and Interscan servers, saving both hardware and software costs. It provides anti-spam and anti-virus services for the organization. EdgeSync is a process that synchronizes the email addresses in AD and the user Junk Mail safe lists/block lists with the Edge server to reduce spam at the network edge.


  • Better Integration with Outlook -- Suspected spam that is not blocked by the Edge server is delivered to Outlook's built-in Junk E-mail folder. Users can choose to block or allow emails from users or domains directly from Outlook without the need for third-party software.


  • Forefront Security for Exchange -- Forefront antivirus is included with the Exchange 2007 Enterprise CAL. Forefront allows you to choose up to five different antivirus engines (from a collection of nine) that all emails are scanned against. This provides more defense in depth than previously possible.


  • Corporate Manage Folders -- Managed folders allow administrators to configure common corporate folders that will display in users' Outlook and OWA that have specific retention periods. For example, a folder named Legal may have a seven year retention policy. Any items in this folder older that 7 years will automatically be purged to maintain the company's corporate retention policy.


  • Improved Outlook Web Access -- Outlook Web Access (OWA) has been improved to provide much better performance and usability. The Private computer security setting now allows you to stay logged in for up to 24 hours. Calendaring and scheduling has been greatly improved. OWA now provides the ability to open another user's mailbox (assuming you have the appropriate rights to do so). Public Folders now open in the same OWA window. Searching for an email items takes only seconds, no matter how large the mailbox is.


  • Remote Access to Network Shares -- OWA provides the ability to "translate" UNCs to internal network shares. For example, if you click a link for //hofs01/share/CIOMeeting.ppt, OWA will fetch the document from the internal network (assuming you have rights to the document) and deliver it to you in OWA. You can also open a Windows SharePoint Services or file share by typing the address of the share to open directly in OWA.


  • WebReady Document Viewing -- WebReady Document Viewing renders common document types for you to view within OWA, even if the application is not installed on that computer. For example, if you want to view an Excel attachment from a machine that does not have Excel installed, click the "View as web page" link next to the attachment. Exchange 2007 will convert the spreadsheet to a web page for you to review.


Read more ...

Exchange 2007 High Availability Sessions

Thursday, June 7, 2007
Today was an "all Exchange, all the time" day. The sessions I attended dealt with Exchange 2007 high availability and disaster recovery.

One was presented by Ayla Kol entitled, "High Availability in Microsoft Exchange Server 2007 and Exchange Server 2007 Service Pack 1". She did a good job explaining what's offered in E2K7 RTM for HA and went on to explain what's going to be new in SP1. Here are the highlights for RTM:
  • Windows 2003 needs KB921181 to enable File Share Witness (FSW)
  • Continuous Cluster Replication (CCR) is limited to 2 nodes
  • CCR requires hardware from the Geographically Dispersed Cluster category of the HCL
  • FSW should be on hub in primary site
  • CCR nodes must be in the same subnet. This poses a problem for geo-clustering
  • Best Practice to use a CNAME record for the FSW name. This provides easier failover
  • Best Practice to increase tolerance of heartbeat failures to 10
  • Log shipping to the passive node is a pull model. The Replication Service monitors logs
  • Divergence = loss of mailbox data. This is what happens in a "lossy" recovery. Normally, in CCR the hub's transport dumpster will backfill the recovered node with missing data.
  • LLR = lost log resilience. This is what the transport dumpster is for.
  • The transport dumpster works only with CCR in RTM. It will work with LCR in SP1
  • Recovery from transport dumpster is designed to backfill within 30 seconds
  • SP1 will have a GUI for cluster management (finally!)

And now for what we've all been waiting for, Single Copy Replication (SCR)!

  • SCR will be included in SP1
  • Possible scenarios include: Standalone server to SCR, LCR to SCR, and CCR cluster to SCR
  • Designed for datacenters
  • CCR can use dissimilar hardware. This offers simplified hardware and storage requirements. Does not require hardware from the Geographically Dispersed Cluster category of the HCL
  • No subnet requirements! Can work across different subnets, unlike CCR
  • Only works with one database per storage group
  • Must be same paths

In a future blog, I hope to write more about CCR and SCR. For now, we're off to the TechEd attendee party at Islands of Adventure. The kids are gonna have a blast!

Read more ...