Deploy Extended Protection for Exchange server NOW

Thursday, January 18, 2024


Exchange 2019 CU14 is expected to enable Windows Extended Protection in Exchange Server by default. This feature enhances the existing authentication in Windows Server and mitigates authentication relay or man-in-the-middle (MitM) attacks..

Extended Protection requires several very important prerequisites, which the link above describes.

Prerequisites for enabling Extended Protection on Exchange Server:

  • SSL offloading must be disabled on all Exchange servers (it's enabled by default).
  • Clients should use NTLMv2 instead of NTLMv1, which is the default setting in Windows. I recommend configuring this via Group Policy. If NTLMv1 is used by clients when Extended Protection is enabled, the configuration leads to password prompts on the client side without a way to authenticate successfully against the Exchange server.
  • TLS configurations must be consistent across all Exchange servers within the organization. Any variation in TLS version use across servers can cause client connections to fail. I recommend that all Exchange servers be configured to use only TLS 1.2 for client and server operations, as well as .NET.
  • Third-Party software running on your Exchange server must be compatible with Extended Protection. Ensure to test all third-party products that are running in your Exchange Server environment to ensure that they work properly when Extended Protection is enabled.
  • Extended Protection doesn't work with hybrid servers using a Modern Hybrid configuration.
  • Extended Protection can't be enabled on Exchange Server 2013 servers with Public Folders in a coexistence environment.
  • Extended Protection can't be enabled on Exchange Server 2016 CU22 or Exchange Server 2019 CU11 or older that hosts a Public Folder hierarchy.

It's unlikely that the Exchange 2019 CU14 installer will perform "deep" inspection for these prerequisites, so this may cause problems in your environment if the prerequisites are not met and CU14 enables Extended Protection. The most likely issue will be that clients will be unable to connect or authenticate to Exchange server after Extended Protection is enabled.

I strongly recommend that all customers with Exchange server (including hybrid) check that they meet the requirements above and run the Exchange Extended Protection Management script before they install Exchange 2019 CU14. This script will check that the major requirements are met before enabling Extended Protection across all Exchange servers (not just Exchange 2019) in the organization.

The best course of action is to check and mitigate the Extended Protection prerequisites first. Always read the CU installation notes, especially if you use Windows Update to deploy this security update.

Please reach out to EXPTA Consulting if you would like assistance.

Read more ...

Do yourself a favor. Deploy PowerShell serialization for Exchange server NOW

Friday, November 10, 2023

Exchange 2019 CU12/13 Security Update 13 is expected to enable PowerShell serialization by default. This feature configures certificate-based signing of PowerShell serialization payloads to reduce the possibility of man-in-the-middle attacks in PowerShell scripts that connect to Exchange server.

PowerShell serialization requires prerequisites, which the link above describes:

Prerequisites to enable this feature: 

  • Make sure that all Exchange-based servers in your environment have the January 2023 SU or a later SU installed. If you enable this feature before you update all servers, deserialization failures might occur and trigger other issues. 

  • Make sure that a valid Exchange Server auth certificate is configured and available on all Exchange-based servers (except Edge Transport servers) before and after you enable certificate signing.

You can run the MonitorExchangeAuthCertificate.ps1 script to check for a valid auth certificate on Exchange-bases servers in your environment. The script also checks whether the auth certificate will expire in less than 60 days, and it can help you to rotate the certificate. For more information about MonitorExchangeAuthCertificate.ps1, see Monitor Exchange AuthCertificate

To manually check auth certificate availability and validity, see Auth Certificate Availability and Validity. 

We strongly recommend that you use the MonitorExchangeAuthCertificate.ps1 script (or create a new one, if it's necessary). This is because the script can also renew an expired auth certificate. The script includes a manual execution mode (verify the auth certificate availability or verify and take action, if it's necessary). The script also includes an automation mode that works by using Windows Task Scheduler.

It's unlikely that the SU installer will check for these prerequisites, so this may cause problems with Exchange scripts in your environment if the prerequisites are not met but the SU enables PowerShell serialization.

The best course of action is to check the prerequisites first, especially if you don't read the SU installation notes first or you use Windows Update to deploy this security update.


Read more ...

Lessons Learned and Best Practices for Autodiscover in a Hybrid Environment

Tuesday, June 20, 2023

Outlook uses the Autodiscover service to get real-time connection information for your mailbox and any other mailbox you connect to. Without Autodiscover you may be able to get Outlook to connect, but it won't connect correctly. For example, Exchange Web Services (EWS) connectivity in Outlook can only be made using Autodiscover.

Outlook normally performs Autodiscover requests when you setup a mail profile for the first time and from then on, periodically in the background. This is how automapped shared mailboxes get automatically added to Outlook. Outlook also runs an Autodiscover request when your mailbox moves between servers or databases, as when a failover event occurs. Autodiscover is also used whenever you check free/busy availability of another user's calendar.

Domain-joined computers in an Exchange Server or hybrid environment normally use a Service Connection Point (SCP) published in Active Directory to get the URI Outlook should use for Autodiscover requests. This is set using the Set-ClientAccessService -AutoDiscoverServiceInternalUri <value> cmdlet in the Exchange Management Shell (EMS).

There's a lot of documentation in the web that says you should set the AutoDiscoverServiceInternalUri value to $null after a hybrid migration is complete. But is that the right thing to do?

It's a long answer, so strap in. 😉  Tl;dr at the end.

First, know that Autodiscover behavior changes depending on the Outlook client and build version, as well as possible non-standard registry settings.

Microsoft 365 Apps for Enterprise always tries https://outlook.office365.com/autodiscover/autodiscover.xml first (Autodiscover-V2) regardless of your DNS settings. Microsoft's assumption is that if you’re running that version, your account is probably in the cloud. If your mailbox is indeed in EXO, that process looks like this and only takes 1-2 seconds:


Autodiscover-V2 will fail if your account is missing in EXO or not migrated yet and Outlook will then start the regular Autodiscover-V1 process. Note that the Autodiscover-V2 process can also be skipped with the following reg key. I see this often in older enterprise environments.

HKEY_CURRENT_USER\Software\Microsoft\Office\16.0\Outlook\AutoDiscover]
"ExcludeExplicitO365Endpoint"=dword:00000001

Office 2016/2019 clients normally only do the regular Autodiscover-V1 process, which is well known:

  1. Check for Local Data preference (configured via GPO to use an autodiscover.xml file stored locally on the computer)
  2. Check for Last Known Good (LKG) cached data
  3. Some later builds use heuristics to determine if the user account comes from Azure AD and will check against https://autodiscover-s.outlook.com/autodiscover/autodiscover.xml 
  4. SCP (see *notes below)
  5. DNS
    • Root domain (https://contoso.com/autodiscover/autodiscover.xml, which nearly always fails)
    • Autodiscover URI (https://autodiscover.contoso.com/autodiscover/autodiscover.xml)
  6. HTTP redirect
    • http://autodiscover.contoso.com/autodiscover/autodiscover.xml
  7. SRV
    • Value from _autodiscover._tcp.contoso.com 443 0 0 in DNS

*Note that the SCP process won't work in several scenarios:

  • The computer is not domain-joined
  • SCP is $null
  • SCP is not available via LDAP because the domain-joined machine is disconnected from the DC
  • Registry keys can, and most often will, override the default Autodiscover behavior

Here’s what the process looks like for an M365 mailbox user in a hybrid environment from a domain-joined computer on the LAN. The SCP is set to https://autodiscover.contoso.com/autodiscover.autodiscover.xml (the on-prem Exchange Server). This process took 52 seconds to complete. Remember, this is the same process that Outlook goes through when creating a new mail profile, too.


When the SCP is set to $null it skips the first five lines, but execution time is nearly the same. It gets there, but it's not efficient and takes a really long time.

If we set the SCP to https://autodiscover-s.outlook.com/autodiscover/autodiscover.xml, the process only takes about 1 second.


As you can see, setting the SCP to https://autodiscover-s.outlook.com/autodiscover/autodiscover.xml is much more efficient than setting it to $null when the migration is complete.

Tl;dr:

The Service Connection Point (SCP) is set using the Set-ClientAccessService -AutoDiscoverServiceInternalUri <value> cmdlet.

  • If you're a hybrid customer and you still have mailboxes on-premises that use Outlook:
    • Set your SCP to https://autodiscover.contoso.com/autodiscover/autodiscover.xml.
    • Create an A record for autodiscover.contoso.com in internal and external DNS resolving to on-prem Exchange for computers that can't reach AD.
  • If you're a hybrid or cloud customer and all mailboxes that use Outlook or in EXO:
    • Use Microsoft 365 Apps for Enterprise, which always checks EXO first. It also provides the best experience, features, and performance for cloud mailboxes.
    • If you're hybrid, set your SCP to https://autodiscover-s.outlook.com/autodiscover/autodiscover.xml.
    • Create a CNAME record for autodiscover.contoso.com in external DNS resolving to autodiscover.outlook.com. This way, older clients that don't use Autodiscover-V2 will use the HTTP redirect method to get to EXO.


Read more ...

Exchange Online will Throttle and Block Email from Persistently Vulnerable Exchange Servers

Thursday, March 23, 2023

Microsoft announced that they will begin Throttling and Blocking Email from Persistently Vulnerable Exchange Servers to Exchange Online.

They will begin slowly by blocking OnPremises (hybrid) connections from Exchange 2007 servers to Exchange Online, but plan to include all persistently vulnerable servers soon. A “persistently vulnerable server” is any Exchange server that has reached end of life (e.g., Exchange 2007, Exchange 2010, and very soon, Exchange 2013), or remains unpatched for known vulnerabilities.

If you have any Exchange 2007, 2010, or 2013 servers in your organization that are used for hybrid or SMTP relay, you must make plans to replace or remove them ASAP. You must also keep any Exchange 2016 and 2019 servers up to date with the latest Cumulative and Security Updates, as they are released.

I support this initiative. Organizations using Exchange Servers with known and unpatched vulnerabilities put themselves and their partners at risk. I look forward to seeing it include additional unsupported Exchange Server versions, and I understand their approach of rolling this out slowly and carefully at first.

There are millions of mailboxes in Exchange Online and they have a duty to protect those mailboxes. They know there are 16-year old Exchange 2007 servers currently connecting to their service that haven’t been patched in years and have dozens of known vulnerabilities. 

Microsoft is not forcing anyone to move to Exchange Online. They’re just not going to allow Exchange servers with known vulnerabilities to send hybrid (trusted) emails into their service.

It’s only 2007 for now, but eventually it will be any Exchange Server that is not running the latest or second to latest updates. It’s too risky for everyone.

The table below details the stages of progressive enforcement over time of a persistently vulnerable server:

thumbnail image 2 of blog post titled 


							Throttling and Blocking Email from Persistently Vulnerable Exchange Servers to Exchange Online

Read more ...

Do Not Install the February 2023 Exchange Server Security Updates via Windows Update

Wednesday, February 15, 2023


Microsoft released the February 2023 Exchange Server Security Updates yesterday, February 14, via Windows Update and on their website. The website links to the correct files for the February 2023 Security Updates, but Windows Update currently is deploying the January 2023 Security Update CAB file for Exchange Server 2013, 2016, and 2019. 

For this reason, install the February updates from the hyperlinks listed in the EHLO Blog post, not Windows Update. If you did already install the Exchange Security Updates via Windows Update, download the files directly and reinstall them on all your servers. Then check the version with the HealthChecker.ps1 script.

UPDATE: Microsoft just said, "We've fixed the issue, so it's safe to install the SU from MU/WU again. Apologies for the inconvenience." According to Microsoft, customers who already installed the February SU via Windows Update can either install it again via Windows Update or download the update from the web and install it.

For further details, keep reading.


Several of my customers installed the Security Update For Exchange Server CU23 SU6 (KB5023038) on multiple servers via Windows Update. These servers include Exchange Server 2013, 2016, and 2019.

Windows Update history shows the February 2023 KB5023038 update has been installed, but HealthChecker.ps1 reports the servers are still on the January 2023 KB5022143 SU. 


Checking the registry,

HKEY_LOCAL_MACHINE\SOFTWARE\Microsoft\Windows\CurrentVersion\Uninstall\Microsoft Exchange v15\DisplayVersion says the Exchange build is 15.1.2507.18 (not listed here, but should be 15.1.2507.21). 

HKEY_LOCAL_MACHINE\SOFTWARE\Microsoft\Windows\CurrentVersion\Uninstall\Patch\DisplayName says “Security Update for Exchange Server 2016 Cumulative Update 23 (KB5022143)” 

When you run Windows Update again, it says no updates are pending.

When I view the C:\Windows\SoftwareDistribution\Download folder I see a folder named f664b5c67010fa70659624355017ed43 with the date and time when Windows Updates were applied.


Inside that folder is the Exchange2016-KB5022143-x64-en.cab which is the January 2023 Exchange Security Update, proving that Windows Update is pushing the wrong SU.


Installing the February 2023 Exchange Security Updates from the published download pages installs the correct SU. Verify with the HealthChecker script.


Read more ...

How to Remove Internet Explorer from Windows Computers and Servers

Thursday, January 19, 2023

Support for Internet Explorer 11 ended on June 15, 2022 and IE 11 will no longer be accessible after February 14, 2023.

Even so, Internet Explorer 11 is still installed as the default web browser with every version of Windows and Windows Server. To make matters worse, Windows 10 also shipped with non-Chromium Edge (now called Legacy Edge). You'll need to download and install a "modern" web browser, such as Microsoft Edge, Google Chrome, FireFox, etc. Keep in mind that you can reload Internet Explorer sites with IE mode in Microsoft Edge.

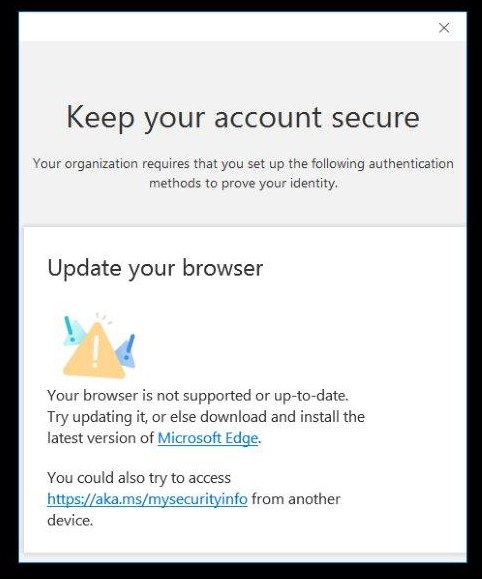
Even with ChrEdge (my name for Chromium Edge) installed as the default web browser, I've heard from a few customers that IE is still being used for some web work flows. For example, a customer recently showed me this MFA security confirmation prompt that is opening in IE for some reason.


All this leads me to the task at hand. How do you uninstall Internet Explorer 11 from Windows?

This is not straight forward since IE 11 is part of the Windows installation. It cannot be removed as a Windows application or feature. The answer is to use DISM (Deployment Imaging Servicing Management) installed with all versions of Windows and Windows Server.

Run the following command from an elevated CMD or PowerShell prompt:

C:\Windows\System32\dism.exe /online /Disable-Feature /FeatureName:Internet-Explorer-Optional-amd64

Removal only takes a few seconds and the output looks like this:


DISM will prompt you to restart the computer to complete the operation. Until you do, Internet Explorer will still show as an available web browser. Optionally, you can add the /Quiet switch which will not show DISM uninstall progress and will automatically restart the computer when it's done.

Read more ...

ProTip: Scheduled Task to Start Stopped Services in Exchange Server

Friday, January 13, 2023

As a best practice, I've always created a scheduled task on my Exchange Servers that starts all stopped services 1 minute after server startup. This is useful for virtualized environments where servers restart much faster than physical environments. Often the VM comes back up before the network has fully initialized. When this happens, some of the Exchange services do not start properly.

This scheduled task is becoming important with the release of the January 2023 Exchange Server Security Updates. There is a known issue that Microsoft Exchange AD Topology service may not start properly on Exchange 2016 servers running on Windows Server 2012 R2. Microsoft is investigating.

I've seen this happen on several of my customers' environments. Since almost all Exchange services rely on the AD Topology service, none of the Exchange services will start. You are required to start all the services manually after every reboot. Instead, you can install the scheduled task that does this for you.


Run the following from an elevated PowerShell or EMS prompt:

$TaskProgram =  "$env:SystemRoot\System32\WindowsPowerShell\v1.0\powershell.exe"

$TaskArguments = '-NoProfile -command "gwmi win32_service | where {$_.StartMode -eq ''Auto'' -and $_.State -eq ''Stopped''} | Start-Service"'

$TaskAction = New-ScheduledTaskAction -Execute $TaskProgram -Argument $TaskArguments

$TaskTrigger = New-ScheduledTaskTrigger -AtStartup -RandomDelay 00:01:00

Register-ScheduledTask -TaskName "Start Stopped Services" -Action $TaskAction -Trigger $TaskTrigger -RunLevel Highest -User "system" -Description "Starts all stopped services 1 minute after startup due to slow network initialization."

It's safe to install this on any Exchange server.


Read more ...