Showing posts with label Exchange 2013. Show all posts

The Future of Exchange Server

Tuesday, September 10, 2024

Microsoft published an important new article today detailing some of the requirements and recommendations for upgrading Exchange Server to the latest version, Exchange Server SE (Subscription Edition). Upgrading your organization from current versions to Exchange Server SE - Microsoft Community Hub

This article applies to all customers running Exchange Server on-premises, including hybrid customers using Exchange Server for hybrid management.

The blog post is dense with a lot of information, but the key important points are:

  • Exchange Server SE is the next version of Exchange Server and will be released the second half of 2025.
  • Exchange 2019 CU15 will be released Q4 this year. This will be the last cumulative update for Exchange 2019. There will be no future updates for Exchange 2016.
  • Exchange 2019 CU15 will allow for an in-place upgrade to Exchange Server SE. This is a first for Microsoft. Previous upgrades required new servers.
  • Exchange Server SE will only allow coexistence with Exchange 2016 CU23 and Exchange 2019 CU14/15.
  • Exchange 2013 will become totally unsupported with the release of Exchange 2019 CU15. You must upgrade or remove Exchange 2013 from your organization ASAP.
  • Customers should upgrade their Exchange 2016 servers to Exchange 2019 CU14/15 ASAP to prepare for Exchange Server SE.
  • After Exchange Server SE is released in 2025, Exchange 2016 and 2019 will be subject to throttling by Microsoft. See Throttling and Blocking Email from Persistently Vulnerable Exchange Servers to Exchange Online - Microsoft Community Hub
  • The following table from the blog post illustrates the milestones and actions to take:


  • Licensing for Exchange Server SE will be similar to Exchange 2019 – You either must have an existing Microsoft 365 license for all users or you can buy server licenses and CALs with Software Assurance (SA).

Please reach out to EXPTA Consulting if you need help implementing these requirements. We also can meet with you to discuss options for removing the last Exchange Server from hybrid environments.

Read more ...

Deploy Extended Protection for Exchange server NOW

Thursday, January 18, 2024


Exchange 2019 CU14 is expected to enable Windows Extended Protection in Exchange Server by default. This feature enhances the existing authentication in Windows Server and mitigates authentication relay or man-in-the-middle (MitM) attacks..

Extended Protection requires several very important prerequisites, which the link above describes.

Prerequisites for enabling Extended Protection on Exchange Server:

  • SSL offloading must be disabled on all Exchange servers (it's enabled by default).
  • Clients should use NTLMv2 instead of NTLMv1, which is the default setting in Windows. I recommend configuring this via Group Policy. If NTLMv1 is used by clients when Extended Protection is enabled, the configuration leads to password prompts on the client side without a way to authenticate successfully against the Exchange server.
  • TLS configurations must be consistent across all Exchange servers within the organization. Any variation in TLS version use across servers can cause client connections to fail. I recommend that all Exchange servers be configured to use only TLS 1.2 for client and server operations, as well as .NET.
  • Third-Party software running on your Exchange server must be compatible with Extended Protection. Ensure to test all third-party products that are running in your Exchange Server environment to ensure that they work properly when Extended Protection is enabled.
  • Extended Protection doesn't work with hybrid servers using a Modern Hybrid configuration.
  • Extended Protection can't be enabled on Exchange Server 2013 servers with Public Folders in a coexistence environment.
  • Extended Protection can't be enabled on Exchange Server 2016 CU22 or Exchange Server 2019 CU11 or older that hosts a Public Folder hierarchy.

It's unlikely that the Exchange 2019 CU14 installer will perform "deep" inspection for these prerequisites, so this may cause problems in your environment if the prerequisites are not met and CU14 enables Extended Protection. The most likely issue will be that clients will be unable to connect or authenticate to Exchange server after Extended Protection is enabled.

I strongly recommend that all customers with Exchange server (including hybrid) check that they meet the requirements above and run the Exchange Extended Protection Management script before they install Exchange 2019 CU14. This script will check that the major requirements are met before enabling Extended Protection across all Exchange servers (not just Exchange 2019) in the organization.

The best course of action is to check and mitigate the Extended Protection prerequisites first. Always read the CU installation notes, especially if you use Windows Update to deploy this security update.

Please reach out to EXPTA Consulting if you would like assistance.

Read more ...

Do yourself a favor. Deploy PowerShell serialization for Exchange server NOW

Friday, November 10, 2023

Exchange 2019 CU12/13 Security Update 13 is expected to enable PowerShell serialization by default. This feature configures certificate-based signing of PowerShell serialization payloads to reduce the possibility of man-in-the-middle attacks in PowerShell scripts that connect to Exchange server.

PowerShell serialization requires prerequisites, which the link above describes:

Prerequisites to enable this feature: 

  • Make sure that all Exchange-based servers in your environment have the January 2023 SU or a later SU installed. If you enable this feature before you update all servers, deserialization failures might occur and trigger other issues. 

  • Make sure that a valid Exchange Server auth certificate is configured and available on all Exchange-based servers (except Edge Transport servers) before and after you enable certificate signing.

You can run the MonitorExchangeAuthCertificate.ps1 script to check for a valid auth certificate on Exchange-bases servers in your environment. The script also checks whether the auth certificate will expire in less than 60 days, and it can help you to rotate the certificate. For more information about MonitorExchangeAuthCertificate.ps1, see Monitor Exchange AuthCertificate

To manually check auth certificate availability and validity, see Auth Certificate Availability and Validity. 

We strongly recommend that you use the MonitorExchangeAuthCertificate.ps1 script (or create a new one, if it's necessary). This is because the script can also renew an expired auth certificate. The script includes a manual execution mode (verify the auth certificate availability or verify and take action, if it's necessary). The script also includes an automation mode that works by using Windows Task Scheduler.

It's unlikely that the SU installer will check for these prerequisites, so this may cause problems with Exchange scripts in your environment if the prerequisites are not met but the SU enables PowerShell serialization.

The best course of action is to check the prerequisites first, especially if you don't read the SU installation notes first or you use Windows Update to deploy this security update.


Read more ...

Support for Windows Active Directory 2022 Environments

Monday, October 17, 2022

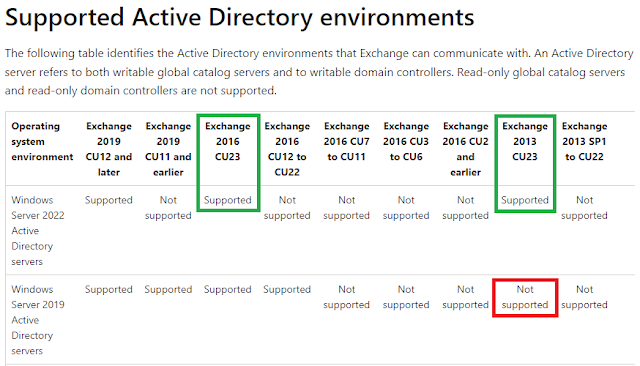
As Scott Schnoll mentioned at MEC 2022, Microsoft now supports Active Directory environments running on Windows Server 2022 beginning with Exchange Server 2013 CU23 and Exchange Server 2016 CU23.


It's interesting to note that Exchange 2013 CU23 does not support Windows Server 2019 Active Directory, so if you're running Windows Server 2016 AD or earlier you should plan accordingly. There are no issues upgrading AD directly from a previous version to 2022, bypassing 2019 AD.

The highest Active Directory forest functional level supported by all supported versions of Exchange Server is still Windows Server 2016.

View the Exchange Server supportability matrix | Microsoft Learn here.


Read more ...

URGENT: Patch your Exchange Servers NOW!

Wednesday, March 3, 2021


UPDATE: Microsoft updated it's Microsoft Safety Scanner Tool (MSERT) to scan for malicious files that may be dropped on your Exchange Servers by the latest CVE vulnerabilities. 
You can run this on any Windows server. Run a Full Scan which will scan all files and folders, even those excluded by antivirus. The tool will automatically remove malicious files and, if any were found, prompt for restart to finish up.

THIS TOOL IS NOT A REPLACEMENT FOR THE SECURITY PATCHES. UPDATE YOUR EXCHANGE SERVERS.


Yesterday Microsoft posted a blog article, Released: March 2021 Exchange Server Security Updates, for a serious zero-day vulnerability in Exchange Server.

URGENT! PLEASE INSTALL THESE SECURITY UPDATES ASAP!  <--Click here

The security update addresses a vulnerability that was released publicly on the web and every script kiddy is playing around with it.


Important Things to Know

  • The vulnerability affects ALL versions and update levels of Exchange.
  • The attack starts with an unauthenticated request to an Exchange server, so if your Exchange Server is not publicly accessible, less risk can be assumed. You're still open to internal attacks, though. PATCH YOUR SERVERS.
  • Security updates have been released for the following Exchange versions and Cumulative Update levels:
    • Exchange 2010 SP3
    • Exchange 2013 CU23
    • Exchange 2016 CU18
    • Exchange 2016 CU19
    • Exchange 2019 CU7
    • Exchange 2019 CU8
  • If your Exchange Servers are not at these CU levels, you need to get on the latest CU for your version before you can install the security update.
    • Be aware the .NET Framework and Visual Studio C++ runtime prerequisites may be required to update your server to the latest CU. The Exchange CU setup will block installation until the prerequisites are satisfied.
    • .NET Framework installations and updates can peg your CPU for a while after restarting. Plan accordingly.
  • You MUST run the security update from an ELEVATED CMD prompt. Admins who ignore this have reported that it breaks ECP.
  • Hybrid customers are affected, as well. Apply these updates to your hybrid management servers.

Best Practices

  • Apply the patches ASAP.
  • Always restart the Exchange server BEFORE you install the security updates or upgrade the CU. That way you know that the server reboots properly before you install the updates. It also releases any locked files.
  • The update normally takes 15-20 minutes to install. Always restart the Exchange Server AFTER installing the security updates or upgrading the CU (whether it prompts you to, or not). I find that it doesn't warn you to restart about 50% of the time on the dozen or so servers I've upgraded.
  • Do not "batch" updates. For example, don't upgrade Exchange 2016 CU17 to CU19 and immediately install the security patch without rebooting. Restart Exchange Server after every update.
  • Always keep your Exchange Server up to date with the latest (or second to latest) CU so you can more easily install urgent updates like these.

Helpful Tips

Run the following from an elevated PowerShell or EMS console so you can right-click an MSI or MSP file and "Run as Administrator":

New-ItemProperty registry::HKEY_CLASSES_ROOT\Msi.Patch\shell\runas\command -Name "(Default)" -Value '"%SystemRoot%\System32\msiexec.exe" /p "%1" %*' -PropertyType ExpandString -Force

New-ItemProperty registry::HKEY_CLASSES_ROOT\Msi.Package\shell\runas\command -Name "(Default)" -Value '"%SystemRoot%\System32\msiexec.exe" /p "%1" %*' -PropertyType ExpandString -Force
Use the following PowerShell script to check for compromise. Run elevated. This script does not work on Exchange 2010.
Start-Transcript -Path "Check-Compromise-$env:COMPUTERNAME.log" -Force
Write-Host "Checking for CVE-2021-26858 exploitation..."
findstr /snip /c:"Download failed and temporary file" "%PROGRAMFILES%\Microsoft\Exchange Server\V15\Logging\OABGeneratorLog\*.log"
Write-Host "Checking for CVE-2021-26857 exploitation..."
Get-EventLog -LogName Application -Source "MSExchange Unified Messaging" -EntryType Error | Where-Object { $_.Message -like "*System.InvalidCastException*" }
Write-Host "Checking for CVE-2021-27065 exploitation..."
Select-String -Path "$env:PROGRAMFILES\Microsoft\Exchange Server\V15\Logging\ECP\Server\*.log" -Pattern 'Set-.+VirtualDirectory'
Write-Host "Checking CVE-2021-26855 exploitation..."
$logs = (Get-ChildItem -Recurse -Path "$env:PROGRAMFILES\Microsoft\Exchange Server\V15\Logging\HttpProxy" -Filter '*.log' -ErrorAction SilentlyContinue).FullName | sort -Descending
$logCount = $logs.Count
foreach ($log in $logs) {
$i++
$percentage = $i / $logCount * 100
$perc = $percentage.ToString("#")
Write-Progress "Search in progress" -Status "$perc% Complete:" -PercentComplete $percentage
Import-Csv -Path $log -ErrorAction SilentlyContinue | Where-Object { $_.AuthenticatedUser -eq "" -and $_.AnchorMailbox -like 'ServerInfo~*/*' } | select DateTime, AnchorMailbox
}
Stop-Transcript
Review the Check-Compromise-<computername>.log file for results. You can ignore any errors that say something like, "The member '40' is already present." See HAFNIUM targeting Exchange Servers with 0-day exploits for more details.

If your update fails for some reason, you may find that all the Exchange services are stopped and disabled. If you try to rerun the update it will fail again for this reason. Run the following to return the Exchange service to automatic, then reboot and try again ELEVATED.
Get-Service -Name MSExchangeDelivery, MSExchangeRepl,MSExchangeRPC,MSExchangeFastSearch, MSExchangeThrottling, wsbexchange,MSExchangeSubmission, MSExchangeMailboxReplication, MSExchangeMailboxAssistants, MSExchangeIMAP4BE, MSExchangeImap4, MSExchangeIS, MSExchangeDagMgmt, MSExchangeDiagnostics, MSExchangeFrontEndTransport, MSExchangeADTopology, MSExchangeAntispamUpdate, MSExchangeUM, MSExchangeEdgeSync, MSExchangeHM, MSExchangeHMRecovery, MSExchangeServiceHost, MSExchangeTransport, MSExchangeTransportLogSearch, FMS, HostControllerService, winmgmt, remoteregistry, w3svc, iisadmin | Set-Service -StartupType automatic
Whenever a new version of .NET Framework is installed or a .NET Framework update is applied, the server CPU will peg at 90-100% utilization after reboot for up to 40 minutes while it recompiles MOFs. This process is also called NGEN. You will see mscorsvw.exe processes chewing up CPU. The same happens after you install an Exchange update, since Exchange Server is written in .NET.

Use the 7318.DrainNGenQueue.wsf script to speed up .NET Framework recompiling performance by allowing it to use multiple threads and up to 6 cores. Run it after any .NET Framework installation or update.

Read more ...

Keep your Exchange Federation Trust up-to-date

Monday, July 8, 2019
From time to time, Microsoft refreshes the certificate used by the Microsoft Federation Gateway service in Office 365. They just did this again on July 5, 2019. The MFG is the trust broker used by hybrid organizations and by other on-premises orgs that share free/busy information between them. Most Exchange configurations will update the federation trust metadata automatically, but if your on-premises org is running Exchange 2010 or Exchange 2013 on Windows Server 2008 you will need to update this manually.

Begin by testing to see if the metadata is up-to-date in your org by running the Test-FederationTrust cmdlet in EMS from one of your Exchange servers. The cmdlet normally does not require any switches to run.

Exchange will check AD to confirm that the Federation Trust configuration object exists and is valid, the Token Issuer certificate is valid, and then request a delegation token from the MFG. Here's what a good test looks like in Exchange 2010:

Test-FederationTrust from Exchange 2010
Exchange 2013+ performs a few more detailed tests using a built-in test account:

Test-FederationTrust from Exchange 2013
If you see any validation errors, such as the following error, you will need to update your MFG refresh token manually:
Id : TokenValidationType : ErrorMessage : Failed to validate delegation token.
You can update AD with the latest Microsoft Federation Gateway certificate one time by running the following cmdlet from EMS on any Exchange server in your org:
Get-FederationTrust | Set-FederationTrust –RefreshMetadata 
Once updated, run the Test-FederationTrust cmdlet again to confirm the validation and delegation token is valid.

If you want to automate this process, you can create a scheduled task on one of your Exchange servers to update the federation trust once per day. Nothing will actually update in your environment unless Microsoft updates their MFG certificate. Run the following from an elevated CMD prompt or EMS window to create the scheduled task:
Schtasks /create /sc Daily /tn FedRefresh /tr "C:\Windows\System32\WindowsPowerShell\v1.0\powershell.exe -version 2.0 -command Add-PSSnapIn Microsoft.Exchange.Management.PowerShell.E2010;$fedTrust = Get-FederationTrust;Set-FederationTrust -Identity $fedTrust.Name -RefreshMetadata" /ru System
Remember, you will only need to do this if your organization runs Exchange 2010 or Exchange 2013 on Windows Server 2008. Later versions of Windows allows Exchange to update the federation trust certificate automatically.

Read more ...

How to Uninstall Antispam Agents on Exchange Servers

Friday, March 17, 2017
UPDATE: The Exchange Team posted an article about this issue today. See Exchange Server Edge Support on Windows Server 2016 Update.

Microsoft announced that they were deprecating support for the SmartScreen spam content filter for Exchange Server in September 2016. See the article, Deprecating support for SmartScreen in Outlook and Exchange for full details.

All that is supposed to mean is that Microsoft is no longer producing anti-spam signatures for Exchange, but I discovered today that the Microsoft Exchange Transport service would not start on my Exchange 2016 Edge Transport servers after a servicing reboot. These Edge servers are running on Windows Server 2016. The Application event log shows the following error:
Log Name:      Application
Source:        MSExchangeTransport
Date:          3/17/2017 2:59:07 PM
Event ID:      16023
Task Category: Configuration
Level:         Error
Keywords:      Classic
User:          N/A
Computer:      mail.contoso.com
Description:
Microsoft Exchange couldn't start transport agents. The Microsoft Exchange Transport service will be stopped. Exception details: Failed to create type 'Microsoft.Exchange.Transport.Agent.ContentFilter.ContentFilterAgentFactory' from assembly 'C:\Program Files\Microsoft\Exchange Server\V15\TransportRoles\agents\Hygiene\Microsoft.Exchange.Transport.Agent.Hygiene.dll' due to error 'Exception from HRESULT: 0xC0630005'...
The highlighted section in the error log indicates the problem is with the content filter, which is one of the antispam agents installed with the Install-AntispamAgents.ps1 PowerShell script. Whenever the MSExchangeTransport service is started, the service stops again within a minute and this event is logged.

The fix for me is to remove the content filter transport agent on the Exchange server(s) where the antispam agents are installed. Run the Get-TransportAgent cmdlet from the Exchange Management Shell to see if the antispam agents are installed. These transport agents include the Content Filter Agent, Sender Filter Agent, Sender ID Agent, and Protocol Analysis Agent.


To uninstall these agents use the Uninstall-TransportAgent cmdlet. For example,
Uninstall-TransportAgent -Identity "Content Filter Agent"
Uninstall-TransportAgent -Identity "Sender Id Agent"
Uninstall-TransportAgent -Identity "Content Filter Agent"
Uninstall-TransportAgent -Identity "Protocol Analysis Agent"
For me, all I really needed to uninstall as the Content Filter Agent to get the Transport Service to start.

Once you've uninstalled them you need to restart the Transport Service:
Restart-Service MSExchangeTransport
This will start the Microsoft Exchange Transport Service if it was already stopped and you're back in business. Of course, you still need a good antispam service for on-prem. I use Exchange Online Protection (EOP) which works very well for me and most of my customers.

Read more ...

Fix for Performance Counter Updating Error (Event 106) on Exchange Servers

Tuesday, November 29, 2016
You may see multiple warnings or errors in the Application event log on Exchange servers for event 106, indicating that performance counters could not be updated.

Multiple Event ID 106 - Perf Counter Events
An example event 106 reads,
Log Name:      Application
Source:        MSExchange Common
Date:          11/29/2016 12:24:28 PM
Event ID:      106
Task Category: General
Level:         Warning
Keywords:      Classic
User:          N/A
Computer:      EX16B.contoso.com
Description:
Performance counter updating error. Counter name is Percentage of Failed Offline GLS Requests in Last Minute, category name is MSExchange Global Locator OfflineGLS Processes. Optional code: 3. Exception: System.InvalidOperationException: The requested Performance Counter is not a custom counter, it has to be initialized as ReadOnly.
   at System.Diagnostics.PerformanceCounter.InitializeImpl()
   at System.Diagnostics.PerformanceCounter.get_RawValue()
   at Microsoft.Exchange.Diagnostics.ExPerformanceCounter.set_RawValue(Int64 value)
The TechNet article, "'Performance counter updating error' after you install an Exchange Server 2013 cumulative update", indicates this is a problem on Exchange 2013 after applying a CU, but I've seen this happen after applying an update rollup, cumulative update, or .NET Framework update on Exchange 2010, Exchange 2013, or Exchange 2016 servers.

I wrote the following PowerShell script to reload the Exchange performance counters. You run it directly on the affected Exchange server from an elevated PowerShell or EMS prompt. The script will reload all the performance counters in the %ExchangeInstallPath%\setup\perf directory.
Add-PSSnapin Microsoft.Exchange.Management.PowerShell.Setup
$perfcounters = Get-ChildItem "$env:ExchangeInstallPath\Setup\Perf\" *.xml | Where-Object {!($_.psiscontainer)}
$perfcount = $perfcounters.Count

foreach ($perfcounter in $perfcounters) {
New-PerfCounters -DefinitionFileName $perfcounter.FullName -ErrorAction SilentlyContinue
Write-Progress -Activity "Reloading $perfcount Exchange Performance Counters" -PercentComplete (($i++ / $perfcount) * 100)}
The script may take a few minutes to run and will reload all the Exchange performance counters. Once complete, the event 106 warnings or errors should stop.


Read more ...

How to Change the From Address in OWA

Monday, August 22, 2016
If you have Send-As rights for another mailbox, you may want to send email as that other user from your own mailbox. You may also want to send as an Office 365 Group so that all replies to your message go back to that group.

This is easy enough to do in the Outlook client by clicking the From drop-down box and selecting the appropriate account or entering an email address. It's not quite that intuitive in Outlook Web App (OWA), but it can still be managed.

First, you need to display the From field for the message you are composing in OWA. Click the [...] ellipses button and select Show From:


Next, right-click From the email address and select Remove:


Now type in the email address of the user or Office 365 Group you want to send the email as:


Of course you need to have rights to send as the user for this to work properly, otherwise you will get an NDR saying, "You don't have rights to send as this user."

Note that the sent item will go into your Sent Items folder, not the user's who you are sending as.


Read more ...

New Set-AutodiscoverSCP v2 script is on the TechNet Gallery

Friday, July 22, 2016
Set-AutodiscoverSCP.ps1
I just published version 2.0 of my Set-Autodiscover.ps1 script to the TechNet Gallery. This is a complete rewrite of the old script and includes the following new features:
  • Made setting the new values easier by cloning an existing server
  • Now also configures Outlook Anywhere and all Exchange virtual directory internal and external URLs
  • Revised verbiage and use *-ClientAccessService cmdlets for Exchange 2016
  • Added -Verbose output to display the values we're configuring
  • Improved overall display output
These changes are intended to make the script more powerful and easier to use.


How many times have you installed a new Exchange 2010-2016 server only to hear users complain about a security pop-up in Outlook referencing the new server?

This happens because Exchange setup uses the FQDN of the server as the service connection point (SCP) that Outlook clients use for autodiscover requests (for example, https://exch03.contoso.local/autodiscover/autodiscover.xml). This new SCP is configured in Active Directory when the Front-End Client Access role is installed during setup. In most load balanced environments the valid SCP should be something like https://autodiscover.contoso.com/autodiscover/autodiscover.xml. Outlook will prompt users with a security warning because the self-signed Exchange certificate installed by setup is not trusted. If the new server is Internet-facing, ActiveSync clients can also get security warnings on their mobile device.


Read Exchange Active Directory Deployment Site for more information about this behavior.

I wrote a script, Set-AutodiscoverSCP.ps1 (available on the TechNet Gallery), that automatically updates the SCP, Outlook Anywhere FQDNs, and all the virtual directory internal/external URLs for the server your specify to match the values currently configured on another server you specify as soon as the new server is detected in AD. It continually polls Active Directory until it finds the new SCP value and sets the new values. A progress bar indicates that the script is polling AD.

The script is intended to run on another Exchange server in the org running the same version of Exchange as the new server. This is because Exchange 2010 cannot update SCP values for Exchange 2013 or 2016, and vice versa. You can also have the script target a particular domain controller. This is useful when the new server you are installing is in a different AD site.

The syntax for Set-AutodiscoverSCP.ps1 is:
Set-AutodiscoverSCP.ps1 [-Server] <String> [-ServerToClone] <String> [[-DomainController] <String>] [<CommonParameters>]
Two examples of usage:
PS C:\>Set-AutodiscoverSCP.ps1 -Server exch02 -ServerToClone exch01
Example #1 continually queries the current configuration domain controller until it finds an SCP for server EXCH02 and then sets it to match the SCP of EXCH01. It also configures Outlook Anywhere and the internal/external virtual directory URLs to match those found on EXCH01.

PS C:\>Set-AutodiscoverSCP.ps1 -Server exch02 -ServerToClone exch01 -DomainController dc03
Example #2 is almost the same as the command in the previous example, except it continually queries DC03 for the SCP record and configures it on that domain controller. This is useful when configuring a new Exchange server in a different Active Directory site.

The script is designed to be run during installation. Normally, you would run this script from an existing Exchange server of the same version while the new server is being installed.

You can also run the script directly from the server that is being installed. This is useful when you're installing the first Exchange 2013/2016 server in a 2010 environment. You can start running the script on the new server when the Client Access Front End Service is being installed. The caveat is that setup restarts IIS and web services several times during setup, causing the script to possibly stall during configuration of the virtual directories. If that happens, simply CTRL-C to quit the script and run it again.

I've included error handling for the following conditions:

  1. The script notifies you what version of Exchange is running the script and warns you to make sure the new server is running the same version. Note that Exchange 2013/2016 servers can update each other. This warning really only applies to Exchange 2010 and Exchange 2013/2016 coexistence. 
  2. The script checks that the server, server to clone, and the domain controller (if specified) are pingable. If the servers cannot be pinged, the script will terminate.
  3. If a domain controller is specified, it validates that the DC specified is actually a domain controller

Set-AutodiscoverSCP.ps1 is a useful addition to your Exchange toolbox. Please let me know if you have any questions or feature requests. I'll update the script again on the TechNet Gallery as needed.

Read more ...

Cannot Create Frontend Receive Connector using Exchange 2016 CU2 Admin Center

Wednesday, July 13, 2016
I've heard a few people complaining about this on Twitter and social media, so I figured I document it here.

You may find when you create a new Receive Connector using the Exchange Admin Center from an Exchange 2016 CU2 server that you cannot create the new connector as a Frontend Hub Transport role. The option to select the Frontend Transport role is grayed out and defaults to the Hub Transport role.

New receive connector role is grayed out

I've been able to reproduce this bug when the admin account used to create the new receive connector has a mailbox hosted on an Exchange 2016 CU server. If the admin account's mailbox is hosted on Exchange 2013 you can select the Frontend Transport role as expected.

This smells very much like a mailbox anchoring issue, which was supposed to have been reversed in Exchange 2016 CU2.

There are three workaround for this:
  • Create the new receive connector using the Exchange Management Shell (EMS)
  • Create the new receive connector from the Exchange 2013 Admin Center. Note you will need to connect directly to the Exchange 2013 EAC using the Exchange 2013 server's FQDN. For example, https://EX2013.contoso.com/ecp/?exchclientver=15
  • Move the admin account's mailbox to an Exchange 2013 server. Note that this bug will still occur if the admin mailbox is hosted on an Exchange 2010 server.
You can create a new frontend transport receive connector via the Exchange Management Shell using a cmdlet similar to this example:
New-ReceiveConnector -Name 'New Receive Connector' -RemoteIPRanges @('10.0.1.0-10.0.1.255') -Bindings @('0.0.0.0:25') -Usage 'Custom' -Server 'EX16B.contoso.com' -TransportRole 'FrontendTransport' 
I've created a bug for this on Microsoft Connect. Hopefully it will be corrected in Exchange 2016 CU3.

Irritating Side Note:
Why, oh why, does the Exchange Admin Center default to creating a Hub Transport role receive connector in the first place?? 99.99% of all receive connectors created by admins should be Frontend Transport role connectors. This causes much wailing and gnashing of teeth because the new receive connector doesn't function as expected.

In order to change the role to Frontend Transport, run the following cmdlet:
Set-ReceiveConnector "Receive Connector" -TransportRole "FrontendTransport"
FYI - I have an Exchange design change request logged to make the default transport role Frontend Transport, too. <holding breath>

Read more ...

MAPI Virtual Directory Bug in Exchange 2016 CU2

Wednesday, June 29, 2016
I discovered a bug in Exchange 2016 CU2 where if you change the MAPI virtual directory URLs using the Exchange Admin Center (EAC), it clears all forms of authentication from the MAPI virtual directory. This will cause all Outlook clients to constantly prompt for credentials because there are no ways for Outlook to authenticate.

All authentication methods are disabled

The default IISAuthenticationMethods for the MAPI virtual directory are NTLM, Negotiate, and OAUTH.

Steps to reproduce the issue:
  • Double-click the MAPI virtual directory from the Exchange Admin Center to confirm that authentication is set to NTLM and Negotiate. Note that OAUTH is not shown as an authentication method in EAC. Click Cancel to close the dialog box.
  • Double-click the MAPI virtual directory and change the internal and/or external URL and click Save.
    • Observing the command console, the cmdlet executed is: Set-MapiVirtualDirectory -ExternalUrl 'https://mail.contoso.com/mapi' -IISAuthenticationMethods @() -Identity 'fe29d135-6f9c-4191-a68e-b028d94bd7ff'
  • If you examine the authentication settings before you click Save, the authentication settings will be written as NTLM and Negotiate (missing OAUTH).
    • Observing the command console, the cmdlet executed is: Set-MapiVirtualDirectory -ExternalUrl 'https://mail.contoso.com/mapi' -IISAuthenticationMethods @(Ntlm,Negotiate) -Identity 'fe29d135-6f9c-4191-a68e-b028d94bd7ff'

This bug affects both Exchange 2013 and Exchange 2016 MAPI virtual directories configured using the Exchange 2016 CU2 EAC. Note that the MAPI virtual directory was not exposed in the EAC until Exchange 2016 RTM, so you won't see it in the Exchange 2013 EAC.

If you change the URLs via the Exchange Management Shell (without using the -IISAuthenticationMethods parameter) the URLs are updated without affecting the authentication methods.

To set the authentication methods for all MAPI virtual directories back to their defaults, run the following cmdlet from EMS:
Get-MapiVirtualDirectory | Set-MapiVirtualDirectory -IISAuthenticationMethods @(Ntlm,Negotiate,OAuth)
All MAPI virtual directories set back to default authentication methods

I reported this bug on Connect and Microsoft confirmed this is an issue with Exchange Server 2016 CU2.

Read more ...

How to Quickly Determine Exchange Server Versions

Tuesday, June 28, 2016
It's fairly easy to determine the version of Exchange Server running on a server using the Exchange Management Shell. The following cmdlet will display the Exchange version for each server in the organization, according to Active Directory:
Get-ExchangeServer | fl name,AdminDisplayVersion
The output will look something like this:


The AdminDisplayVersion value tells you the Exchange version using the following ww.xx.yyyy.zzz format:

MajorVersion | ServicePack | CumulativeUpdate/UpdateRollup | MinorVersion

For example, 14.3.0123.004 is Exchange 2010 Service Pack 3, 15.0.1178.004 is Exchange Server 2013 CU13, and 15.1.0466.034 is Exchange Server 2016 CU2. You can refer to Exchange Server Updates: build numbers and release dates to determine the exact version of Exchange is running. You can also run the Get-ExchangeServerBuildNumbers cmdlet in Exchange 2013 or Exchange 2016. This cmdlet scrapes the same webpage and displays the Product Names, Release Dates, and Build Numbers for every version of Exchange Server going as far back as Exchange Server 4.0 Standard Edition, released on June 11, 1996. Worth memorizing if you want to win one of Tony Redmond's famous Exchange trivia contests. :)

Note that Exchange 2013 CU4 was released as "Exchange 2013 Service Pack 1", but the ServicePack build number did not really increment until Exchange 2016 to 15.1, further demonstrating that Exchange 2016 is really just an incremental upgrade to Exchange 2013.

But what if you don't have easy access to EMS, or you want to check the version of the Exchange Server your mailbox is hosted on in Exchange Online for some reason?

If your on-prem Exchange 2013/2016 organization is using MAPI over HTTP (and you really should be) you can use the following URL to check which version of Exchange is running on the server hosting your mailbox:
https://<serverFQDN>/mapi/emsmdb/
For Office 365 use https://outlook.office.com/mapi/emsmdb/

The output will show the server version number, as shown below.


The cool thing about this method is that even works externally as long as Outlook Anywhere is published to the Internet. Keep in mind that the version returned is for the server hosting the mailbox being accessed, not the front-end client access proxy server. You can tell which front-end CAS your hitting by observing the Cafe server value.

Note that this method won't work if you haven't configured MAPI/HTTP or for mailboxes hosted on Exchange 2010 or earlier because they don't support MAPI over HTTP.

Read more ...

Exchange 2016 CU2 and Exchange 2013 CU13 now supports .NET Framework 4.6.1

Tuesday, June 21, 2016
Prior to Exchange 2016 CU2 and Exchange 2013 CU13, .NET Framework 4.6.1 was not supported with Exchange server. It still isn't supported for Exchange 2010 and most likely will never be, so you'll still need to block it as per the steps in my previous article.

The EHLO Blog post explaining support for .NET Framework 4.6.1 and all the other new Cumulative Update goodness can be read in the article, Released: June 2016 Quarterly Exchange Updates.

If you previously blocked .NET Framework 4.6.1 installation via the registry you'll need to remove that block by removing the "BlockNetFramework461" DWORD value from the registry in HKEY_LOCAL_MACHINE\SOFTWARE\Microsoft\NET Framework Setup\NDP\WU.

The recommended order of operations for installation is:

  • Install Exchange Server 2016 CU2 or Exchange Server 2013 CU13 on your Exchange server. Restart.
  • Remove the block for .NET Framework 4.6.1 from Windows Update (see key above).
  • Download and install .NET Framework 4.6.1 from Windows Update. Restart.
    • Note: The Exchange assemblies will recompile when the server starts back up. This will take several minutes and Exchange performance will suck during this time. I recommend downloading and running the NET Framework optimization speed up script from the .NET Blog. to make this process run faster.
  • Download and install the appropriate post-release fixes for the .NET Framework:
  • Restart and run the NET Framework optimization speed up script again. 
  • Personally, I would restart again just to make sure everything starts up correctly.
Read more ...

Redirection in Exchange 2013 CU6+ and Exchange 2016

Monday, May 2, 2016

Beginning with Exchange 2013 Cumulative Update 6, the Exchange 2013/2016 application itself performs redirection from the default website to the /OWA virtual directory. That means that if a user goes to https://server.contoso.com Exchange will redirect the user's browser to https://server.contoso.com/owa.

This 301 redirect behavior may affect load balancer health checks if your load balancer does not support direct URL health checking. Application-level health checks should normally be made directly to the https://server.contoso.com/<protocol>/healthcheck.htm URL. Citrix NetScaler load balancers, for example, perform healthchecks by connecting first to the default website and then performing a GET /OWA command. Since Exchange 2013 CU6 and later redirect the client (the load balancer) to the /OWA virtual directory this breaks that functionality.

The only reference to this new behavior is in the support article, Load balancer marks Exchange server as down in an Exchange Server 2013 Cumulative Update 6 environment. At the time of this writing, the article says this behavior applies to Microsoft Exchange Server 2013 Standard and Enterprise and that, "Microsoft has confirmed that this is a problem in the Microsoft products that are listed in the 'Applies to' section." I have confirmed with the product team that this is by design, not a problem. It also applies to all versions of Exchange 2016 Standard and Enterprise, as well. Microsoft will be updating the support article soon to reflect this.

Note that this behavior does not redirect HTTP requests to HTTPS. You still need to perform these redirects from the server or the load balancer. My preference is to do this from the server(s).

Here's how I recommend implementing HTTP -> HTTPS redirection on Exchange Servers:

  • Open Internet Information Services (IIS) Manager on the Exchange Server and select the server name.
  • Double-click Error Pages.
  • Click the Add action on the right and create a new error page for status code 403.4 that responds with a 302 redirect to https://server.contoso.com/owa as shown below.


Since the default website on Exchange servers is configured to require SSL, a user who tries to connect via HTTP will then get redirected to https://mail.contoso.com/owa, rather than getting an error page saying, "HTTP 403 Forbidden" and that SSL is required or you are required to log in.

With Exchange 2013 CU6 or later that's all you need to do. With older versions of Exchange you should create a default.htm file in the C:\inetpub\wwwroot folder with the following:
<html>
<meta http-equiv="REFRESH" content="0;url=/owa">
</html>
This will cause anyone who connects to https://mail.contoso.com to be redirected to https://mail.contoso.com/owa, which is now the default behavior with Exchange 2013 CU6 or later.

Read more ...

Important Information about Group Expansion for In-Place Holds

Thursday, March 3, 2016
Exchange 2013, Exchange 2016, and Exchange Online in Office 365 all support In-Place Hold. In-Place Hold allows compliance administrators to retain specific data in Exchange for eDiscovery in an immutable fashion.

In-Place Hold differs from Litigation Hold in a few key ways. Litigation Hold allows you to hold all contents of one or more mailboxes. In-Place Hold allows you to define what data to hold (keywords, specific senders/recipients, and start/end dates, and the types of data, such as emails or calendar items). Both In-Place and Litigation Hold allow you to specify how long to hold this data.

When you configure a new In-Place Hold you have the option to place a group on hold. You need to be aware that group membership is expanded at the time the In-Place Hold is created, and the sources of the In-Place Hold do not automatically adjust if the group membership changes.

For example, I'll create an In-Place Hold for the members of Keith's Group.

Creating a new In-Place Hold for members of Keith's Group
I configure the search parameters, enable the In-Place Hold, and click Finish. Exchange then displays the following warning:
To enable In-Place Hold for the mailbox search, the distribution groups specified in the "Source mailboxes" field must be expanded. The task can expand the group members and save the expanded mailboxes as the source mailboxes of the mailbox search. Do you want to expand the group?
You have to click OK to continue. If you click Cancel it will not save the In-Place Hold.

Warning about group expansion
If you edit the new In-Place hold you will see that Keith's Group has been replaced with the members of the group at the time the In-Place hold was created.

Expanded group
There is no longer any link between Keith's Group and the new In-Place Hold sources. If the group membership changes, you will need to edit the mailbox sources for the In Place Hold manually.

Note that this expansion behavior is the same, whether you use distribution groups, mail-enabled security groups, or dynamic distribution groups.

Read more ...

Fix for "Error - Can't Remove Mailbox Search"

Monday, February 15, 2016
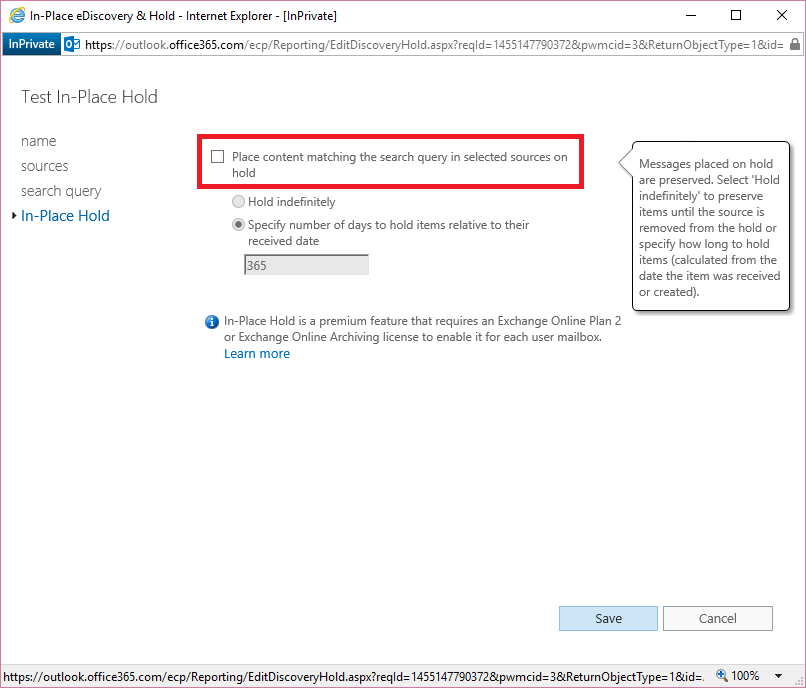
You may receive the following error when trying to remove an In-Place eDiscovery & Hold search item:
Error

Can't remove mailbox search 'Test In-Place Hold' because there is still at least one mailbox on In-Place Hold.


In order to delete the In-Place eDiscovery Hold you need to clear the check box to "Place content matching the search query on selected sources on hold" first. Edit the In-Place Hold item and click In-Place Hold, then clear the top check box and click Save.


Now you can successfully delete the In-Place Hold by clicking the trash can.

Read more ...

Turn Exchange Anonymous Relay On or Off with Toggle-ExternalRelayReceiveConnectors.ps1

Thursday, January 7, 2016
Toggle-ExternalRelayReceiveConnectors.ps1
I wrote this PowerShell script to make it easy to identify and toggle anonymous relay rights on any of your organization's front-end Receive Connectors.

Most organizations require SMTP relays to internal and external recipients. This allows application servers and appliances, such as copier/scanners, to email messages to those recipients. An internal relay allows these devices to email internal (local) recipients. An external relay allows these emails to also be sent to external recipients outside the organization, such as joe@gmail.com.

It's fairly easy to setup an internal relay in Exchange - just create a new frontend receive connector, specify the IP addresses that can use this connector, and set security to allow Anonymous Users to connect to this receive connector, as shown below.


However, if you try to send an email to any SMTP address outside the organization, the relay connector will reject it with one of these errors (or similar):
550 5.7.1 Unable to relay
-or-
550 5.7.54 SMTP; Unable to relay recipient in non-accepted domain
In order to configure the relay connector to allow sending to remote domains, you need to configure an extended right for Anonymous Users similar to this lengthy cmdlet:
Get-ReceiveConnector "Relay" | Add-ADPermission -User 'NT AUTHORITY\Anonymous Logon' -ExtendedRights ms-Exch-SMTP-Accept-Any-Recipient
Trying to determine whether this setting has already been configured on a particular receive connector can be even more challenging. That's why I wrote the script Toggle-ExternalRelayReceiveConnectors.ps1.

The script will display a numbered list of all the front end receive connectors that exist in the entire organization. Connectors with the Anonymous/ms-Exch-SMTP-Accept-Any-Recipient right configured are listed in Yellow. All other connectors are listed in White. Simply enter the number of the connector you wish to toggle and press Enter. If it was off, it will turn it on. If it was on, it will turn it off. It's that simple!


Read more ...

Chrome Browser Now Warns About Weak SHA-1 Certificates

Monday, December 14, 2015
*** ACTION REQUIRED ***

The Google Chrome web browser is now warning users if Outlook on the web (OWA) or other websites are using SHA-1 SSL certificates.

These certificates are no longer considered secure and should be replaced ASAP. Please read my article, "Is Your Organization Using SHA-1 SSL Certificates?" on Windows IT Pro for more information and steps you should take.

SHA1 certificates are being sunsetted by January 1, 2017. These certs should be replaced or re-keyed with SHA256 certs to improve security and prevent outages.
Read more ...

Don't Delete or Rename the Default MRM Policy

Wednesday, October 28, 2015
I was troubleshooting an issue with an Exchange 2013 customer where their "Default Archive and Retention Policy" was not being automatically applied to archive-enabled mailboxes. Admins could manually apply the policy, but they wanted it applied automatically when the mailbox is enabled for an in-place archive or Exchange Online Archiving.

It turns out that the only retention policy that will be automatically applied is one named "Default MRM Policy". That name is hard-coded into the product, so if you delete it all you need to do is recreate it with that same name to make it the default policy. There is no property for that policy that makes it the default. It's just the name.

Here's some of the back story. Exchange 2007 introduced Managed Folders, which was an early form of retention management, but it was rather clumsy to work with. Exchange 2010 SP1 and later uses message records management (MRM) policies and policy tags. MRM policies are collections of policy tags that tell Exchange server how manage mail data. Some tags apply by default, such as the "Default 2 year move to archive" tag. Others are personal tags that users can chose to apply to one or more mail items, or entire folders, such as "1 Year Delete". Exchange setup creates the "Default MRM Policy" which includes a default set of policy tags.


The Default MRM Policy does not actually apply to any mailboxes by default, unless the the mailbox is given an archive mailbox. At that time, Exchange looks for an MRM policy named, "Default MRM Policy" and automatically applies it to the mailbox. If the Default MRM Policy does not exist, no retention policy is applied.


If you want to apply a different MRM policy you need to manually update the retention policy in the EAC (Mailbox User > Mailbox Features < Retention Policy - see above) or from EMS:
Set-Mailbox <username> -RetentionPolicy "Sales Dept MRM Policy"
For hybrid customers and those using Exchange Online Archiving, you manage MRM policies for on-prem mailboxes on-prem. The policy settings for these mailboxes will sync to Exchange Online with the DirSync process and will be applied to the online archive mailbox.

If a user mailbox and archive mailbox are both in the cloud, you will apply the cloud version of the Default MRM Policy in Office 365. Here, you should configure the Office 365 version of the Default MRM Policy to match the same settings as on-prem.

Read more ...