Showing posts with label Exchange 2007. Show all posts

Exchange 2007 End of Life on April 11th

Monday, February 27, 2017

As announced, Exchange Server 2007 reaches end of life on April 11th, 2017, over ten years after its introduction. That means that Microsoft will no longer provide either free or paid support and, more importantly, will not offer future security or bug fixes for Exchange 2007. This can leave your organization in a vulnerable state.

You're options are to move to Office 365 Exchange Online or upgrade your messaging infrastructure to a newer version of Exchange on-premises. EXPTA Consulting is here to help you. We have years of experience migrating customers to Exchange on-prem or online with minimal disruption to your end-users. Contact us today for a free evaluation!


Read more ...

Turn Exchange Anonymous Relay On or Off with Toggle-ExternalRelayReceiveConnectors.ps1

Thursday, January 7, 2016
Toggle-ExternalRelayReceiveConnectors.ps1
I wrote this PowerShell script to make it easy to identify and toggle anonymous relay rights on any of your organization's front-end Receive Connectors.

Most organizations require SMTP relays to internal and external recipients. This allows application servers and appliances, such as copier/scanners, to email messages to those recipients. An internal relay allows these devices to email internal (local) recipients. An external relay allows these emails to also be sent to external recipients outside the organization, such as joe@gmail.com.

It's fairly easy to setup an internal relay in Exchange - just create a new frontend receive connector, specify the IP addresses that can use this connector, and set security to allow Anonymous Users to connect to this receive connector, as shown below.


However, if you try to send an email to any SMTP address outside the organization, the relay connector will reject it with one of these errors (or similar):
550 5.7.1 Unable to relay
-or-
550 5.7.54 SMTP; Unable to relay recipient in non-accepted domain
In order to configure the relay connector to allow sending to remote domains, you need to configure an extended right for Anonymous Users similar to this lengthy cmdlet:
Get-ReceiveConnector "Relay" | Add-ADPermission -User 'NT AUTHORITY\Anonymous Logon' -ExtendedRights ms-Exch-SMTP-Accept-Any-Recipient
Trying to determine whether this setting has already been configured on a particular receive connector can be even more challenging. That's why I wrote the script Toggle-ExternalRelayReceiveConnectors.ps1.

The script will display a numbered list of all the front end receive connectors that exist in the entire organization. Connectors with the Anonymous/ms-Exch-SMTP-Accept-Any-Recipient right configured are listed in Yellow. All other connectors are listed in White. Simply enter the number of the connector you wish to toggle and press Enter. If it was off, it will turn it on. If it was on, it will turn it off. It's that simple!


Read more ...

Chrome Browser Now Warns About Weak SHA-1 Certificates

Monday, December 14, 2015
*** ACTION REQUIRED ***

The Google Chrome web browser is now warning users if Outlook on the web (OWA) or other websites are using SHA-1 SSL certificates.

These certificates are no longer considered secure and should be replaced ASAP. Please read my article, "Is Your Organization Using SHA-1 SSL Certificates?" on Windows IT Pro for more information and steps you should take.

SHA1 certificates are being sunsetted by January 1, 2017. These certs should be replaced or re-keyed with SHA256 certs to improve security and prevent outages.
Read more ...

KEMP Series: How to Restrict Exchange Admin Center Access From the Internet Using KEMP VLB

Tuesday, February 10, 2015
This is part five in a series of articles detailing load balancing for Exchange using the KEMP virtual load balancer (VLB). In this article I will explain how to restrict Exchange Admin Center (EAC) access from the Internet using KEMP LoadMaster.

The other articles in this series are:
My first article explains the basics of load balancing and how to download a free copy of KEMP Virtual Load Master for your home lab. I'll assume you've already configured it for Layer 7 load balancing.
Note: Since the following procedures rely on SubVSs and traffic inspection, this configuration will only work with Layer 7 load balancing. Layer 4 load balancing cannot inspect traffic and therefore cannot be used to deny access to the EAC.
The Exchange Admin Center (EAC) is the web-based management console used to manage your Microsoft Exchange Server 2013 infrastructure. As such, some customers want to block EAC access from the Internet.

The EAC is part of the ECP virtual directory and is the same virtual directory used in OWA to manage user settings, such as Out of Office settings. If you were to disable or not publish the entire ECP virtual directory to the Internet in order to block EAC access, it would prevent external users from accessing many settings from OWA.
Update: Microsoft just released a new article, Configuring Multiple OWA/ECP Virtual Directories on the Exchange 2013 Client Access Server Role, which describes how to create a separate vDir for the Exchange Admin Center. If you chose the Microsoft solution to disable Internet access to EAC (and I do, if you want Microsoft support) know that you need to follow those step EXACTLY and you will need to redo that setup after every CU. If you wish to load balance the new vDir you will also need to create new SubVSs on the KEMP LoadMaster.
Let's get started configuring EAC restrictions on the KEMP LoadMaster. Log into the LoadMaster with the bal account and navigate to Rules & Checking > Content Rules.


Add each of the following five rules. Be careful to copy and paste each rule entirely and name them "EAC_Block_1-5":
/^\/ecp/PhoneVoice*/|^\/ecp/PublicFolders*/|^\/ecp/Reporting*/|^\/ecp/Servers*/

/^\/ecp/UnifiedMessaging*/|^\/ecp/UsersGroups*/|^\/ecp/Organize/OrganizationRetentionPolicyTags*/


/^\/ecp/Organize/RetentionPolicies*/|^\/ecp/RulesEditor/JournalRules*/|^\/ecp/RulesEditor/TransportRules*/|^\/ecp/tools*/


/^\/ecp/.*Mgmt*/|^\/ecp/AcceptedDomain*/|^\/ecp/AddressList*/|^\/ecp/Antimalware*/|^\/ecp/DLPPolicy*/|^\/ecp/EmailAddressPolicy*/|^\/ecp/Federation*/

/^\/ecp/Hybrid*/|^\/ecp/Migration*/|^\/ecp/OwaMailboxPolicy*/|^\/ecp/Extension/OrgExtensions*/
To do this click the Create New button and enter the new rule name (i.e., EAC_Block_1). Paste the first rule string above into the Match String field and click the checkboxes for Ignore Case and Fail on Match. Then click the Create Rule button.


 Repeat for each of the rules above. Your rule list should now look like this:


Now expand Virtual Services > View/Modify Services and click Modify for the Exchange 2013 virtual service. Click the Add New button under SubVSs. You will see a new SubVS at the bottom of the list. Click the rule None and add the EAC_Block_1 rule to the new SubVS. Be sure to click the Add button to add it. Repeat for each of the five EAC_Block rules.


Click <-Back and then click the Modify button for the new SubVS. Name the SubVS Block EAC and click the Set Nickname button.

Expand Advanced Properties and set the Error Code to 401 Unauthorized. There is no need to enter any real servers for this SubVS.


Click <-Back and then expand Advanced Properties for the Exchange 2013 virtual service. Click the Rule Precedence button for Content Switching. You will see a list of all the rules. Click the Promote buttons to move the five EAC_Block rules so they are at the top of the list.


Now when if you try to access the Exchange Admin Center using the KEMP load balancer VIP you will still be able to logon, but cannot access any of the EAC administration parts.


End users will still be able to access their ECP settings from OWA.

If you want to access the EAC internally, simply use the FQDN of one of your CAS servers to bypass the KEMP load balancer. Alternatively, you can configure another virtual service for internal load balancing that does not use the blocking rules.

This concludes my series on configuring the KEMP virtual LoadMaster. I hope you found these articles useful.

Read more ...

KEMP Series: How to Configure an L4 KEMP Virtual Load Balancer (VLB) for Exchange 2013

Saturday, February 7, 2015
This is part four in a series of articles detailing load balancing for Exchange using the KEMP virtual load balancer (VLB). In this article we will be configuring the VLB as a Layer 4 load balancer for Exchange 2013.

The other articles in this series are:
My first article explains the basics of load balancing and how to download a free copy of KEMP Virtual Load Master for your home lab. As a refresher, here's a brief explanation of the differences between Layer 7 and Layer 4 load balancing.
Layer 7 Load Balancing
L7 load balancing happens at the application layer. Health checks are performed on the applications (for example OWA, EWS, ActiveSync, etc.). The SSL connection must terminate on the load balancer, the content is inspected, and then re-encrypted back to the real servers. This requires that the L7 load balancer has to have an understanding of the applications being load balanced. It also usually involves some sort of persistence, such as cookie-based or source IP. Because of all this, L7 load balancing is more complex. Exchange 2010 required L7 load balancing due to the different ways that each application protocol handled persistence. Exchange 2013 does not require persistence even when using L7 load balancing.

Layer 4 Load Balancing
L4 load balancing happens at the network layer after routing is compete (Routing occurs at Layer 3). Health checks are performed on the servers, not the applications. Layer 4 load balancers do not decrypt, inspect, and re-encrypt SSL traffic. This means L4 load balancers have higher performance and are less complex, but the load balanced application must support it. Exchange 2013 CAS is designed for L4 load balancing, but also supports L7 load balancing.
In my second article I showed you how to configure the general settings for the LoadMaster. This includes configuring Ethernet settings, the Web UI, time and DNS settings, and SSL certificates. These settings are common to all types of load balancing configurations. Now I'm ready to show you how to configure the VLB as a Layer 4 load balancer for Exchange 2013. But first, I need to get some potentially confusing things out of the way.

When an incoming connection goes through a load balancer, the load balancer needs to NAT the connection to the real servers so that the reply comes back through the load balancer, otherwise the real servers will respond directly to the client and the session will break. For example, imagine you, Sally, and Tim are in the same room. You ask Sally a direct question, but Tim responds. You ignore Tim's response because it's out of order.


The computer above communicates with the VIP on the load balancer and expects the response to come from that same IP address. The only three ways to make this to happen are:
  1. Use Network Address Translation (NAT) - The incoming client traffic is sent to the real server after performing address translation, which causes server to respond back to the load balancer. The load balancer then forwards the response back to the client.
  2. Configure the load balancer as the Default Gateway on the real servers - This forces all outgoing traffic to external subnets back through the load balancer, but has many downsides. For example, you must size load balancer to account for all traffic for given server. While this configuration may be supported for Exchange, it isn't best practice.
  3. Use Direct Server Return (DSR) - DSR is a complex load balancing method that has many drawbacks, including the inability to insert cookies or do port translation. It is not supported for Exchange or Lync deployments.
Of these options, only NAT is a viable option. In an interesting choice of wording, KEMP calls this an "L7 connection" to the load balancer. KEMP verbiage is referring to actual TCP layer functionality where the KEMP load balancer accepts the client’s TCP connection and creates a new TCP connection to the server. This is required in order to perform NAT.

While the term can be confusing, and I hope that KEMP is able to change it so it isn’t so, from an Exchange perspective this is still Layer 4 load balancing. The load balancer is not decrypting SSL connections, the client connections can still be configured to be distributed evenly in round robin fashion across the CAS servers with no affinity or persistence requirement, and the traffic is not inspected by the load balancer. As a matter of fact, the SSL certificate doesn't even need to be installed on the load balancer for this to work, which makes it truly "light weight" operation when compared to L7 load balancing which results in much higher resource requirements due to SSL decryption and re-encryption. I'm going to lengths to explain this because when you see "Force L7" in the LoadMaster configuration, I want you to understand why it doesn't translate to Layer 7 load balancing in the way Microsoft refers to it.

OK, so now that's done, let's start configuring the KEMP LoadMaster for Layer 4 load balancing Exchange 2013. There are basically two options for doing this. Option 1 configures a single VIP to load balance all virtual services for all the real servers. This is useful for home lab scenarios where you have a simple consumer-grade router and can only forward all SSL traffic to one IP address. Option 2 configures a different IP address for each virtual service on the real servers.

Note: Neither of these L4 options use the KEMP application templates. Those are only used in Layer 7 load balancing.

Option 1 - Use a Single VIP

Log into the LoadMaster with the bal account and navigate to Virtual Services > Add New. Enter the new virtual IP address, set the port to 443, and enter a Service Name. Then click the Add this Virtual Service button.


Under Standard Options, leave "Force L7" checked and uncheck "Transparency". Keep the default values for Persistence (None) and Scheduling Method (Round Robin).


Confirm that SSL Properties > SSL Acceleration is disabled (unchecked). Leave Advanced Properties and ESP Options with their default settings.

Expand Real Servers. Since we're doing L4 load balancing we cannot configure vSubs and you can only monitor one virtual server (OWA, ActiveSync, MAPI, etc.). In this example, I will monitor the OWA virtual server.

Enter /owa/healthcheck.htm for the URL to health check and click the Set URL button. Change the "HTTP Method" to GET and enter OK for the "Reply 200 Pattern". Then click the Set Pattern button.


Now it's time to add your real servers. Click the Add New button. Add the first real server's IP address and click the Add This Real Server button. Repeat for each of your real servers. When you're done click <-Back twice.

Now you will see the new Exchange 2013 virtual service that L4 load balances the real servers. Ignore the fact that it shows L7 for the Layer, as this is really only the connection type (see explanation above). Note that the SSL certificate is installed on the real servers, not the load balancer.


That's all there is for this configuration. As noted earlier, we're only monitoring the OWA virtual server on the real servers for health checks. If another virtual server, say ActiveSync, goes offline on one of the real servers the load balancer will still direct traffic to it. Likewise, if the OWA virtual server goes offline on one of the real servers that server will be marked as down and no traffic will be directed to it, even though other virtual servers may be healthy.

Option 2 - Use Separate VIPs for Each Virtual Server

This option requires nine separate VIPs on the load balancer, one for each Exchange 2013 virtual server. It also requires nine different names on the SAN certificate or use of a wildcard cert.

Log into the LoadMaster with the bal account and navigate to Virtual Services > Add New. Enter a new virtual IP address, set the port to 443, and enter a Service Name (i.e, EX2013 ActiveSync). Then click the Add this Virtual Service button.


Under Standard Options, leave "Force L7" checked and uncheck "Transparency". Keep the default values for Persistence (None) and Scheduling Method (Round Robin).


Confirm that SSL Properties > SSL Acceleration is disabled (unchecked). Leave Advanced Properties and ESP Options with their default settings.

Expand Real Servers. Enter /microsoft-server-activesync/healthcheck.htm for the URL to health check and click the Set URL button. Change the "HTTP Method" to GET. Enter OK for the "Reply 200 Pattern" and click the Set Pattern button.


Now it's time to add your real servers. Click the Add New button. Add the first real server's IP address and click the Add This Real Server button. Repeat for each of your real servers. When you're done click <-Back twice.

Repeat for each Exchange 2013 virtual server: Autodiscover, ECP, EWS, MAPI, OAB, OWA, PowerShell, and RPC. Nine virtual services in all. 

Thankfully you can make this easier on yourself by duplicating VIPs. Select a Virtual Service in View/Modify Services and click the Duplicate VIP button. Enter the new virtual IP address and click the Duplicate VIP button. Change the "Service Name" and click the Set NickName button, then change the health check URL and click the Set URL button. Rinse and repeat for each virtual server.


Note that the SSL certificate is installed on the real servers, not the load balancer.

With this configuration the load balancer will direct traffic to any available virtual server on any real server. The downside to this approach is that it requires your router to send traffic for each namespace to a different VIP and you have many more names to manage on your SSL certificates. 

This concludes the Layer 4 setup options for Exchange 2013. My final article in the series will explain how to restrict Exchange Admin Center access from the Internet.

Read more ...

KEMP Series: How to Configure an L7 KEMP Virtual Load Balancer (VLB) for Exchange 2013

Tuesday, February 3, 2015
This is part three in a series of articles detailing load balancing for Exchange using the KEMP virtual load balancer (VLB). In this article we will be configuring the VLB as a Layer 7 load balancer for Exchange 2013.

The other articles in this series are:
My first article explains the basics of load balancing and how to download a free copy of KEMP Virtual Load Master.

In the second article I showed you how to configure the general settings for the LoadMaster. This includes configuring Ethernet settings, the Web UI, time and DNS settings, and SSL certificates. These settings are common to all types of load balancing configurations. Now I'm ready to show you how to configure the VLB as a Layer 7 load balancer for Exchange 2013.

As a refresher, here's an explanation of the differences between Layer 7 and Layer 4 load balancing.
Layer 7 Load Balancing
L7 load balancing happens at the application layer. Health checks are performed on the applications (for example OWA, EWS, ActiveSync, etc.). The SSL connection must terminate on the load balancer, the content is inspected, and then re-encrypted back to the real servers. This requires that the L7 load balancer has to have an understanding of the applications being load balanced. It also usually involves some sort of persistence, such as cookie-based or source IP. Because of all this, L7 load balancing is more complex. Exchange 2010 required L7 load balancing due to the different ways that each application protocol handled persistence. Exchange 2013 does not require persistence even when using L7 load balancing.

Layer 4 Load Balancing
L4 load balancing happens at the network layer after routing is compete (Routing occurs at Layer 3). Health checks are performed on the servers, not the applications. Layer 4 load balancers do not decrypt, inspect, and re-encrypt SSL traffic. This means L4 load balancers have higher performance and are less complex, but the load balanced application must support it. Exchange 2013 CAS is designed for L4 load balancing, but also supports L7 load balancing.

Download and Install the Templates

Start by downloading the LoadMaster templates from the KEMP documentation website. Templates contain the preconfigured setups for common load balanced applications. For Microsoft products that includes Exchange 2010 / 2013, Lync 2013, ADFS 2.0, and Remote Desktop Services (RDS).


Expand Microsoft > Exchange 2013. You will see that the Exchange 2013 templates include Core Services, ESP Services, and Additional Services. Edge Security Pack (ESP) Services include security configurations for Internet facing applications, such as pre-authentication templates. The Additional Services template includes secondary client access protocols such as POP and IMAP, as well as SMTP.

Download the Core Services template to a folder on your local computer. This will be a single Exchange2013Core.tmpl file.

Log into the LoadMaster with the bal account and navigate to Virtual Services > Manage Templates. Click Choose File, browse to the Exchange2013Core.tmpl file, and click Add New Template. The LoadMaster will display the four templates you just installed.


Configure Layer 7 Load Balancing

Expand Virtual Services > Add New to begin adding a new virtual service for Exchange 2013. Enter the virtual address (VIP) for your load balanced set of Exchange 2013 CAS servers (which should be every Exchange 2013 server in the AD site - you are doing only multi-role servers, right?) If you configured a custom port (8443) in general settings, you can use the same IP address that you use to access the VLB management UI.


Select the Exchange 2013 HTTPS Reencrypted template from the dropdown list. This will automatically populate port, protocol and service name. Since I will be using SSL bridging, I changed the service name to Exchange 2013 HTTPS Bridged. Click Add this Virtual Service.

The LoadMaster will then take you to the configuration of the new service. Examine the Basic Properties. Note that here you can activate or deactivate the virtual service.

Standard Options shows that Transparency is Disabled, persistence is set to None, the load balancing method uses Round Robin, and Idle Connections timeout in 1800 seconds (30 minutes).


Expand SSL Properties and you will see the SSL certificate you installed in my General Settings article as an Available Certificate. Select that certificate and click the ">" button to move it to Assigned Certificates.

I recommend configuring the VLB to use only TLS 1.x since TLS 2.0 and TLS 3.0 connections have known vulnerabilities. Click the TLS 1.x Ciphers Only checkbox which removes all the TLS 2.0 and 3.0 ciphers, Select all the ciphers and click the ">" button to move them to Assigned Ciphers, then click the Set Ciphers button. 


We will skip the Advanced Properties, WAF Options, and ESP Options since they are not used in this implementation.

Expand SubVSs and you will see each of the sub-virtual services that the template installed. There is one for each virtual service in Exchange 2013, including ActiveSync, Autodiscover, ECP, EWS, MAPI, OAB, PowerShell, and RPC.


Next we need to add the real servers for each SubVS. Click Modify for the Exchange 2013 HTTPS Bridged - ActiveSync SubVS. Click the Add New button under Real Servers.


Add the IP address of the real server to load balance and click the Add This Real Server button. Repeat for each real server you want to add to the load balanced set.


When you're done adding real servers for this SubVS click <-Back twice to return to the list of SubVSs. Repeat adding real servers for each SubVS.

Click Virtual Services > View/Modify Services. You will see two Virtual Services are published, one for HTTP redirection to HTTPS and the other that has all the SubVSs for Exchange 2013.


If any of  the Real Servers virtual directories are listed in red, it's either because it's missing real servers or they are all down. Click Add New under Certificate Installed. Select the certificate we installed when we configured General Settings and click the ">" button to assign it. Click the Save Changes button.

I usually change the HTTP redirection service to pass-through because I favor doing this on the Exchange servers. Either way you'll need to add the real servers to this rule, as you did above.

If you want to do HTTP pass-through to the real servers click Modify for the redirect. Rename the service name to MAIL_HTTP_PassThrough and click Set Nickname. Expand Advanced Properties. Clear the Error Code and clear the Redirect URL. Expand Real Servers and select HTTP Protocol for the Real Server Check Parameters. Then configure HTTP redirection directly on the Exchange servers.

Congratulations! You have configured Layer 7 load balancing for Exchange 2013.

A Note About Home Routers and Multiple SSL Endpoints

If you're installing this setup behind a home or consumer-based router you probably have few options for port forwarding. Usually you can only configure the router to forward all HTTPS traffic to a single internal IP address, and that will usually be the VLB.

In this case, you can configure the VLB to decide which endpoint to direct SSL or any other traffic to by using a new SubVS. For example, my Hyper-V lab server hosts many VM servers including three Exchange servers and a Thycotic Secret Server. Both the load balanced Exchange servers and the Thycotic server use port 443, so we need to configure the router to send all HTTPS traffic to the VLB, and configure the VLB to handle multiple endpoints.

Configure Multiple Endpoints

Note: If you're only load balancing Exchange and don't need the load balancer to direct HTTPS traffic to other endpoints, you're done and you can skip this section.

To add another endpoint to the VLB, add a new SubVS from Virtual Services > View/Modify Services. Click the Add New button and click Modify. Then enter a name for the SubVS (i.e., SecretServer) and click Set NickName.

Enter a portion of the URL for the virtual directory on the new server (i.e., /SecretServer/Login.aspx) for the URL and click the Set URL button.

Click Add New to create the new SubVS. This will take you to the Real Server parameters page.
Enter the IP address of the real server and click Add This Real Server. Your config should look like this:


Now click <-Back to get back to the SubVSs page. You'll notice that the Rules for this new SubVS show None. We need to configure a rule for the new server.

Expand Rules & Checking > Content Rules and click the Create New button. Enter a name for the Rule, such as Secret_Server. Note that rule names cannot contain spaces.

Enter HOST for the Header Field and the FQDN of the server in the Match String field. Click the checkbox for Ignore Case and click Create Rule.


Go back to Virtual Services > View/Modify Services. Click the Modify button for Exchange 2013 HTTPS Bridged. Now click the red None button for the rule of the SecretServer SubVS. Select Secret_Server from the rules drop-down list and click the Add button.

Now the router sends all HTTPS traffic to the VLB and the VLB sends the traffic to the correct endpoint.

This concludes the Layer 7 setup for Exchange 2013. My next article will cover configuring the KEMP virtual LoadMaster as a Layer 4 load balancer. My last article will explain how to restrict Exchange Admin Center access from the Internet.

Read more ...

KEMP Series: How to Configure General Settings on the KEMP Virtual LoadMaster

Friday, January 30, 2015
This is part two in a series of articles detailing load balancing for Exchange using the KEMP virtual load balancer (VLB). In this article we will be configuring the general settings for the VLB before we configure specific settings for L4 or L7 load balancing.

The other articles in this series are:
In the previous article I gave a brief overview of some of the fundamentals of load balancing and described how to download and install a free trial of the KEMP Virtual LoadMaster for your home lab. Now we will configure the general settings using the web interface.

Begin by logging into the VLB management interface from a web browser with the password you configured earlier. Remember the admin username is bal.

System Configuration

Click System Configuration on the left to expand these options. Under Interfaces you will see that the VLB has two NICs, eth0 and eth1. Since we are configuring a one-armed load balancer only eth0 has an IP address, which it got from DHCP. This is the IP address used for incoming traffic that will be load balanced. It is also currently used as the management IP. We will not be using eth1, so that IP is blank.

You will want to change the IP address for eth0 to a static IP. Enter the static IP address in CIDR format (i.e, 192.168.1.60/24) and click the Set Address button. After confirming the change, your browser will be redirected to the new IP address.


You'll notice that the link speed is set to automatic and it shows the current speed and duplex. You have the option to adjust the MTU (1500 is correct for most networks) and you can configure a VLAN if required.

Expand Local DNS Configuration. Here you can set a new hostname for the VLB if you wish (the default name is lb100). Click DNS Configuration to set your DNS server IP(s) and your DNS search domains.


Under Route Management. confirm that the default gateway IP address is correct. If you need to change it remember to click the Set IPv4 Default Gateway button.

Expand System Administration. Here is where you can change your password, update the KEMP LoadMaster license, shutdown or restart the VLB, update the LoadMaster software, and backup or restore the configuration.

Click Date/Time to enter the NTP host(s) to use for accurate time. I recommend using a local Domain Controller and/or pool.ntp.org. You can enter multiple NTP server names or IPs separated by spaces. Click the Set NTP Host button to save the configuration. Then set your local timezone and click the Set TimeZone button to save it.

Expand Miscellaneous Options and click Remote Access. Change the port used for Allow Web Administrative Access from port 443 to a custom port, such as 8443. This will allow you to access the LoadMaster web UI using a URL such as https://192.168.1.60:8443. If you change the UI port, you will be able to load balance SSL port 443 traffic using the same IP, otherwise you will need to configure additional IP address to load balance the same port. Remember to click the Set Port button to save the change. You will need to restart the LoadMaster to affect the port change. Do so under System Administration > System Reboot > Reboot. Once it restarts access the web UI using the new URL:port and login.

Expand System Configuration > Miscellaneous Options > L7 Configuration. Select X-Forward-For for the Additional L7 Header field. This will configure the VLB to forward the client's original IP address to the real server so it can be logged.


Next, change the 100-Continue Handling setting to RFC-7231 Compliant. I found the default value of RFC-2616 Compliant prevents MRS connections in hybrid scenarios with Office 365. Thanks to Brian Reid's article that lead me to this solution.

Configure a value for Least Connections Slow Start and click the Set Slow Start button. This is the number of seconds that the LoadMaster will throttle connections after a node comes online. The default value is 0, which means no throttling. Slow Start prevents the load balancer from overloading a node that comes back online because it has no current connections.

Certificates

If you plan to do SSL offloading or SSL bridging you will need to install the endpoint's SSL certificate on the load balancer. As described in the first part of this series, with this configuration client connections terminate at the load balancer. The load balancer then sends traffic to the real servers as HTTP (offloading) or re-encrypts the traffic to the real servers (bridging).

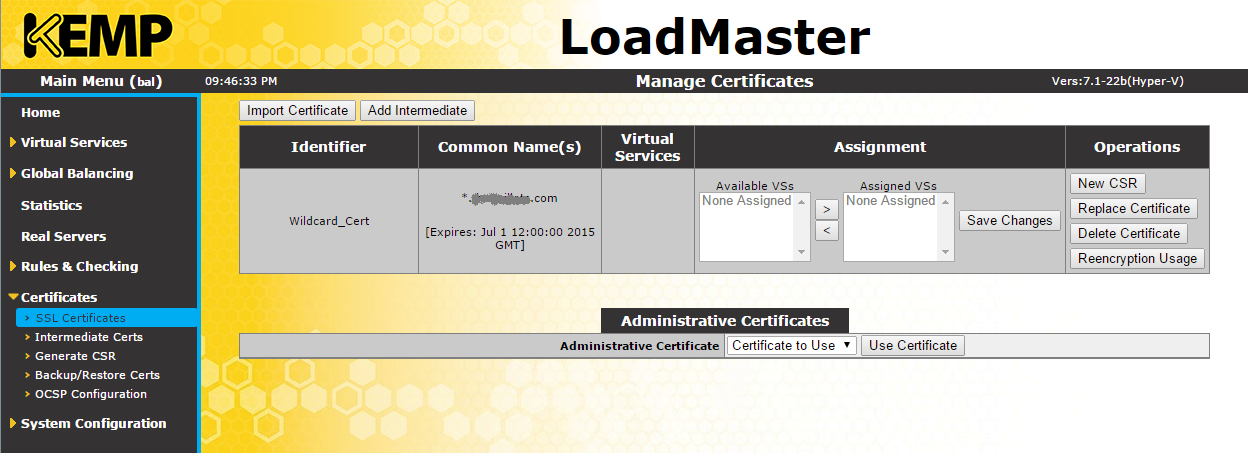
To install an SSL certificate on the VLB click Certificates > SSL Certificates. Under Manage Certificates click the Import Certificate button. Click the Choose File button to browse for the certificate file. Most times this is a PFX file which includes the certificate and private key. Enter the password for the PFX file in the Pass Phrase field and enter a useful Certificate Identifier.


Click Save to import the SSL certificate. You will now see that the SSL certificate is installed.


Almost all third-party trusted CAs use intermediate CAs to issue their certificates. You should install these intermediate certs on the load balancer, too. Click the Add Intermediate button on SSL Certificates.Click the Choose File button and browse for the intermediate CA cert file(s) to install. These certs need to be .cer or .pem files. Once they are installed you will see see them under Certificates > Intermediate Certs.


That does it for configuring general settings. In the next article I'll cover how to configure layer 7 load balancing for Exchange 2013.

Read more ...

KEMP Series: Introduction to Load Balancing for Exchange and Other Workloads

Tuesday, January 27, 2015
Today I'm beginning a series of articles detailing load balancing for Exchange using the Kemp virtual load balancer (VLB). In this series I will cover the following:
I'm using a KEMP virtual load balancer in this series for a number of reasons. First, they offer a free trial version downloadable from their website. Second, it's very easy to configure. And third, a virtual load balancer works great with a home lab setup like my 5th Gen Hyper-V Lab Server.

Why Use a Load Balancer?

A load balancer is required when you have two or more Exchange servers with the Client Access Server (CAS) role installed in the same site for high availability. Load balancers have the intelligence to distribute client traffic amongst the CAS roles in either a round-robin or least connections method. Layer 7 (L7) load balancers also have the intelligence to perform multiple health checks on each node to determine if it's healthy to accept new connections. If the service on one node becomes unavailable, the load balancer will automatically redirect all traffic for that service to a healthy node, if one is available.

Load balancers are also able to load balance many other workloads such as web servers, SharePoint Servers, Lync servers, etc. Typically each service or workload has its own virtual IP (VIP). When clients connect to a service, say OWA, DNS points the namespace to that VIP on the load balancer. The load balancer then directs the traffic to a healthy node offering that service.

Load Balancer Configurations

Here's an explanation of the differences between Layer 7 and Layer 4 load balancing.
Layer 7 Load Balancing
L7 load balancing happens at the application layer. Health checks are performed on the applications (for example OWA, EWS, ActiveSync, etc.). The SSL connection must terminate on the load balancer, the content is inspected, and then re-encrypted back to the real servers. This requires that the L7 load balancer has to have an understanding of the applications being load balanced. It also usually involves some sort of persistence, such as cookie-based or source IP. Because of all this, L7 load balancing is more complex. Exchange 2010 required L7 load balancing due to the different ways that each application protocol handled persistence. Exchange 2013 does not require persistence even when using L7 load balancing.

Layer 4 Load Balancing
L4 load balancing happens at the network layer after routing is compete (Routing occurs at Layer 3). Health checks are performed on the servers, not the applications. Layer 4 load balancers do not decrypt, inspect, and re-encrypt SSL traffic. This means L4 load balancers have higher performance and are less complex, but the load balanced application must support it. Exchange 2013 CAS is designed for L4 load balancing, but also supports L7 load balancing.
Load Balancers are often either configured as one-arm (single NIC) or two-arm (two NICs, one for inbound traffic and another for outbound traffic). See Basic Load-Balancer Scenarios Explained for details on the two. For simplicity we will be configuring our load balancer as one-arm.

Oftentimes load balancers are used to load balance HTTPS traffic. For example, mail.contoso.com for OWA. Here, you have three choices:

1.     Terminate the SSL connection at the load balancer and pass the connection through to the target node unencrypted. This is known as SSL offloading. The SSL certificate is installed only on the load balancer. Exchange virtual directories are configured to use HTTP and SSL Offloading is enabled.
2.     Terminate the SSL connection at the load balancer and then re-encrypt the connection to the target node. This is called SSL bridging. The SSL certificate is installed on the load balancer and another SSL certificate is installed on the target nodes. The load balancer must trust the certificate on the target nodes.
3.     Pass the SSL connection through the load balancer and terminate the SSL connection on the target node. This is called SSL passthrough. The SSL cert is installed only on the target nodes.

Of these options, SSL bridging and SSL passthrough are most common. SSL bridging has the advantage of protocol inspection by the load balancer. Since the session terminates on the load balancer it is able to read or inspect the traffic that going through it. This can be useful for advanced load balancing features or logic, but it adds complexity to the load balancing solution. You'll need to manage separate SSL certificates for the load balancer and target nodes, and it adds CPU overhead because all traffic must be unencrypted, inspected, and re-encrypted. On the flip side, the obvious benefit is the ability to maximize server resource usage by being able to load balance individual services such as OWA, ActiveSync, etc., instead of failing over the entire server when one of the services is affected.

SSL passthrough simply passes all SSL traffic through the load balancer to the target node where it is unencrypted. The load balancer is unable to read or inspect the traffic going through it because it is encrypted, so you won't be able to do anything fancy on the load balancer. As an administrator, you'll only need to manage the SSL certs on the target nodes. On the flip side, if any service used for health check fails, the entire server is taken out of load balancing pool.

In all these three options you should configure the load balancer to NAT the traffic to the real servers. Because of this, the target nodes always see the load balancer as the source IP for load balanced connections. This is also important to know when you are reviewing IIS logs on the target server. For this reason, I usually configure an X-Forward-For header that includes the original source IP. More on that later in the series.

Note: If you prefer to not use NAT on the load balancer, Direct Server Return may be an option to consider. DSR requires additional configuration on load balanced servers and may not be desired due to supportability and additional overhead concerns. Another option when not using NAT is to configure the load balanced servers to use the load balancer as their default gateway. I do not recommend DSR for Exchange and will not be covering it in this series.

Now that we have some of the basics out of the way, let's get started.

Getting Your Free KEMP Virtual Load Balancer Trial

KEMP Technologies offers a fully functional 30-day free trial for their entire LoadMaster family of virtual load balancers. Better yet, if you are a Microsoft Certified Professional (MCP), MVP, or MCM you can register for a free NFR license! This license is good for one year with free renewals as long as the offer is valid. You also get free web support!


For this series I'll be working with the VLM-200. To download the virtual LoadMaster simply click the free trial link, select your hypervisor, country and click download. VLM supports 14 different hypervisors including various versions of Hyper-V, VMware, and Xen.


After you click download you will be redirected to the Free Trial Activation page and your download will begin. To activate your free trial you need to create a KEMP ID from this page. Do that while you're downloading. If you're requesting a LoadMaster NFR license you'll need a KEMP ID, the VLM serial number (get that from the VLM after it's running), and your MCP transcript ID and access code.

The download will consist of a ZIP file that contains the correct files for your hypervisor along with an installation guide. All you need to do is extract the contents and import them into your virtual server management console. For Hyper-V R2 select Import Virtual Machine, browse to the Loadmaster VLM folder, and click Next three times. On the Connect to Network page select your virtual switch, click Next and Finish. The new VLM virtual machine is preconfigured to use 2 virtual CPUs and 1GB of RAM.

Once imported start it up so you can get your trial license. Connect to the VM console to watch it boot up. The VLM is configured for DHCP and should show its management URL and login credentials. The default username is bal and the password is 1fourall. You'll change this later.

KEMP VLM Boot Screen

Licensing the KEMP Virtual LoadMaster
Open your web browser to the URL shown in the console. It's normal to receive a certificate warning, just click through it. Accept the license terms and allow automatic updates. Now you will license your KEMP LoadMaster. Enter your KEMP ID and password and the LoadMaster will license itself as long as it has Internet access.

If it does not have Internet access you will need to select Offline Licensing and complete the form to obtain your license information to paste into the VLM licensing form. When licensing is successful, the VLM will indicate that the license has been installed and when it expires.

Next, the VLM will have you change the default password and log back in to begin configuration.

In the next part of the series, I will show you how to configure general settings on the virtual LoadMaster to load balance Exchange 2013.

Read more ...

SMTP Firewall Requirements for Exchange Online

Tuesday, May 20, 2014
Most of my Office 365 engagements are hybrid projects connecting Office 365 with Exchange on-premises, and most are with larger companies concerned with securing the hybrid deployment.

Exchange Online Protection servers send SMTP emails using a TLS connection usually to the hybrid or Edge Transport server to enable mail flow between cloud and on-prem users. Microsoft does not support any sort of SMTP gateway or appliance between EOP and the Edge or hybrid server. For this reason, customers normally have to open TCP port 25 on the firewall to the hybrid server from the Exchange Online Protection servers.


Companies can secure this SMTP traffic by configuring the perimeter firewall to allow inbound TCP 25 traffic only from Exchange Online Protection servers to the hybrid or Edge servers.

I've seen a number of articles that list the public IP addresses used by EOP to send SMTP emails to on-prem customers, but the one true list is maintained in the article, Exchange Online Protection IP Addresses. Currently, this article lists seven IPv4 blocks and one IPv6 block for SMTP delivery to on-prem:
  • 65.55.88.0/24
  • 207.46.51.64/26
  • 207.46.163.0/24
  • 213.199.154.0/24
  • 213.199.180.128/26
  • 216.32.180.0/24
  • 216.32.181.0/24
  • 2a01:111:f400:7c00::/54
Microsoft tries hard to not make changes to this list, but if they do they will update the article. It's important for firewall admins to know that EOP does not use URLs for root domain routing (also known as Top-Level Domains, or TLDs). You must use the IP addresses listed in the article above.

Up until April 2014, Microsoft used many other IP addresses to send emails from Office 365 tenants to on-prem customers. This is because they maintain another set of IP addresses for something called the High Risk Delivery Pool, which is used to protect the production Exchange Online namespace from "spammy" senders. EOP no longer uses the High-Risk Delivery Pool when sending emails between the customer's tenant and their on-prem servers.

It's nice to know that we now have a single source to point to when configuring firewalls for Office 365.

Read more ...

Troubleshooting TLS SMTP Connections to Exchange Online Protection

Monday, March 10, 2014
By default Office 365 uses Transport Layer Security (TLS) to send encrypted SMTP emails between Exchange Online and Exchange on-prem. This provides end-to-end encryption of emails between your on-prem Exchange Hybrid Server and Exchange Online Protection (EOP), just like they were the same organization.

TLS utilizes x.509 (SSL) certificates to encrypt the email in transport. Exchange Online and Exchange 2013's implementation of TLS differs from previous implementations of TLS in several important ways:
  • The certificates used for TLS must be issued by a trusted third-party CA (Digicert, Godaddy, Verisign, etc.)
  • The CRL for the certification authority must be available. If Exchange or O365 can't read the CRL it will not trust the certificate.
  • The FQDN that the Receive Connector provides in response to EHLO must match the subject name or a subject alternative name on the certificate. SAN certificates and wildcard certificates are both valid for TLS use. If you use a wildcard cert the FQDN used on the connector can be any name that is valid for the wildcard cert's domain.
  • In previous versions of TLS any certificate could be used to encrypt SMTP traffic, even expired or self-signed certificates. This is not the case with Office 365 and Exchange 2013.
As previously mentioned, TLS is required by default for SMTP communication between Hybrid servers and Exchange Online Protection (EOP). When you run the Hybrid Configuration Wizard it will configure forced TLS for all Send and Receive Connectors. Note that this configuration is updated whenever you run the HCW, so if you reconfigure the connectors for opportunistic TLS or turn it off completely, the HCW will reconfigure them to use forced TLS again.

The following options are available for TLS encryption in Office 365:
  • Force TLS - Email sent across this connector must use TLS. If TLS is unavailable messages will queue until they are delivered or expired.
  • Opportunistic TLS - The connector tries to setup a TLS connection using the STARTTLS verb. If a TLS connection cannot be made the connector falls back to regular ESMTP or SMTP. This is functionally equivalent to turning TLS off.
Normally the use of TLS is configured on Receive or Inbound Connector. You do this to control how email is accepted by your domain and it can be easily configured using the Exchange Admin Console. 
Office 365's Inbound Connector from Hybrid Server
Send Connectors can also be configured to require TLS. This is used to enforce that email is sent by this connector must only use TLS, and is configured in the shell using the RequireTLS property:
Outbound Connector TLS Settings to Office 365
Using this configuration if the corresponding Receive Connector does not offer or require TLS, messages will queue on the sending server until they are finally delivered or expire.

You can easily tell if a receiving SMTP server is configured to use TLS using Telnet. Install the Telnet Client feature, Telnet to the server using TCP port 25, and look for the STARTTLS verb after issuing the EHLO domain.com command. For example:
Telnet servername 25
If you see that the STARTTLS verb is missing, the server is not offering TLS. If your Send Connector is configured to require TLS, the messages will queue on the sending server with the error,
451 4.4.0 Primary target IP address responded with: "451 5.7.3 STARTTLS is required to send mail."
There are several reasons that the STARTTLS verb might be missing:
  • The receiving server is not configured to Force TLS or use Opportunistic TLS.
  • The sending server's IP is on an SMTP block list (aka SMTP blacklist or SMTP blocklist). Office 365 will not attempt to send TLS traffic with a server it can't trust.
  • The receiving server is configured to only respond to SMTP (not ESMTP) commands. TLS is part of the ESMTP protocol.
  • Your firewall is doing some form of email inspection and is filtering "unsafe" verbs from the SMTP conversation. Some examples of firewalls that do this are:
Office 365 uses internal and external SMTP blocklists to protect the network. If the sending server is on one of these black lists the EOP servers will not offer TLS. You can test this by sending a non-TLS email to EOP using Telnet. See Brian Reid's article, "Cannot Send Emails to Office 365 or Exchange Online Protection Using TLS". The response from the EOP server will tell you which block list you're on and how to request removal.

If the receiving server requires TLS, but the sending server is not configured to use a TLS certificate messages will queue on the sending server with the error,
451 4.4.0 Primary target IP address responded with: "451 5.7.3 Must issue a STARTTLS command first."
The fix here is to configure the Send Connector to use TLS and a valid certificate using the Enable-ExchangeCertificate cmdlet, such as:
Enable-ExchangeCertificate -Thumbprint 5DC5902752816FD2FC51D5564C363F68D8F7FFC4 -Services SMTP
Make sure to use Get-ExchangeCertificate to get the correct certificate's thumbprint for the command above.

Hopefully this information will help you understand TLS and will assist you with troubleshooting.

Read more ...