Showing posts with label Microsoft 365. Show all posts

Lessons Learned and Best Practices for Autodiscover in a Hybrid Environment

Tuesday, June 20, 2023

Outlook uses the Autodiscover service to get real-time connection information for your mailbox and any other mailbox you connect to. Without Autodiscover you may be able to get Outlook to connect, but it won't connect correctly. For example, Exchange Web Services (EWS) connectivity in Outlook can only be made using Autodiscover.

Outlook normally performs Autodiscover requests when you setup a mail profile for the first time and from then on, periodically in the background. This is how automapped shared mailboxes get automatically added to Outlook. Outlook also runs an Autodiscover request when your mailbox moves between servers or databases, as when a failover event occurs. Autodiscover is also used whenever you check free/busy availability of another user's calendar.

Domain-joined computers in an Exchange Server or hybrid environment normally use a Service Connection Point (SCP) published in Active Directory to get the URI Outlook should use for Autodiscover requests. This is set using the Set-ClientAccessService -AutoDiscoverServiceInternalUri <value> cmdlet in the Exchange Management Shell (EMS).

There's a lot of documentation in the web that says you should set the AutoDiscoverServiceInternalUri value to $null after a hybrid migration is complete. But is that the right thing to do?

It's a long answer, so strap in. 😉  Tl;dr at the end.

First, know that Autodiscover behavior changes depending on the Outlook client and build version, as well as possible non-standard registry settings.

Microsoft 365 Apps for Enterprise always tries https://outlook.office365.com/autodiscover/autodiscover.xml first (Autodiscover-V2) regardless of your DNS settings. Microsoft's assumption is that if you’re running that version, your account is probably in the cloud. If your mailbox is indeed in EXO, that process looks like this and only takes 1-2 seconds:


Autodiscover-V2 will fail if your account is missing in EXO or not migrated yet and Outlook will then start the regular Autodiscover-V1 process. Note that the Autodiscover-V2 process can also be skipped with the following reg key. I see this often in older enterprise environments.

HKEY_CURRENT_USER\Software\Microsoft\Office\16.0\Outlook\AutoDiscover]
"ExcludeExplicitO365Endpoint"=dword:00000001

Office 2016/2019 clients normally only do the regular Autodiscover-V1 process, which is well known:

  1. Check for Local Data preference (configured via GPO to use an autodiscover.xml file stored locally on the computer)
  2. Check for Last Known Good (LKG) cached data
  3. Some later builds use heuristics to determine if the user account comes from Azure AD and will check against https://autodiscover-s.outlook.com/autodiscover/autodiscover.xml 
  4. SCP (see *notes below)
  5. DNS
    • Root domain (https://contoso.com/autodiscover/autodiscover.xml, which nearly always fails)
    • Autodiscover URI (https://autodiscover.contoso.com/autodiscover/autodiscover.xml)
  6. HTTP redirect
    • http://autodiscover.contoso.com/autodiscover/autodiscover.xml
  7. SRV
    • Value from _autodiscover._tcp.contoso.com 443 0 0 in DNS

*Note that the SCP process won't work in several scenarios:

  • The computer is not domain-joined
  • SCP is $null
  • SCP is not available via LDAP because the domain-joined machine is disconnected from the DC
  • Registry keys can, and most often will, override the default Autodiscover behavior

Here’s what the process looks like for an M365 mailbox user in a hybrid environment from a domain-joined computer on the LAN. The SCP is set to https://autodiscover.contoso.com/autodiscover.autodiscover.xml (the on-prem Exchange Server). This process took 52 seconds to complete. Remember, this is the same process that Outlook goes through when creating a new mail profile, too.


When the SCP is set to $null it skips the first five lines, but execution time is nearly the same. It gets there, but it's not efficient and takes a really long time.

If we set the SCP to https://autodiscover-s.outlook.com/autodiscover/autodiscover.xml, the process only takes about 1 second.


As you can see, setting the SCP to https://autodiscover-s.outlook.com/autodiscover/autodiscover.xml is much more efficient than setting it to $null when the migration is complete.

Tl;dr:

The Service Connection Point (SCP) is set using the Set-ClientAccessService -AutoDiscoverServiceInternalUri <value> cmdlet.

  • If you're a hybrid customer and you still have mailboxes on-premises that use Outlook:
    • Set your SCP to https://autodiscover.contoso.com/autodiscover/autodiscover.xml.
    • Create an A record for autodiscover.contoso.com in internal and external DNS resolving to on-prem Exchange for computers that can't reach AD.
  • If you're a hybrid or cloud customer and all mailboxes that use Outlook or in EXO:
    • Use Microsoft 365 Apps for Enterprise, which always checks EXO first. It also provides the best experience, features, and performance for cloud mailboxes.
    • If you're hybrid, set your SCP to https://autodiscover-s.outlook.com/autodiscover/autodiscover.xml.
    • Create a CNAME record for autodiscover.contoso.com in external DNS resolving to autodiscover.outlook.com. This way, older clients that don't use Autodiscover-V2 will use the HTTP redirect method to get to EXO.


Read more ...

Exchange Online will Throttle and Block Email from Persistently Vulnerable Exchange Servers

Thursday, March 23, 2023

Microsoft announced that they will begin Throttling and Blocking Email from Persistently Vulnerable Exchange Servers to Exchange Online.

They will begin slowly by blocking OnPremises (hybrid) connections from Exchange 2007 servers to Exchange Online, but plan to include all persistently vulnerable servers soon. A “persistently vulnerable server” is any Exchange server that has reached end of life (e.g., Exchange 2007, Exchange 2010, and very soon, Exchange 2013), or remains unpatched for known vulnerabilities.

If you have any Exchange 2007, 2010, or 2013 servers in your organization that are used for hybrid or SMTP relay, you must make plans to replace or remove them ASAP. You must also keep any Exchange 2016 and 2019 servers up to date with the latest Cumulative and Security Updates, as they are released.

I support this initiative. Organizations using Exchange Servers with known and unpatched vulnerabilities put themselves and their partners at risk. I look forward to seeing it include additional unsupported Exchange Server versions, and I understand their approach of rolling this out slowly and carefully at first.

There are millions of mailboxes in Exchange Online and they have a duty to protect those mailboxes. They know there are 16-year old Exchange 2007 servers currently connecting to their service that haven’t been patched in years and have dozens of known vulnerabilities. 

Microsoft is not forcing anyone to move to Exchange Online. They’re just not going to allow Exchange servers with known vulnerabilities to send hybrid (trusted) emails into their service.

It’s only 2007 for now, but eventually it will be any Exchange Server that is not running the latest or second to latest updates. It’s too risky for everyone.

The table below details the stages of progressive enforcement over time of a persistently vulnerable server:

thumbnail image 2 of blog post titled 


							Throttling and Blocking Email from Persistently Vulnerable Exchange Servers to Exchange Online

Read more ...

Turning off Basic Authentication for Autodiscover in Exchange Online

Thursday, November 17, 2022

Much has been said and written about disabling Basic Authentication in Exchange Online, and for good reason. Basic Auth is insecure and makes it easy for bad guys to hack your accounts and access your organization's data.

Microsoft disabled Basic Auth for most Exchange Online protocols in October of this year. Those protocols include Outlook, EWS, RPS, POP, IMAP, and EAS. SMTP Auth was also be disabled in your tenant if it is not being used. Modern Authentication is the secure way to authenticate for these protocols. Congratulations to Microsoft for pulling off such a monumental achievement to help keep customers' data safe!

Read Deprecation of Basic authentication in Exchange Online | Microsoft Learn for more information.

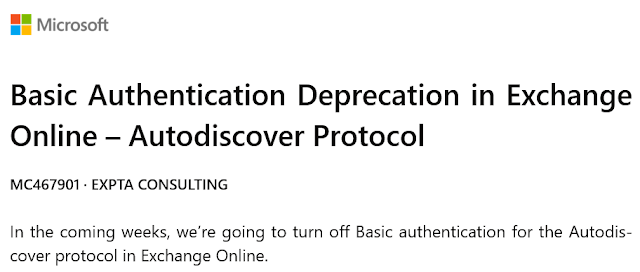
Next up, Microsoft is going to disable Basic Auth for the Autodiscover protocol. I would argue this is one of the most significant changes to deprecating Basic Auth, since it is continuously used by Outlook and whenever you configure a mail profile on a mobile device that uses ActiveSync. Because of this, it's easy to ignore this traffic when monitoring for Basic Auth usage. It's also a fairly easy protocol for the bad guys to use for password guessing or dictionary attacks.

As with all the other impacted protocols, Microsoft is not turning off the protocol itself, only the ability to authenticate to the protocol using nothing more than a username and password.


Read more ...

How to Setup Exchange Management Tools in Environments without Exchange Server

Friday, October 14, 2022

Some Exchange Online customers have an Active Directory on-premises, but never had Exchange Server on-prem. For example, customers who migrated their email from an Exchange hosted environment or from a different email system, such as Notes.

In some environments, these customers are having to manage user accounts and groups in both AD and Azure AD. This leads to confusion since accounts and passwords are not synced, so usernames and passwords can be different. Those customers may be looking for a way to master accounts, groups, and mailboxes from AD on-prem so they have a single source of authority, similar to the way that hybrid customers do.

In other environments, customers are using Azure AD Connect to sync users from AD on-premises to the cloud. Here, user accounts and groups are managed on-premises, but mailboxes are managed in Exchange Online. These customers may be looking for a way to manage mailboxes and groups from AD, so they also have a single source of authority.

The following steps will let you install the Exchange 2019 Exchange Management Tools (EMT) in an AD environment without having to install Exchange Server. 

Keep in mind that this solution is not supported by Microsoft, since manual configurations must be made in AD using ADSI Edit. The Microsoft supported way to do this is to install an Exchange Server in the org. The solution below does not require this.

Prerequisites

  • Active Directory is installed and the Forest Functional Level is Windows Server 2012 R2 or higher.
  • The Exchange Management Tools (EMT) must be installed on a domain-joined computer. Azure AD-joined by itself is not enough, since we need to be able to update Active Directory.
  • EMT can be installed on Windows 10, Windows 11, or any Windows Server 2016+ server.
  • You will need the Exchange Server 2019 CU12 or later media.
  • The AD schema will be updated during EMT installation. These procedures assume the installation is being performed by a Domain Admin.

Steps for Installing the Exchange Management Tools

  • Logon to the domain-joined computer or server where you want to install the EMT as a Domain Admin. For ease of installation, it is recommended that this computer be in the same AD site as the AD Schema Master.
  • Install the .NET Framework 4.8.
  • Install the Visual C++ 2012 Runtime.
  • Install Windows Remote Server Administration Tools (RSAT) for Windows 10 or Windows 11. On Windows Server add the AD DS Tools from Server Manager.
  • Install the IIS 6 Metabase Compatibility component using the following command:
    • dism /online /Enable-Feature /FeatureName:IIS-IIS6ManagementCompatibility /all
  • Restart the management computer twice to ensure all files and installations are up-to-date.
  • Run Setup from the Exchange 2019 CU12+ media
    • Select only Management Tools in the Server Role Selection
    • You will be prompted to add the Exchange Organization Name (i.e., Contoso)
    • Restart the computer after EMT installation
  • Run the C:\Program Files\Microsoft\Exchange Server\V15\Scripts\Add-PermissionForEMT.ps1 script from an elevated PowerShell prompt to create the Recipient Management EMT security group in the Users container.
  • Add admin accounts to the new Recipient Management EMT group. Domain Admins already have rights to run the EMT and do not need to be added.
  • Create a shortcut on the Desktop to the EMT:
    • C:\Windows\System32\WindowsPowerShell\v1.0\powershell.exe -noexit -command "Add-PSSnapin *RecipientManagement"
    • Configure the shortcut to run as Administrator
Note:
All mailbox management will be done using the EMT PowerShell cmdlets. The Exchange Management Shell (EMS) will also be installed, but you will never use it because you have no Exchange Server to connect to.

There is no built-in GUI for EMT recipient management, but fellow Office Apps & Services MVP Steve Goodman wrote one on GitHub. You may want to check it out. 

Also, be aware that the EMT does not support roles based access controls (RBAC) and there is no auditing available. For complete Microsoft EMT documentation see Install the Exchange management tools | Microsoft Learn.

Microsoft Exchange System Objects (MESO) Configuration

In order for admins to create remote mailboxes, you need to add a remote domain to the Exchange configuration partition in Active Directory. This is done using ADSI Edit. The usual disclaimer applies - Don't use this tool unless you know what you're doing. I accept no responsibility. Yada yada yada.
  • Begin by getting your Microsoft 365 tenant's remote routing domain.
    • Open Exchange Admin Center
    • Navigate to Mail Flow > Accepted Domains
    • Record the accepted domain of the domain that looks like domain.mail.onmicrosoft.com
  • Open ADSIEdit.msc from the management computer. This was installed when you installed the Windows Remote Server Administration Tools (RSAT).
  • Connect to the Configuration Naming Context.
  • Navigate to CN=Configuration > CN=Services > CN=Microsoft Exchange > CN=domain > CN=Global Settings > CN=Internet Message Formats
  • Right-click CN=Internet Message Formats and select New > Object...
  • Select the class msExchDomainContentConfig and click Next
  • Enter Hybrid Domain - domain.mail.onmicrosoft.com for the value, using the value recorded above. Click Next and Finish.
  • Edit the Hybrid Domain you just created and set the following values:
    • contentType: 0
    • domainName: domain.mail.onmicrosoft.com, using the value recorded above
    • msExchContentByteEncoderTypeFor7BitCharsets: 15
    • msExchContentPreferredInternetCodePageForShiftJis: 0
    • msExchDomainContentConfigFlags: 1
    • msExchMinAdminVersion: -2147453113
    • msExchResolveP2: 2147483647
    • msExchRoutingAcceptMessageType: 351
    • msExchRoutingDisplaySenderEnabled: True
    • msExchVersion: 4535486012416
    • sendTNEF: True
  • Close ADSI Edit.

Add the remote routing domain as an accepted domain.
  • Run the following from an elevated EMT prompt, using the value you recorded above:
    • New-AcceptedDomain domain.mail.onmicrosoft.com -DomainName domain.mail.onmicrosoft.com

Update the email address policy that was created when the EMT was installed.
  • Run the following from an elevated EMT prompt:
    • Get-EmailAddressPolicy | Set-EmailAddressPolicy -EnabledEmailAddressTemplates "SMTP:@domain.com","smtp:@domain.mail.onmicrosoft.com"
    • Replace the domains with the correct values.
      • SMTP:@domain.com (SMTP in all caps) is the primary SMTP address for your organization.
      • smtp:@domain.mail.onmicrosoft.com is the remote routing domain that you recorded above.

Now you can run all the EMT cmdlets to update your on-prem user accounts, mailboxes, and groups.

Configure AD Synchronization with Azure AD

Now that you have a way to update Exchange attributes in AD, the final step is to configure Azure AD Connect to sync the AD objects with Azure AD. 

If your environment already has AAD Connect installed and configured, you only need to update the AAD Connect configuration to use Exchange Hybrid Deployment in Optional Features.


If your environment doesn't already have Azure AD Connect installed and configured, you will need to do so and perform a soft match of the AD accounts to Azure AD. That's beyond the scope of this article. 

If you need help please reach out to me at EXPTA Consulting.

Read more ...

Big Exchange News!

Wednesday, April 20, 2022

Lots of exciting announcements are being made today about Exchange Server on the EHLO Blog.

  • A new Exchange Management Tools update is being announced. This will allow customers who have completed their migration to Microsoft 365 Exchange Online an option to turn off (not remove!) their last Exchange Server. There are several large caveats to this -- The solution is PowerShell only, it does not support RBAC, and there is no auditing available. I'm working on a blog article that does a walkthrough and explains all the details.
  • The Hybrid Configuration Wizard is making several improvements, including MFA support.
  • Microsoft is changing the updates delivery model for Exchange Server to bi-annually, rather than (roughly) every quarter. This will allow customers more time for testing and deployment between releases.
  • Exchange Server 2019 is adding Windows Server 2022 support. Exchange 2019 CU12 and above can be installed on Windows Server 2019 or Windows Server 2022.
  • With the latest CUs, Exchange Server 2013/2016/2019 now supports Windows Server 2022 Active Directory environments. Exchange customers no longer need to put off upgrading their Domain Controllers.
  • New Microsoft Bounty Program for Exchange Server. A security vulnerability bounty program for Microsoft Exchange Server is being launched to help keep Exchange Server secure for all customers.
Read all about these exciting changes here: Released: 2022 H1 Cumulative Updates for Exchange Server

Read more ...

Yes, Virginia, You Can Buy Exchange 2019!

Monday, April 18, 2022

In the Beginning

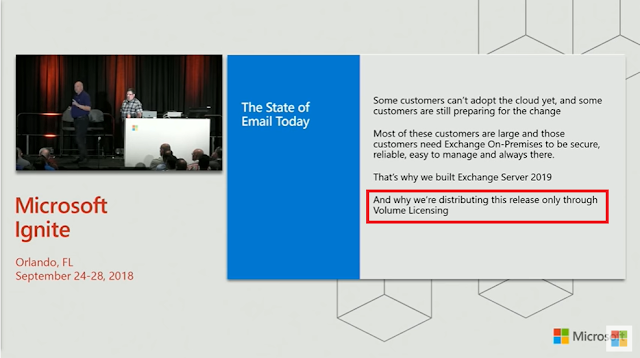
When Exchange 2019 was announced at Microsoft Ignite 2019, it was also announced that Exchange Server 2019 and its Cumulative Updates would be available only through the Volume Licensing Service Center (VLSC). It was explained that large enterprise customers were asking for security, reliability, and dependability. They want all the things that mean Exchange runs as a mission critical application.

Welcome to Exchange Server 2019! - BRK2176

As Greg Taylor, then Director of Product Marketing for Exchange Server/Online, said at the time, "For those customers who still want to stay on premises, that's the reason we built Exchange 2019. And that's also the reason why we are only going to distribute Exchange 2019 to those customers through Volume Licensing."

As anticipated, Exchange Server 2019 RTM and CUs 1-8 were only available through the VLSC and to developers for testing and application development through MSDN. And for the first time ever, the current version of Exchange Server was no longer available on the Office Servers Evaluation Center.

To access Exchange Server 2019 through the VLSC, customers must have an active agreement in one of the following Microsoft Volume Licensing programs:

  • Microsoft Enterprise Agreement (500+ seats)
  • Microsoft Products and Services Agreement (250+ seats)
  • Microsoft Open Value Agreement (5-499 seats)
See the Compare Microsoft Volume Licensing Programs resource document for full details.

I've found that most small-midsize customers mistakenly think that access to the VLSC requires an Enterprise Agreement or large minimum spend requirement. Plus, most of these customers buy licenses through a third-party license provider, like a Cloud Solution Provider or licensing distribution partners. Few of the customers I speak with have actually entered into a licensing agreement directly with Microsoft.

The VLSC requirement imposed a barrier that prevented these customers from accessing Exchange Server 2019. And if non-VLSC customers cannot get Exchange 2019, it means that Exchange 2016 is the latest version they could use for hybrid management after they have completed their migration to the cloud.

As we know, an Exchange server is still required for Exchange recipient management even after all mailboxes have been moved to Microsoft 365 since Active Directory is still the Source of Authority for hybrid customers.

Then HAFNIUM happened...

In March 2021 a state-sponsored hacking group called HAFNIUM targeted Exchange Servers around the world by exploiting zero-day vulnerabilities. Threat actors gained access to email servers and installed malware to facilitate long-term access to victim environments and to perform data exfiltration.

Microsoft quickly responded to HAFNIUM by releasing Security Updates (SUs) that patched the Exchange Server vulnerabilities and a short time later included these fixes in the March 2021 Quarterly Exchange Updates. In an effort to ensure that all customers could get and stay up-to-date, it was decided to publish Exchange Server 2019 CU9 and future CUs to the Microsoft Download Center in addition to the VLSC.

What This Means to Hybrid Customers

Exchange hybrid customers who have completed their migration to the cloud can now use Exchange Server 2019 as their hybrid management server. All customers can now run the latest version of Exchange server with the most recent CUs and SUs by downloading them from the Download Center, even with a Volume Licensing agreement.

CU's are build-to-build upgrades and contain a full server installation, so the latest CU can be used for a fresh installation. Always check the Exchange Team Blog for details on the latest CU. All customers, including hybrid customers, should keep their Exchange servers up to date using the N-1 support statement (the current and previous CUs and SUs are supported).

Keep in mind that currently there is no free Exchange hybrid license available for Exchange 2019 like there is for Exchange 2013/2016, so customers will need to license their Exchange Server 2019. See Big Exchange Announcements!

Customers with Exchange Server 2010 must keep in mind that Exchange Server 2019 will not install if Exchange 2010 is in the environment. Those customers must transition to Exchange Server 2016 and decommission Exchange 2010 before installing Exchange 2019.


Read more ...

Azure AD Connect V1.X versions no longer support the V2 endpoint

Thursday, November 4, 2021

Microsoft introduced the Azure AD Connect sync V2 endpoint with version 1.6.4.0 in March 2021. Among the improvements, the V2 endpoint includes performance improvements and allows for synchronization of groups with up to 250K members. Enterprise customers with groups of 50K or more were encouraged to move to the new V2 endpoint.

AAD Connect version 2.0.3.0 was released in July 2021 and was a major upgrade. It supports the V2 endpoint by default, but requires Windows Server 2016 or 2019 due to it's dependency on SQL Server Express 2019 for localDB. There are still many customers running AADC V1.x for this reason.

Today, Microsoft updated the AADC version history to say that the V2 endpoint is no longer available for V1.x versions

UPDATE - 11/10/2021: Microsoft just added the following information to the AAD Connect version history:

Known Issues

There is an issue where customers who have the V2 endpoint running with an older version and try to upgrade to a newer V1.6 release will see that the 50K limitation on group membership is reinstated. We will not fix this issue in V1.6 and require customers to upgrade to AADConnect V2.0 if this is an issue for them.

Azure AD Connect V1.x customers are strongly encouraged to update to V2.x, keeping in mind that this may require installing AADC V2.x on a new Windows 2016 or Windows 2019 server. I wrote a step-by-step article on upgrading here.

In the meantime, if you are still using Azure AD Connect 1.x you should make sure you're using the V1 endpoint using the following steps.

First, check to see which sync endpoint you're using with these cmdlets, run from the server where Azure AD Connect 1.x is running:

  • Import-Module 'C:\Program Files\Microsoft Azure AD Sync\Extensions\AADConnector.psm1'
  • Get-ADSyncAADConnectorExportApiVersion
  • Get-ADSyncAADConnectorImportApiVersion
If both Get-* cmdlets return the value "1", you're using the V1 endpoint. Nothing more to do here, except plan to upgrade to AAD Connect V2.x as soon as reasonable.

If the values returned are "2", you're using the V2 endpoint and need to change it back to V1.
  • Import-Module 'C:\Program Files\Microsoft Azure AD Sync\Extensions\AADConnector.psm1'
  • Set-ADSyncScheduler -SyncCycleEnabled $false
  • Set-ADSyncAADConnectorExportApiVersion 1
  • Set-ADSyncAADConnectorImportApiVersion 1
  • Set-ADSyncScheduler -SyncCycleEnabled $true
Be aware that the V1 endpoint cannot sync groups with 50K+ members. You should plan to upgrade to AAD Connect V2.x as soon as possible.

Read more ...

CHANGE LOG: View Quarantine add-in for Outlook

Monday, October 11, 2021

View Quarantine add-in for Outlook Change Log


Please see How to install an Outlook add-in to view the Microsoft 365 End-User Quarantine for a full description and installation instructions.


Version 1.0.0.0: Microsoft won't certify my add-in because they say it "does not provide significant value or benefits to commercial marketplace customers". I think most of you will disagree. I'll keep trying to get it certified, but in the meantime you can always install it from my website using the procedures from my blog article.

Version 1.0.1.0: Added automatic localization for 37 languages. Reinstall the add-in to if you need one of these languages. Please let me know if my translations need adjustments.


Version 1.1.1.0 : Added new manifest.xml (option 1) and ZIP file (option 2) deployments for GCC (Government Cloud) and GCC High (Government Cloud High) tenants.

Read more ...

Install an Outlook add-in to view the Microsoft 365 End-User Quarantine

Thursday, October 7, 2021
This article explains how to install an Outlook add-in called View Quarantine that will open the Microsoft 365 end-user quarantine in a browser with a single click. This makes it really easy to access the quarantine directly from Outlook. And since this is a true Office add-in, it also displays and works in Outlook mobile and Outlook on the web!

I'm happy to announce that the add-in now also works with Microsoft Government Community Clouds (GCC and GCC High)! View the change log for status and feature updates.

The add-in shows in the Outlook ribbon when viewing any folder that contains mail items. 

The View Quarantine add-in for Outlook

Simply click the button to open the Microsoft Defender Online end-user quarantine in your default browser. You may need to sign-in to view the quarantine.

The Microsoft 365 end-user quarantine

I originally built this add-in using the Build your first Outlook add-in - Office Add-ins documentation. This gave me a good head start to build and customize the add-in.

The add-in consists of three files plus icons in various sizes for the different platforms.

Source File

Description

commands.html

An HTML "wrapper" that calls the JavaScript used by the add-in when the button is clicked.

commands.js

The JavaScript functions that provide status and open the end-user quarantine in a browser.

manifest.xml

The real heart of the add-in. It defines the unique ID for the add-in and describes when to display the View Quarantine button and how the add-in functions.

assets folder

Contains six icon files of different sizes and opacity for Outlook, OWA, and Outlook mobile.


I'm currently in the process of publishing this add-in to the AppSource marketplace via the Microsoft Partner Center. Please see the change log. In the meantime, there are two ways you can install the View Quarantine add-in now.

Option 1 -- Install via the Web

You can install the add-in from my website until Microsoft publishes it on AppSource.
  • Open Outlook and click the Get-Add-ins button in the ribbon. Alternatively, click File and click the Manage Add-Ins button at the bottom.
  • Click My add-ins in the top left.
  • Click the + Add a custom add-in dropdown at the bottom of the window under Custom add-ins, then select Add from URL...
  • Enter the following URL: https://www.expta.com/quarantine/manifest.xml and click OK.
    • If your mailbox is in a GCC tenant use the following URL: https://www.expta.com/quarantine-gcc/manifest.xml
    • If your mailbox is in a GCC High tenant use the following URL: https://www.expta.com/quarantine-gcch/manifest.xml

  • You will see a warning before installation. Click Install to install the add-in.

  • The add-in will now be listed under Custom add-ins. Note: To remove the View Quarantine add-in at any time, click the ellipses (...) and select Remove.
  • Close the Add-ins window to add it to the Outlook ribbon.

Option 2 -- Install from Source Files

You can also install the add-in using the manifest.xml file in my source files.
  • Open Outlook and click the Get-Add-ins button in the ribbon (shown above).
  • Click My add-ins in the top left.
  • Click the + Add a custom add-in dropdown at the bottom of the window under Custom add-ins, then select Add from file...
  • Browse to the manifest.xml file and click Open.
  • You will see a warning before installation. Click Install to install the add-in.

  • The add-in will now be listed under Custom add-ins.
  • Close the Add-ins window to add it to the Outlook ribbon.

Deploying to All Users in the Organization

Once you're satisfied that the add-in is installed and working properly, you can deploy it to all users in your organization. Here's how to do that:
  • Open the Microsoft Admin Center and navigate to Settings > Integrated Apps > Add-Ins.
  • Click Deploy Add-In and Next.
  • Click the Upload Custom Apps button.
  • Select I have a URL for the manifest file and enter one of the following URLs:
    • For standard M365 use https://www.expta.com/quarantine/manifest.xml
    • For GCC use https://www.expta.com/quarantine-gcc/manifest.xml
    • For GCC High use https://www.expta.com/quarantine-gcch/manifest.xml
  • Select whether to install the add-in for everyone or specific users.
  • Select a Deployment Method.
    • Fixed (Default). The add-in will be automatically deployed to the assigned users and they will not be able to remove it from their ribbon.
    • Available. Users may install this add-in by clicking the Get More add-ins button on the home ribbon in Outlook and going to Admin-managed.
    • Optional. The add-in will be automatically deployed to the assigned users but they can choose to remove it from their ribbon.

I hope you enjoy this free Outlook add-in and you find it useful!

Read more ...

Notes and details on the eradication of Basic Authentication in Exchange Online

Wednesday, October 6, 2021


Unless you've been living under a rock, or are just blissfully unaware, Microsoft has been making a concerted push to remove Basic authentication from Exchange Online for some time.

There's a very good reason for this. Basic auth is a single factor authentication method (username/password), which is just too easy for the bad guys to guess and exploit. Modern Authentication, on the other hand, supports MFA and is much more secure. Disabling Basic auth in your tenant requires you to use Modern Auth for all authentication requests.

The trouble is that some legacy apps and clients still only use Basic auth. Fortunately, that list is getting shorter. As you may have read in the Microsoft Message Center or the Exchange Team Blog, Microsoft is currently disabling Basic auth in tenants that they've determined are not using it. I applaud this endeavor.

At a recent MVP meeting we discussed how this effort is being undertaken. Here are some notes and details on certain aspects that you might find useful or interesting.

  • Microsoft is examining tenants for actual Basic auth usage. They are not checking to see if the tenant has an Authentication Policy set or is using Conditional Access to block Basic authentication.
  • Basic auth is being disabled in the tenant configuration for all protocols except Autodiscover. Basic auth is required by Autodiscover for legacy (read, old) Outlook clients like Outlook 2013 and earlier. This alone is one of the best reasons to get off these old clients ASAP. See New minimum Outlook for Windows version requirements for Microsoft 365 starting November 1, 2021.
  • Basic auth for SMTP is being disabled for customers that don't use it by using the Set-TransportConfig -SmtpClientAuthenticationDisabled:$true command. Admins can reenable it by setting the value to $false. This setting can also be configured as a per-user setting, which is recommended. The user setting overrides the tenant setting.
  • Authentication Policies are the preferred way to disable Basic auth, rather than Conditional Access policies. CA policies only apply AFTER the user has already signed in.
  • You can use Authentication Policies to disable Basic auth for Autodiscover (and all other protocols). That means that if you may have two areas to check if you need to reenable Basic auth for a protocol -- the Auth Policy and the tenant configuration settings that Microsoft is using.
  • For a limited time, tenant admins can use the Basic Auth troubleshooter to run diagnostics and provide self-service options to reenable Basic auth for Exchange Online protocols such as POP3, IMAP4, Exchange ActiveSync, Exchange Web Services, Offline Address Book, MAPI, RPC and Remote PowerShell. Simply click the Help & Support button on any O365 portal and type Diag: Enable Basic Auth in EXO.
  • So far, they have disabled Basic auth in thousands of tenants since they started. Only 0.06% of tenants have reenabled Basic auth for a specific protocol, and all of them using the self-help troubleshooter.
  • Tenant admins can tell if Basic auth has been disabled in their tenant by connecting to Exchange Online PowerShell and running Get-OrganizationConfig | fl basic*. The BasicAuthBlockedApps property value will be 0 if Basic auth is still enabled or 255 if it's been fully disabled. This value is a bit mask for each of the following protocol values, totaling 255. Thanks to Greg Taylor for the secret decoder ring. 😊

Protocol

Action

Value

ActiveSync

Block Basic for Exchange ActiveSync

1

WebServices

Block Basic for Exchange Web Services

2

POP

Block Basic for POP3 Clients

4

IMAP

Block Basic for IMAP4 Clients

8

PowerShell

Block Basic for PowerShell

16

MAPI

Block Basic for MAPI Protocol

32

OAB

Block Basic for Offline Address Book

64

RPC

Block Basic for RPC Protocol

128

  • Be aware that if you've configured a client to connect using Basic auth (Outlook for Mac, for example), it will likely require you to reconfigure the client profile to use Modern Auth after Basic is disabled.
This information should be helpful in your "Death to Basic Auth" journey.

Read more ...

Time is running out for Comms vNext 2021

Wednesday, October 6, 2021
Do you manage the exciting Microsoft Teams collaboration workspace? Are you tired of the thin content of virtual conferences? Do you miss the in-person collaboration and relationship-building that only an in-person conference can bring? Then you should come to Comms vNext Reconnect on October 25-26, 2021 in Denver, CO!


Comms vNext is an independent, Community-led event, created and fashioned with the Community in mind.

Here, you will meet with leaders in the Microsoft Teams community to learn best practices and how to be successful in your engagements. This in-person event will be held at the  Renaissance Denver Central Park Hotel in Denver, Colorado, with special pricing for Comms vNext attendees.


Read more ...

IMPORTANT: AAD Connect versions 1.x will retire August 31, 2022

Friday, August 27, 2021


Microsoft released AAD Connect version 2.0.8.0 on August 10, 2021 which included many important changes. Not the least of which is that the localDB database used by AADC was changed to SQL Server 2019. This means that AAD Connect version 2.x can only run on Windows Server 2016 or later, since that's a requirement for SQL Server 2019.

Today, Microsoft posted in the Azure Active Directory Connect version history that all 1.x versions of AAD Connect will be retired August 31, 2022, roughly one year after version 2.x was released.

Important

On 31 August 2022, all 1.x versions of Azure Active Directory (Azure AD) Connect will be retired because they include SQL Server 2012 components that will no longer be supported. Either upgrade to the most recent version of Azure AD Connect (2.x version) by that date, or evaluate and switch to Azure AD cloud sync.

You need to make sure you are running a recent version of Azure AD Connect to receive an optimal support experience.

If you run a retired version of Azure AD Connect it may unexpectedly stop working and you may not have the latest security fixes, performance improvements, troubleshooting and diagnostic tools and service enhancements. Moreover, if you require support we may not be able to provide you with the level of service your organization needs.

Go to this article to learn more about Azure Active Directory Connect V2.0, what has changed in V2.0 and how this change impacts you.

Please refer to this article to learn more about how to upgrade Azure AD Connect to the latest version.

For version history information on retired versions, see Azure AD Connect version release history archive

A few notes on this announcement:

  1. "Retired" doesn't necessarily mean it won't work anymore, but I suspect Microsoft will eventually block it in the future. You should ALWAYS keep AAD Connect up-to-date for the best features, performance, and security.
  2. Although the announcement mentions evaluating and switching to Azure AD cloud sync, be aware that AAD cloud sync is not compatible with Exchange. See my article, How to Decide Between Azure AD Connect and Azure AD Connect Cloud Sync on the Practical365 blog. I also recorded a video podcast about AAD cloud sync with Steve Goodman from Practical365 here.
  3. Refer to my article, How to migrate AAD Connect to a new server for step-by-step instructions how to move AAD Connect to a new Windows 2016 Server using the latest version of AADC. There's really no better time to do it than now.

Read more ...

Where do those "# Questionable URLs detected in message" emails come from?

Monday, August 23, 2021

Exchange Online admins may receive emails from time-to-time with the line, "# Questionable URLs detected in message:". The email includes the SMTP headers, a text-only version of the original message, and the original message included as an attachment.

Where are these emails coming from and why are you getting them?

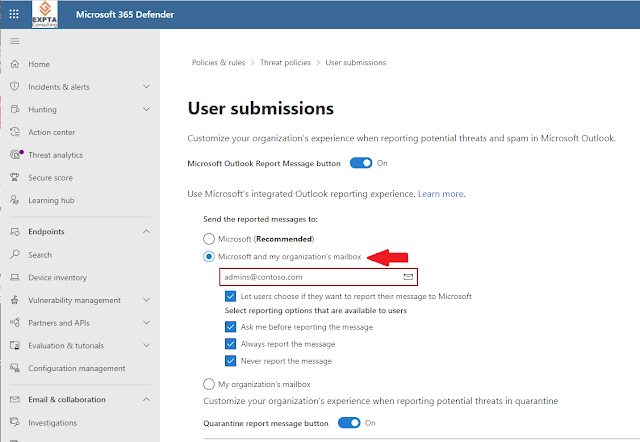
The answer lies within the User Submissions configuration in the Microsoft Defender portal (https://security.microsoft.com). Go to User submissions - Microsoft 365 security and check the Send the reported messages to: configuration.

The default and recommended setting is to send reported messages only to Microsoft, but you can reconfigure it to send to Microsoft and another email address in your organization.


This will send diagnostic info to both Microsoft and the internal email address you specified.

What isn't obvious is that Safe Links in Microsoft Defender for Office 365 (formerly ATP) uses the same configuration. When Safe Links detects questionable URLs in an email, that diagnostic information is sent the same way as User Submissions. So if you've configured User Submissions to send reported messages to an internal email address, you will get Safe Link reports to that address, too.


Read more ...

How to migrate AAD Connect to a new server

Wednesday, July 21, 2021

As I posted earlier, Microsoft has released Azure Active Directory Connect version 2.0.3, which now requires Windows Server 2016 or later. Customers running AAD Connect on Windows Server 2012 or Windows Server 2012 R2 will need to install a new copy of AADC on new Windows Server 2016 computer or later.

In this walk-through I will show you how to do this and migrate all your current settings to the new Windows 2016 server. These same steps can be used whenever you wish to move AADC to a new server.

The high-level steps are:

  • Export the existing AAD Connect configuration from the current server.
  • Install the latest version of AADC on a new or existing Windows Server 2016 computer.
  • Import the AADC configuration, put it into staging mode, and sync.
  • Uninstall AADC from the old server.
  • Remove the new server from staging mode.


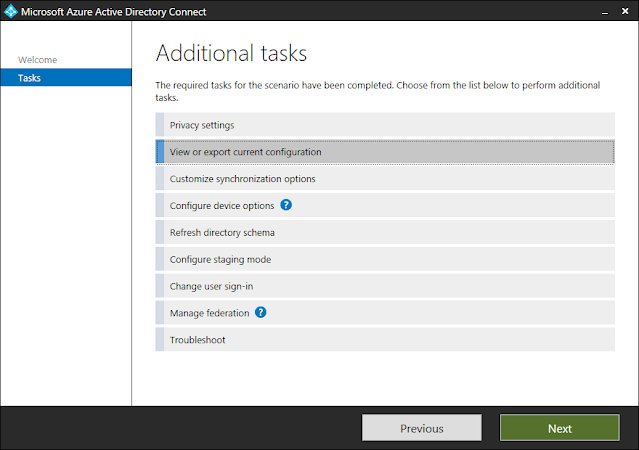
Begin by exporting the AADC configuration on the current server. Open Azure AD Connect and select View or export current configuration.

Select View or export current configuration and click Next

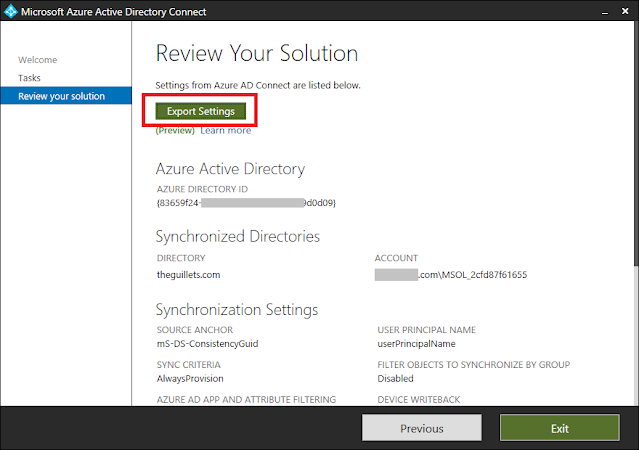
Click the Export Settings button

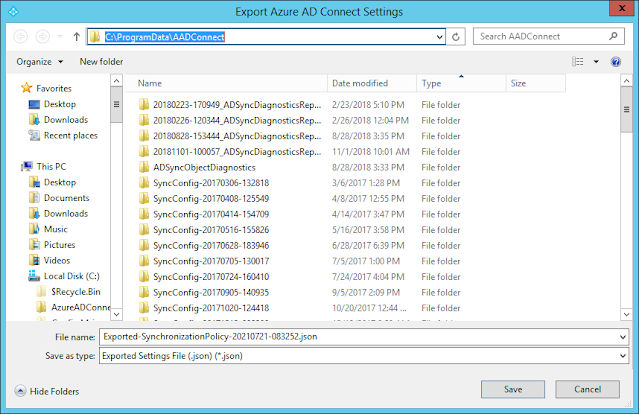
The settings will be exported as a single JSON file in C:\ProgramData\AADConnect by default.
Copy this file to the new AAD Connect server.

Now login to the Windows Server 2016 or later computer where you want to install AADC. This can be either a new or existing domain-joined server.

Download the latest version of AAD Connect from https://www.microsoft.com/en-us/download/details.aspx?id=47594 and install it.

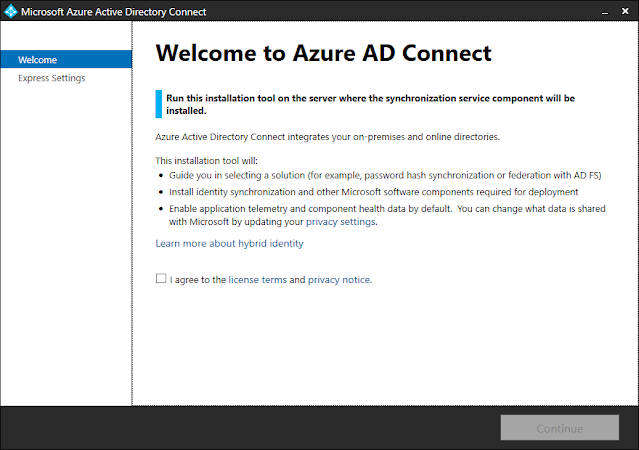
Start the AADC installer.


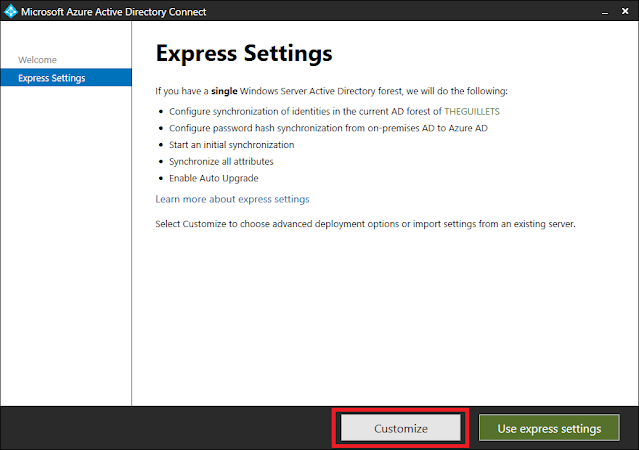
Select Customize since we're going to import the existing config.

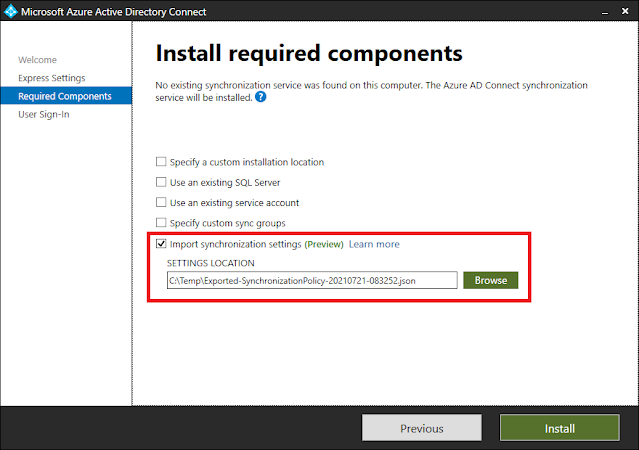
Check Import synchronization settings and browse to the JSON file you copied from the old server.
Click Install to begin the installation.

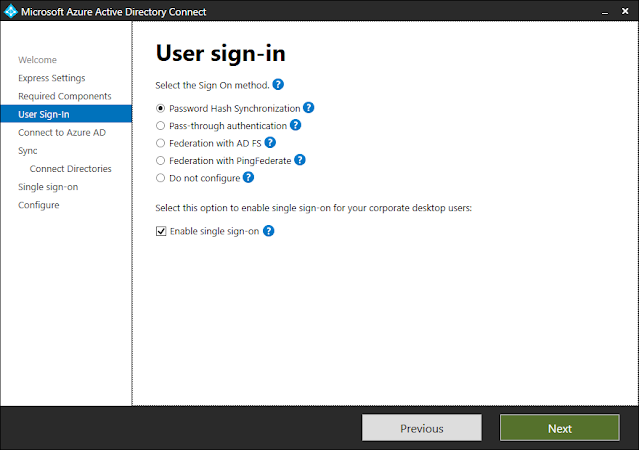
The installer will walk you through setup using the existing config, similar to a manual upgrade.

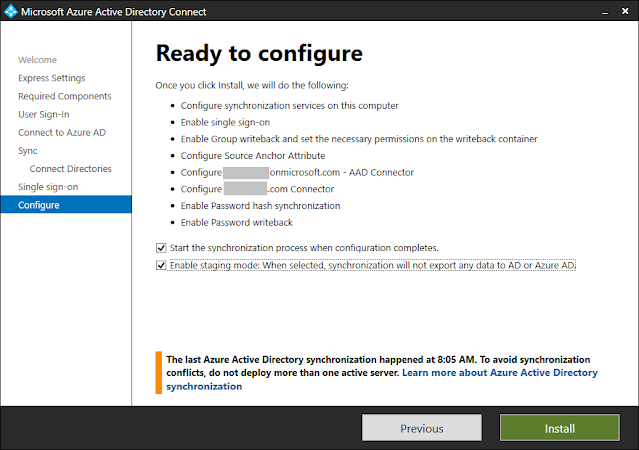
Make sure Enable staging mode is checked, then click Install.

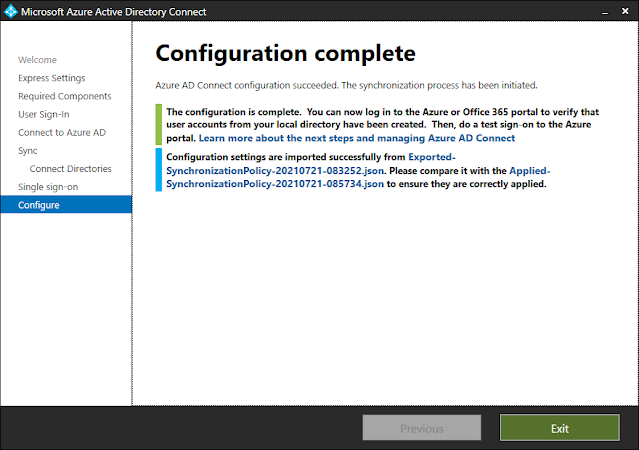
Installation will take a few minutes to complete and should look like this. Click Exit.

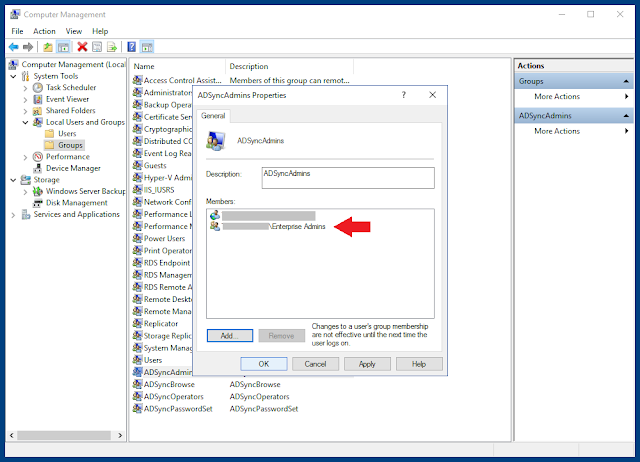
Open Computer Management on the new server and add the domain's Enterprise Admins group to the local ADSyncAdmins group so they can manage AAD Connect. Log off and back on to get the new management permissions.

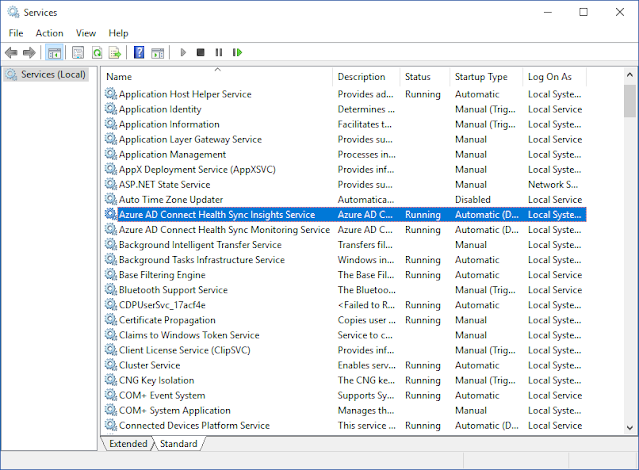
You will notice that the two Azure AD Connect Health Sync services and the Microsoft Azure AD Sync service are now installed and running on the new server.

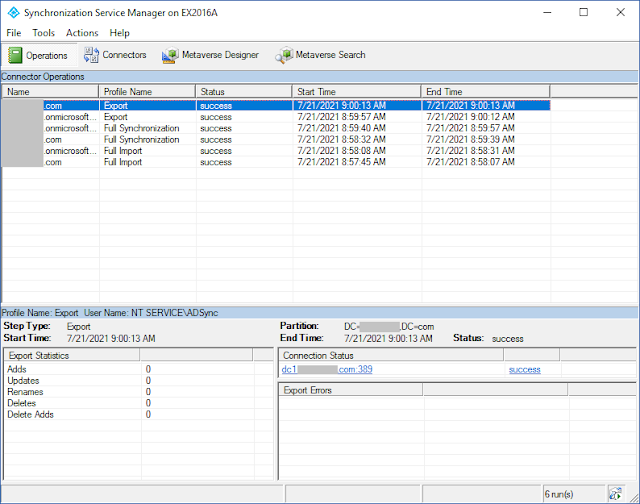
Open the Synchronization Service Manager client located at "C:\Program Files\Microsoft Azure AD Sync\UIShell\miisclient.exe". You will see that the initial full sync occured on the new server.

Now you're ready to complete the AAD Connect migration by uninstalling AADC from the old server and disabling staging mode on the new server.

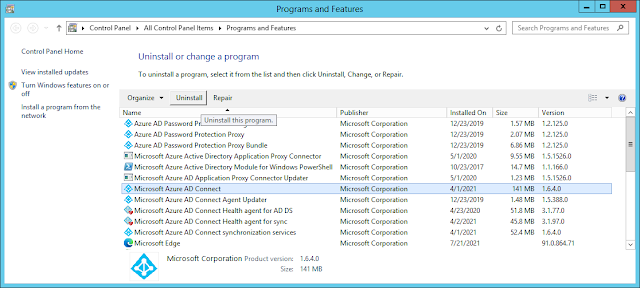
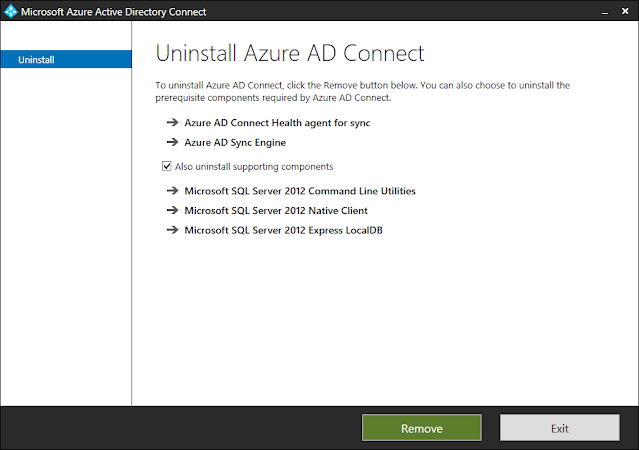
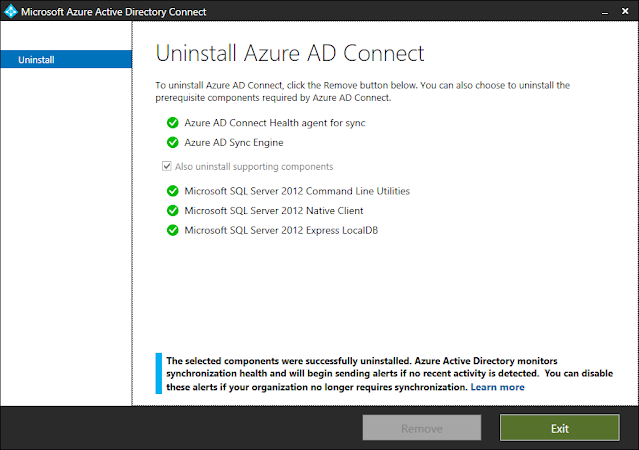
Login to the old AADC server, open Programs and Features, and uninstall Microsoft Azure AD Connect.

Make sure to check "Also uninstall supporting components" and click Remove.

AADC is successfully uninstalled from the old server.

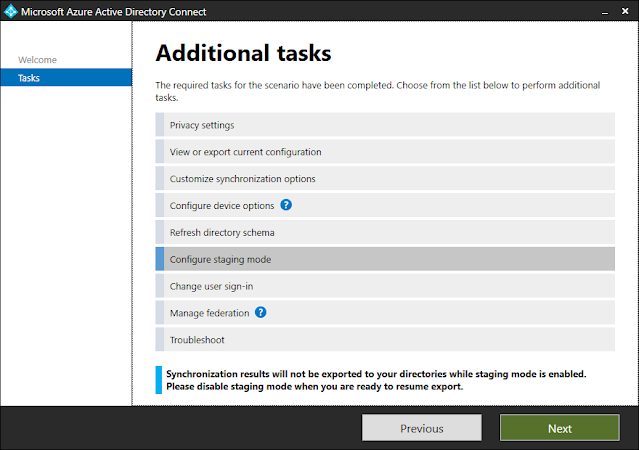
Now login to the new AADC server again and run Azure AD Connect to disable staging mode.

Select Configure Staging Mode and click Next.


Enter the tenant credentials for an admin who has Hybrid Identity Administrator or Global Admin rights.

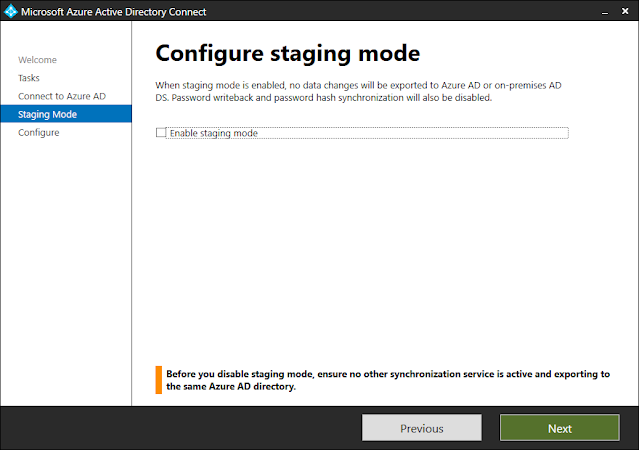
Clear the checkbox to Enable staging mode and click Next.


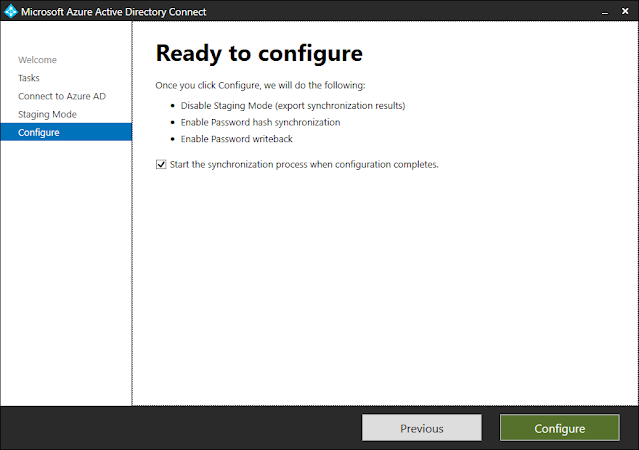
Click Configure to disable staging mode and start the sync process.

Click Exit. The migration to the new AAD Connect server is now complete!


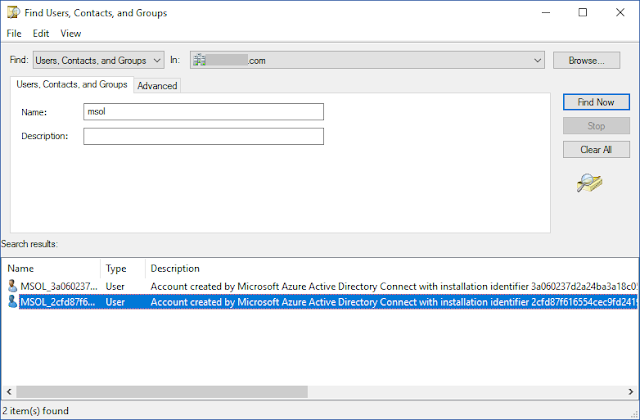
The final step is to delete the old MSOL_<guid> user account from Active Directory. You will find one MSOL_<guid> user account for each AADC installation. Uninstalling AADC does not remove the old account from AD.

Using Active Directory Users and Computers, find the MSOL accounts. They will be normally in the Users container by default. Examine the Description which will tell you which computer created each account.

Delete the MSOL_<guid> account that was created by the old AADC server.


Read more ...