Showing posts with label Windows Server 2019. Show all posts

Yes, Virginia, You Can Buy Exchange 2019!

Monday, April 18, 2022

In the Beginning

When Exchange 2019 was announced at Microsoft Ignite 2019, it was also announced that Exchange Server 2019 and its Cumulative Updates would be available only through the Volume Licensing Service Center (VLSC). It was explained that large enterprise customers were asking for security, reliability, and dependability. They want all the things that mean Exchange runs as a mission critical application.
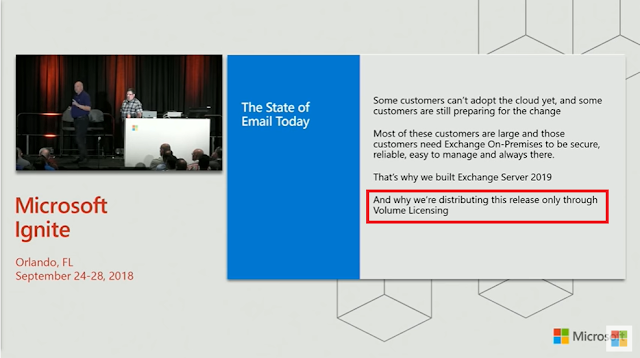
Welcome to Exchange Server 2019! - BRK2176

As Greg Taylor, then Director of Product Marketing for Exchange Server/Online, said at the time, "For those customers who still want to stay on premises, that's the reason we built Exchange 2019. And that's also the reason why we are only going to distribute Exchange 2019 to those customers through Volume Licensing."

As anticipated, Exchange Server 2019 RTM and CUs 1-8 were only available through the VLSC and to developers for testing and application development through MSDN. And for the first time ever, the current version of Exchange Server was no longer available on the Office Servers Evaluation Center.

To access Exchange Server 2019 through the VLSC, customers must have an active agreement in one of the following Microsoft Volume Licensing programs:

  • Microsoft Enterprise Agreement (500+ seats)
  • Microsoft Products and Services Agreement (250+ seats)
  • Microsoft Open Value Agreement (5-499 seats)
See the Compare Microsoft Volume Licensing Programs resource document for full details.

I've found that most small-midsize customers mistakenly think that access to the VLSC requires an Enterprise Agreement or large minimum spend requirement. Plus, most of these customers buy licenses through a third-party license provider, like a Cloud Solution Provider or licensing distribution partners. Few of the customers I speak with have actually entered into a licensing agreement directly with Microsoft.

The VLSC requirement imposed a barrier that prevented these customers from accessing Exchange Server 2019. And if non-VLSC customers cannot get Exchange 2019, it means that Exchange 2016 is the latest version they could use for hybrid management after they have completed their migration to the cloud.

As we know, an Exchange server is still required for Exchange recipient management even after all mailboxes have been moved to Microsoft 365 since Active Directory is still the Source of Authority for hybrid customers.

Then HAFNIUM happened...

In March 2021 a state-sponsored hacking group called HAFNIUM targeted Exchange Servers around the world by exploiting zero-day vulnerabilities. Threat actors gained access to email servers and installed malware to facilitate long-term access to victim environments and to perform data exfiltration.

Microsoft quickly responded to HAFNIUM by releasing Security Updates (SUs) that patched the Exchange Server vulnerabilities and a short time later included these fixes in the March 2021 Quarterly Exchange Updates. In an effort to ensure that all customers could get and stay up-to-date, it was decided to publish Exchange Server 2019 CU9 and future CUs to the Microsoft Download Center in addition to the VLSC.

What This Means to Hybrid Customers

Exchange hybrid customers who have completed their migration to the cloud can now use Exchange Server 2019 as their hybrid management server. All customers can now run the latest version of Exchange server with the most recent CUs and SUs by downloading them from the Download Center, even with a Volume Licensing agreement.

CU's are build-to-build upgrades and contain a full server installation, so the latest CU can be used for a fresh installation. Always check the Exchange Team Blog for details on the latest CU. All customers, including hybrid customers, should keep their Exchange servers up to date using the N-1 support statement (the current and previous CUs and SUs are supported).

Keep in mind that currently there is no free Exchange hybrid license available for Exchange 2019 like there is for Exchange 2013/2016, so customers will need to license their Exchange Server 2019. See Big Exchange Announcements!

Customers with Exchange Server 2010 must keep in mind that Exchange Server 2019 will not install if Exchange 2010 is in the environment. Those customers must transition to Exchange Server 2016 and decommission Exchange 2010 before installing Exchange 2019.


Read more ...

Windows Server Reboot Loop After Installing January 2022 Security Updates

Sunday, January 16, 2022
It seems all my blog posts are about Microsoft update failures lately: (

I've seen several reports of Windows Server 2012 R2, 2019, and 2022 getting stuck in a reboot loop after installing the January Windows Updates. Specifically, these updates:
  • KB5009624 for Windows Server 2012 R2
  • KB5009557 for Windows Server 2019
  • KB5009555 for Windows Server 2022
Microsoft is currently aware of the issue.


To fix the issue, restart the computer in Safe Mode which will allow you to login and remove the offending update from Windows Update. You can normally get into Safe Mode by pressing F8 immediately after the server starts.

Domain Controllers are a little more tricky, since there isn't a local user account to login with. For DCs you should restart in Safe Mode with Networking. This will allow you to login with a Domain Admin account.

To remove the update from the command line, run the the appropriate command for your operating system:

Windows Server 2012 R2:
wusa /uninstall /kb:5009624

Windows Server 2019:
wusa /uninstall /kb:5009557

Windows Server 2022:
wusa /uninstall /kb:5009555

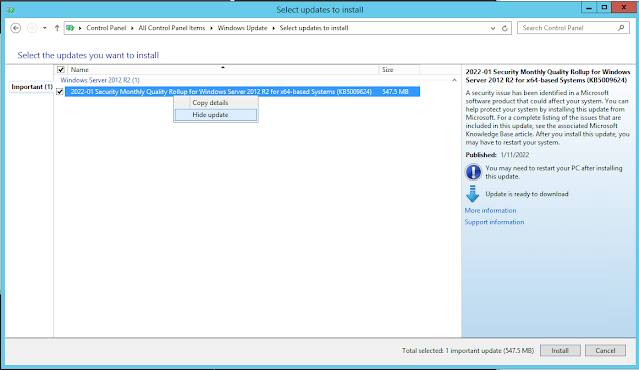
I found that if the server is configured to automatically download and install updates it will reinstall the errant update all over again. Grrrr. To prevent this, you can hide the update from reinstalling.
  • Uninstall the update and then run run Check for Updates from Windows Update in the server.
  • Right-click the update and select Hide Update to prevent it from being reinstalled.

I, for one, am really getting tired of poor quality of updates coming from Microsoft these days. There's simply no excuse for this.

UPDATE - January 17, 2022

Microsoft is releasing Out-of-band (OOB) updates today, January 17, 2022, for some versions of Windows. This update addresses issues related to VPN connectivityWindows Server Domain Controllers restartingVirtual Machines start failures, and ReFS-formatted removable media failing to mount. All updates are available on the Microsoft Update Catalog, and some are also available on Windows Update as an optional update. Check the release notes for your version of Windows for more information.

Updates for the following Windows versions are available on Windows Update as an optional update. For instructions, see the KB for your OS listed below:

·         Windows 11, version 21H1 (original release): KB5010795

·         Windows Server 2022: KB5010796

·         Windows 10, version 21H2: KB5010793

·         Windows 10, version 21H1: KB5010793

·         Windows 10, version 20H2, Windows Server, version 20H2: KB5010793

·         Windows 10, version 20H1, Windows Server, version 20H1: KB5010793

·         Windows 10, version 1909, Windows Server, version 1909: KB5010792

·         Windows 10, version 1607, Windows Server 2016: KB5010790

·         Windows 10, version 1507: KB5010789

·         Windows 7 SP1: KB5010798

·         Windows Server 2008 SP2: KB5010799

Updates for the following Windows versions are available only on Microsoft Update Catalog. For instructions, see the KB for your OS listed below:

·         Windows 8.1, Windows Server 2012 R2: KB5010794

·         Windows Server 2012: KB5010797


Read more ...

Script to Set Exchange Server Antivirus Exclusions for Windows Defender

Wednesday, June 30, 2021

Microsoft released the June 2021 Quarterly Exchange Updates which now includes Exchange Server AMSI integration. 

The Antimalware Scan Interface (AMSI) allows antivirus software, such as Windows Defender which is installed by default on Windows Server 2016 and Windows Server 2019, to dynamically scan for malware such as the web shells created by the HAFNIUM attack earlier this year. Here's the Microsoft announcement which includes links to Exchange Server 2019 CU 10 and Exchange Server 2016 CU 21:

Exchange Server AMSI Integration

As mentioned in our recent blog post, the June 2021 CUs include new Exchange Server integration with AMSI (Antimalware Scan Interface). AMSI exists in Windows Server 2016 and Windows Server 2019, and the new integration is available in Exchange 2016 and Exchange 2019 when running on either of those operating systems. For Exchange 2016, AMSI integration is available only when running on Windows Server 2016. It is not available for Exchange 2016 running on Windows Server 2012 or Windows Server 2012 R2.

AMSI integration in Exchange Server provides the ability for an AMSI-capable antivirus/antimalware solution to scan content in HTTP requests sent to Exchange Server and block a malicious request before it is handled by Exchange Server. The scan is performed in real-time by any AMSI-capable antivirus/antimalware solution that runs on the Exchange server as the server begins to process the request. This provides automatic mitigation and protection that compliments the existing antimalware protection in Exchange Server to help make your Exchange servers more secure.

Because we know that some of our customers modify the web.config file on their Exchange Server, we wanted to let you know that installation of the June 2021 CUs will add a new section in the web.config of every HTTP service under <Modules>. The entry will be called "HttpRequestFilteringModule" and it must be present for AMSI integration to work.

AMSI helps keep your Exchange servers protected from malware, but it's still imperative to set the antivirus exclusions for Exchange Server as per the article, Running Windows antivirus software on Exchange servers on Microsoft Docs. This is required to prevent anti-virus/anti-malware solutions from potentially corrupting the Exchange Server installation, worker processes, and databases. Trust me. I've seen this happen many times and it usually ends up with a complete server rebuild.

If you've ever looked at this document, it lists many folder, process, and file name extension exclusions. To ease this configuration for Windows Defender I created the following Set-ExchangeAntivirusExclusionsForDefender.ps1 PowerShell script. 

Please note this script only works for Windows Defender running on Windows Server 2016 or 2019. If you're running another antivirus or antimalware solution, you'll still need to configure these exclusions some other way.

Simply copy the text below to a Set-ExchangeAntivirusExclusionsForDefender.ps1 file on your Exchange server and run it from EMS.
#Sets Exchange 2016/2019 antivirus exclusions for Windows Defender
#Author: Jeff Guillet | MCSM | MVP, jguillet@expta.com
#Ref: https://docs.microsoft.com/en-us/Exchange/antispam-and-antimalware/windows-antivirus-software?view=exchserver-2019

$m = Get-Module -ListAvailable Defender
if ($m -eq $null) {
Write-Host "Windows Defender is not installed on" (Get-WmiObject -class Win32_OperatingSystem).Caption
Exit
}

$ExchangeInstallPath = $Env:ExchangeInstallPath -replace ".$"

$excludedPaths = @( "$Env:SystemDrive\ExchangeSetupLogs", `
"$ExchangeInstallPath", `
"$Env:WinDir\SoftwareDistribution", `
"$Env:SystemRoot\Cluster", `
"$Env:SystemRoot\Microsoft.NET\Framework64\v4.0.30319\Temporary ASP.NET Files", `
"$Env:SystemRoot\System32\Inetsrv" ), `
"$Env:SystemDrive\inetpub\temp\IIS Temporary Compressed Files"

$excludedExtensions = @( "config", "chk", "edb", "jfm", "jrs", "log", "que", "dsc", "txt", "cfg", "grxml", "lzx" )

$excludedProcesses = @( "$ExchangeInstallPath\Bin\Search\Ceres\Runtime\1.0\noderunner.exe", `
"$ExchangeInstallPath\Bin\EdgeTransport.exe", `
"$ExchangeInstallPath\Bin\Microsoft.Exchange.AntispamUpdateSvc.exe", `
"$ExchangeInstallPath\Bin\Microsoft.Exchange.Diagnostics.Service.exe", `
"$ExchangeInstallPath\Bin\Microsoft.Exchange.Directory.TopologyService.exe", `
"$ExchangeInstallPath\Bin\Microsoft.Exchange.AntispamUpdateSvc.exe", `
"$ExchangeInstallPath\Bin\Microsoft.Exchange.EdgeCredentialSvc.exe", `
"$ExchangeInstallPath\Bin\Microsoft.Exchange.EdgeSyncSvc.exe", `
"$ExchangeInstallPath\Bin\Microsoft.Exchange.Notifications.Broker.exe", `
"$ExchangeInstallPath\Bin\Microsoft.Exchange.ProtectedServiceHost.exe", `
"$ExchangeInstallPath\Bin\Microsoft.Exchange.RPCClientAccess.Service.exe", `
"$ExchangeInstallPath\Bin\Microsoft.Exchange.Search.Service.exe", `
"$ExchangeInstallPath\Bin\Microsoft.Exchange.Servicehost.exe", `
"$ExchangeInstallPath\Bin\Microsoft.Exchange.Store.Service.exe", `
"$ExchangeInstallPath\Bin\Microsoft.Exchange.Store.Worker.exe", `
"$ExchangeInstallPath\Bin\MSExchangeCompliance.exe", `
"$ExchangeInstallPath\Bin\MSExchangeDagMgmt.exe", `
"$ExchangeInstallPath\Bin\MSExchangeDelivery.exe", `
"$ExchangeInstallPath\Bin\MSExchangeFrontendTransport.exe", `
"$ExchangeInstallPath\Bin\MSExchangeHMHost.exe", `
"$ExchangeInstallPath\Bin\MSExchangeHMWorker.exe", `
"$ExchangeInstallPath\Bin\MSExchangeMailboxAssistants.exe", `
"$ExchangeInstallPath\Bin\MSExchangeMailboxReplication.exe", `
"$ExchangeInstallPath\Bin\MSExchangeRepl.exe", `
"$ExchangeInstallPath\Bin\MSExchangeSubmission.exe", `
"$ExchangeInstallPath\Bin\MSExchangeTransport.exe", `
"$ExchangeInstallPath\Bin\MSExchangeTransportLogSearch.exe", `
"$ExchangeInstallPath\Bin\MSExchangeThrottling.exe", `
"$ExchangeInstallPath\Bin\OleConverter.exe", `
"$ExchangeInstallPath\Bin\UmService.exe", `
"$ExchangeInstallPath\Bin\UmWorkerProcess.exe", `
"$ExchangeInstallPath\Bin\wsbexchange.exe", `
"$ExchangeInstallPath\FIP-FS\Bin\fms.exe", `
"$ExchangeInstallPath\Bin\Search\Ceres\HostController\hostcontrollerservice.exe", `
"$ExchangeInstallPath\TransportRoles\agents\Hygiene\Microsoft.Exchange.ContentFilter.Wrapper.exe", `
"$ExchangeInstallPath\FrontEnd\PopImap\Microsoft.Exchange.Imap4.exe", `
"$ExchangeInstallPath\ClientAccess\PopImap\Microsoft.Exchange.Imap4service.exe", `
"$ExchangeInstallPath\FrontEnd\PopImap\Microsoft.Exchange.Pop3.exe", `
"$ExchangeInstallPath\ClientAccess\PopImap\Microsoft.Exchange.Pop3service.exe", `
"$ExchangeInstallPath\FrontEnd\CallRouter\Microsoft.Exchange.UM.CallRouter.exe", `
"$ExchangeInstallPath\Bin\Search\Ceres\ParserServer\ParserServer.exe", `
"$ExchangeInstallPath\FIP-FS\Bin\ScanEngineTest.exe", `
"$ExchangeInstallPath\FIP-FS\Bin\ScanningProcess.exe", `
"$ExchangeInstallPath\FIP-FS\Bin\UpdateService.exe", `
"$Env:SystemRoot\System32\Dsamain.exe", `
"$Env:SystemRoot\System32\inetsrv\inetinfo.exe", `
"$Env:Systemroot\System32\WindowsPowerShell\v1.0\Powershell.exe", `
"$Env:SystemRoot\System32\inetsrv\W3wp.exe" )

$excludedPaths | ForEach {if (!(Test-Path -Path $_ )) {New-Item -ItemType Directory -Path $_ }; Add-MpPreference -ExclusionPath $_ }
$excludedExtensions | ForEach {Add-MpPreference -ExclusionExtension $_ }
$excludedProcesses | ForEach {Add-MpPreference -ExclusionProcess $_ }
Be sure to run this from all your Exchange servers including those used for hybrid and Edge Transport after installation. You do not need to run it again after CU installations, but it won't hurt anything if you do.

Read more ...

How to install Exchange Server 2019 on Windows Server 2019 Core Step-by-Step

Tuesday, July 24, 2018
The following article is a step by step walk-through for installing Exchange Server 2019 on Windows Server 2019 Server Core.
If you're looking for a super-fast and inexpensive lab server, check out my home lab server builds!
As announced, Exchange 2019 can be installed either on Windows Server 2019 with a GUI or Windows Server 2019 Core. Since Server Core lacks most GUI aspects, we need to use PowerShell and Remote Server Administration Tools (RSAT) to manage and administer Server Core. Here's how to install Windows Server 2019 Core and install Exchange Server 2019.

Install Windows Server 2019 Core:

You can download the Windows Server 2019 preview here.
Boot to the Windows Server 2019 Core ISO and run setup:
  • Set Language, Time, and keyboard, Next
  • Click Install Now
  • Select the Operating System you want to install (Windows Server Standard or Windows Server Datacenter), Next
  • Accept the license terms, Next
  • Select Custom Installation
  • Select the drive where you want to install Windows, Next. Windows will install and the server will restart.

The Administrator's password must be changed before signing in:
  • Select OK to change it. 
  • Enter the password twice to confirm and select OK again to sign in.
  • Welcome to Server Core! Exciting, ain't it?

Run sconfig.cmd to configure the server (in this order):
  • 2) Change Computer Name and restart. You must do this first if you're recovering an existing Exchange 2019 server.
  • 8) Configure Network Settings (it's currently using DHCP). Set static IP, netmask, and default gateway. Then configure the DNS Servers.
  • 7) Enable Remote Desktop (optional)
  • 5) Configure Windows Update Settings (Automatic, DownloadOnly, or Manual)
  • 6) Download and Install Updates
  • 10) Configure Telemetry settings (optional)
  • 1) Change Domain/Workgroup to join a domain. Restart.

Press Ctrl-Alt-Del to sign-in to the server with the Domain Admin account:

  • Enter the username and password for the Domain Admin account

To enable file sharing so you can copy files to the new server, run the following from the CMD window:
netsh advfirewall firewall set rule group="File and Printer Sharing" new enable=Yes
To enable the High Performance power configuration (recommended for Server Core VMs) run:
powercfg -setactive 8c5e7fda-e8bf-4a96-9a85-a6e23a8c635c
Now that Server Core on Windows Server 2019 is setup, we can install Exchange Server 2019.

Install Exchange Server 2019 on Windows Server 2019 Core:

You can download the Exchange Server 2019 Public Preview here.
Sign-in to Server Core with an account with Domain Admin, Enterprise Admin, and Schema Admin rights. If you're adding another server to an existing Exchange organization, you'll also need to be a member of Organization Administrators.

Mount the Exchange Server 2019 ISO. You can either mount it in your VM or copy the ISO to the new server and mount it in PowerShell by running the following cmdlet:
Mount-DiskImage -ImagePath "C:\Temp\ExchangeServer2019-x64.iso"
Change to the drive letter that represents the mounted ISO and run Setup to install most of the Exchange 2019 prerequisites:
Setup.EXE /Mode:Install /InstallWindowsComponents /IAcceptExchangeServerLicenseTerms /Roles:MB
Notice I said "most" of the prerequisites. The command above will install all the Windows Server roles and features, but Exchange 2019 still requires the Unified Communications Managed API (UCMA) runtime 4.0. You can't install UCMA until the Windows Server features are installed first. You may ask, "Why does Exchange 2019 still need UCMA even though Unified Messaging has been removed from the product?" The answer is, it's required for Lync and Skype for Business integration.

Setup will tell you to download UCMA 4.0 from a URL, but that setup won't work on Server Core. Instead, install the version included in the Exchange Server 2019 ISO in the UCMARedist folder.

Setup will also tell you to install the Visual C++ 2013 Redistributable Package from here. This one you'll have to download and install. I expect this will be included automatically by the time Exchange 2019 ships.

If you'd rather install the Windows prerequisites yourself from PowerShell instead of letting Setup do it, run the following cmdlet:
Install-WindowsFeature Web-WebServer,Web-Common-Http,Web-Default-Doc,Web-Dir-Browsing,Web-Http-Errors,Web-Static-Content,Web-Http-Redirect,Web-Health,Web-Http-Logging,Web-Log-Libraries,Web-Request-Monitor,Web-Http-Tracing,Web-Performance,Web-Stat-Compression,Web-Dyn-Compression,Web-Security,Web-Filtering,Web-Basic-Auth,Web-Client-Auth,Web-Digest-Auth,Web-Windows-Auth,Web-App-Dev,Web-Net-Ext45,Web-Asp-Net45,Web-ISAPI-Ext,Web-ISAPI-Filter,Web-Mgmt-Tools,Web-Mgmt-Compat,Web-Metabase,Web-WMI,Web-Mgmt-Service,NET-Framework-45-ASPNET,NET-WCF-HTTP-Activation45,NET-WCF-MSMQ-Activation45,NET-WCF-Pipe-Activation45,NET-WCF-TCP-Activation45,Server-Media-Foundation,MSMQ-Services,MSMQ-Server,RSAT-Feature-Tools,RSAT-Clustering,RSAT-Clustering-PowerShell,RSAT-Clustering-CmdInterface,RPC-over-HTTP-Proxy,WAS-Process-Model,WAS-Config-APIs
Now install the UCMA runtime and the Visual C++ 2013 Redistributable Package, then run Setup again. This time we don't need to specify installing the prerequisites:
Setup.EXE /Mode:Install /IAcceptExchangeServerLicenseTerms /Roles:MB
If you'd rather run Exchange Setup in the GUI mode, you can do that too and take advantage of the rebootless Windows component installation in Windows Server 2019 server core. Simply run Setup and let it install the prerequisites. Setup will halt because UCMA 4.0 and the Visual C++ 2013 Redistributable Package are not installed - install them. Then click Retry in Exchange Setup and it will continue on with the installation. Awesome!

Once setup completes, restart the server and you can continue to configure the server using the Exchange Management Shell or the Exchange Admin Center from another PC.

Post-Setup Tips:

Run the LaunchEMS cmdlet from a CMD prompt to launch the Exchange Management Shell in another window locally on the server.

If you're new to Windows Server Core, read Manage a Server Core Server for basics on server administration.

I highly recommend Windows Admin Center (formerly Project Honolulu) for managing Server Core servers, or any other Windows server for that matter. It allows you to perform most all server tasks from a single browser window, including updating device drivers. Pretty cool!


Good luck with your Exchange 2019 Server Core implementations! If you need help with your deployments, please reach out to EXPTA Consulting.


Read more ...