Showing posts with label scripts. Show all posts

How to Remove Internet Explorer from Windows Computers and Servers

Thursday, January 19, 2023

Support for Internet Explorer 11 ended on June 15, 2022 and IE 11 will no longer be accessible after February 14, 2023.

Even so, Internet Explorer 11 is still installed as the default web browser with every version of Windows and Windows Server. To make matters worse, Windows 10 also shipped with non-Chromium Edge (now called Legacy Edge). You'll need to download and install a "modern" web browser, such as Microsoft Edge, Google Chrome, FireFox, etc. Keep in mind that you can reload Internet Explorer sites with IE mode in Microsoft Edge.

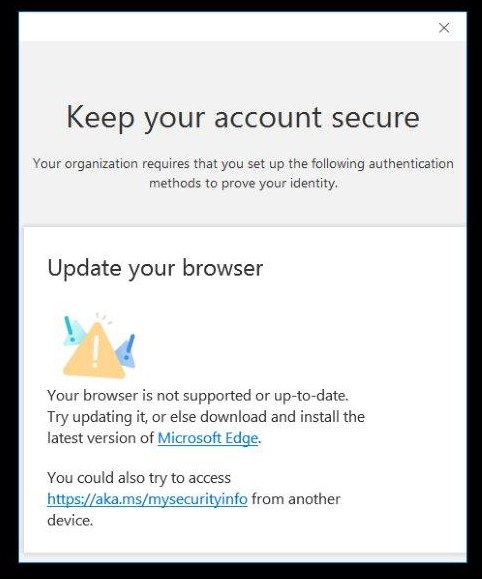
Even with ChrEdge (my name for Chromium Edge) installed as the default web browser, I've heard from a few customers that IE is still being used for some web work flows. For example, a customer recently showed me this MFA security confirmation prompt that is opening in IE for some reason.


All this leads me to the task at hand. How do you uninstall Internet Explorer 11 from Windows?

This is not straight forward since IE 11 is part of the Windows installation. It cannot be removed as a Windows application or feature. The answer is to use DISM (Deployment Imaging Servicing Management) installed with all versions of Windows and Windows Server.

Run the following command from an elevated CMD or PowerShell prompt:

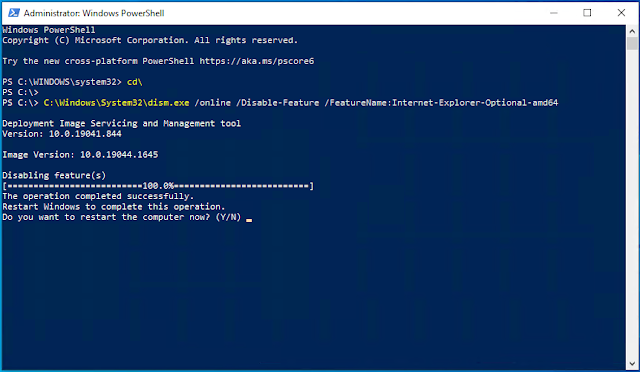
C:\Windows\System32\dism.exe /online /Disable-Feature /FeatureName:Internet-Explorer-Optional-amd64

Removal only takes a few seconds and the output looks like this:


DISM will prompt you to restart the computer to complete the operation. Until you do, Internet Explorer will still show as an available web browser. Optionally, you can add the /Quiet switch which will not show DISM uninstall progress and will automatically restart the computer when it's done.

Read more ...

Script to Set Exchange Server Antivirus Exclusions for Windows Defender

Wednesday, June 30, 2021

Microsoft released the June 2021 Quarterly Exchange Updates which now includes Exchange Server AMSI integration. 

The Antimalware Scan Interface (AMSI) allows antivirus software, such as Windows Defender which is installed by default on Windows Server 2016 and Windows Server 2019, to dynamically scan for malware such as the web shells created by the HAFNIUM attack earlier this year. Here's the Microsoft announcement which includes links to Exchange Server 2019 CU 10 and Exchange Server 2016 CU 21:

Exchange Server AMSI Integration

As mentioned in our recent blog post, the June 2021 CUs include new Exchange Server integration with AMSI (Antimalware Scan Interface). AMSI exists in Windows Server 2016 and Windows Server 2019, and the new integration is available in Exchange 2016 and Exchange 2019 when running on either of those operating systems. For Exchange 2016, AMSI integration is available only when running on Windows Server 2016. It is not available for Exchange 2016 running on Windows Server 2012 or Windows Server 2012 R2.

AMSI integration in Exchange Server provides the ability for an AMSI-capable antivirus/antimalware solution to scan content in HTTP requests sent to Exchange Server and block a malicious request before it is handled by Exchange Server. The scan is performed in real-time by any AMSI-capable antivirus/antimalware solution that runs on the Exchange server as the server begins to process the request. This provides automatic mitigation and protection that compliments the existing antimalware protection in Exchange Server to help make your Exchange servers more secure.

Because we know that some of our customers modify the web.config file on their Exchange Server, we wanted to let you know that installation of the June 2021 CUs will add a new section in the web.config of every HTTP service under <Modules>. The entry will be called "HttpRequestFilteringModule" and it must be present for AMSI integration to work.

AMSI helps keep your Exchange servers protected from malware, but it's still imperative to set the antivirus exclusions for Exchange Server as per the article, Running Windows antivirus software on Exchange servers on Microsoft Docs. This is required to prevent anti-virus/anti-malware solutions from potentially corrupting the Exchange Server installation, worker processes, and databases. Trust me. I've seen this happen many times and it usually ends up with a complete server rebuild.

If you've ever looked at this document, it lists many folder, process, and file name extension exclusions. To ease this configuration for Windows Defender I created the following Set-ExchangeAntivirusExclusionsForDefender.ps1 PowerShell script. 

Please note this script only works for Windows Defender running on Windows Server 2016 or 2019. If you're running another antivirus or antimalware solution, you'll still need to configure these exclusions some other way.

Simply copy the text below to a Set-ExchangeAntivirusExclusionsForDefender.ps1 file on your Exchange server and run it from EMS.
#Sets Exchange 2016/2019 antivirus exclusions for Windows Defender
#Author: Jeff Guillet | MCSM | MVP, jguillet@expta.com
#Ref: https://docs.microsoft.com/en-us/Exchange/antispam-and-antimalware/windows-antivirus-software?view=exchserver-2019

$m = Get-Module -ListAvailable Defender
if ($m -eq $null) {
Write-Host "Windows Defender is not installed on" (Get-WmiObject -class Win32_OperatingSystem).Caption
Exit
}

$ExchangeInstallPath = $Env:ExchangeInstallPath -replace ".$"

$excludedPaths = @( "$Env:SystemDrive\ExchangeSetupLogs", `
"$ExchangeInstallPath", `
"$Env:WinDir\SoftwareDistribution", `
"$Env:SystemRoot\Cluster", `
"$Env:SystemRoot\Microsoft.NET\Framework64\v4.0.30319\Temporary ASP.NET Files", `
"$Env:SystemRoot\System32\Inetsrv" ), `
"$Env:SystemDrive\inetpub\temp\IIS Temporary Compressed Files"

$excludedExtensions = @( "config", "chk", "edb", "jfm", "jrs", "log", "que", "dsc", "txt", "cfg", "grxml", "lzx" )

$excludedProcesses = @( "$ExchangeInstallPath\Bin\Search\Ceres\Runtime\1.0\noderunner.exe", `
"$ExchangeInstallPath\Bin\EdgeTransport.exe", `
"$ExchangeInstallPath\Bin\Microsoft.Exchange.AntispamUpdateSvc.exe", `
"$ExchangeInstallPath\Bin\Microsoft.Exchange.Diagnostics.Service.exe", `
"$ExchangeInstallPath\Bin\Microsoft.Exchange.Directory.TopologyService.exe", `
"$ExchangeInstallPath\Bin\Microsoft.Exchange.AntispamUpdateSvc.exe", `
"$ExchangeInstallPath\Bin\Microsoft.Exchange.EdgeCredentialSvc.exe", `
"$ExchangeInstallPath\Bin\Microsoft.Exchange.EdgeSyncSvc.exe", `
"$ExchangeInstallPath\Bin\Microsoft.Exchange.Notifications.Broker.exe", `
"$ExchangeInstallPath\Bin\Microsoft.Exchange.ProtectedServiceHost.exe", `
"$ExchangeInstallPath\Bin\Microsoft.Exchange.RPCClientAccess.Service.exe", `
"$ExchangeInstallPath\Bin\Microsoft.Exchange.Search.Service.exe", `
"$ExchangeInstallPath\Bin\Microsoft.Exchange.Servicehost.exe", `
"$ExchangeInstallPath\Bin\Microsoft.Exchange.Store.Service.exe", `
"$ExchangeInstallPath\Bin\Microsoft.Exchange.Store.Worker.exe", `
"$ExchangeInstallPath\Bin\MSExchangeCompliance.exe", `
"$ExchangeInstallPath\Bin\MSExchangeDagMgmt.exe", `
"$ExchangeInstallPath\Bin\MSExchangeDelivery.exe", `
"$ExchangeInstallPath\Bin\MSExchangeFrontendTransport.exe", `
"$ExchangeInstallPath\Bin\MSExchangeHMHost.exe", `
"$ExchangeInstallPath\Bin\MSExchangeHMWorker.exe", `
"$ExchangeInstallPath\Bin\MSExchangeMailboxAssistants.exe", `
"$ExchangeInstallPath\Bin\MSExchangeMailboxReplication.exe", `
"$ExchangeInstallPath\Bin\MSExchangeRepl.exe", `
"$ExchangeInstallPath\Bin\MSExchangeSubmission.exe", `
"$ExchangeInstallPath\Bin\MSExchangeTransport.exe", `
"$ExchangeInstallPath\Bin\MSExchangeTransportLogSearch.exe", `
"$ExchangeInstallPath\Bin\MSExchangeThrottling.exe", `
"$ExchangeInstallPath\Bin\OleConverter.exe", `
"$ExchangeInstallPath\Bin\UmService.exe", `
"$ExchangeInstallPath\Bin\UmWorkerProcess.exe", `
"$ExchangeInstallPath\Bin\wsbexchange.exe", `
"$ExchangeInstallPath\FIP-FS\Bin\fms.exe", `
"$ExchangeInstallPath\Bin\Search\Ceres\HostController\hostcontrollerservice.exe", `
"$ExchangeInstallPath\TransportRoles\agents\Hygiene\Microsoft.Exchange.ContentFilter.Wrapper.exe", `
"$ExchangeInstallPath\FrontEnd\PopImap\Microsoft.Exchange.Imap4.exe", `
"$ExchangeInstallPath\ClientAccess\PopImap\Microsoft.Exchange.Imap4service.exe", `
"$ExchangeInstallPath\FrontEnd\PopImap\Microsoft.Exchange.Pop3.exe", `
"$ExchangeInstallPath\ClientAccess\PopImap\Microsoft.Exchange.Pop3service.exe", `
"$ExchangeInstallPath\FrontEnd\CallRouter\Microsoft.Exchange.UM.CallRouter.exe", `
"$ExchangeInstallPath\Bin\Search\Ceres\ParserServer\ParserServer.exe", `
"$ExchangeInstallPath\FIP-FS\Bin\ScanEngineTest.exe", `
"$ExchangeInstallPath\FIP-FS\Bin\ScanningProcess.exe", `
"$ExchangeInstallPath\FIP-FS\Bin\UpdateService.exe", `
"$Env:SystemRoot\System32\Dsamain.exe", `
"$Env:SystemRoot\System32\inetsrv\inetinfo.exe", `
"$Env:Systemroot\System32\WindowsPowerShell\v1.0\Powershell.exe", `
"$Env:SystemRoot\System32\inetsrv\W3wp.exe" )

$excludedPaths | ForEach {if (!(Test-Path -Path $_ )) {New-Item -ItemType Directory -Path $_ }; Add-MpPreference -ExclusionPath $_ }
$excludedExtensions | ForEach {Add-MpPreference -ExclusionExtension $_ }
$excludedProcesses | ForEach {Add-MpPreference -ExclusionProcess $_ }
Be sure to run this from all your Exchange servers including those used for hybrid and Edge Transport after installation. You do not need to run it again after CU installations, but it won't hurt anything if you do.

Read more ...

Enable Outlook Automapping for Exchange mailboxes

Wednesday, January 23, 2019
When a user is delegated full access rights to another mailbox, automapping will automatically add that mailbox to that user's Outlook. Automapping does this when Outlook runs a background autodiscover process and discovers that the user has been given full access to another mailbox. The user doesn't need to add the mailbox manually to Outlook and will be unable to remove the additional mailbox.

Automapping is enabled by default, but it can be disabled by running the following cmdlet:
Add-MailboxPermission TeamMailbox -User kmeyer -AccessRights FullAccess -AutoMapping $false
The cmdlet above gives user Ken Meyer full access to the TeamMailbox mailbox and disables automapping for that mailbox.

I published the Enable-AutomappingForFullAccessMailboxes.ps1 script for Exchange in the Microsoft Script Center Gallery. The script re-enables Outlook automapping on mailboxes where users have been given full access rights. It runs on Exchange 2010-2019 and Exchange Online, and must be run from the Exchange Management Shell (EMS).


Read more ...

Secure AAD Connect! New build 1.1.654.0 and AdSyncConfig.psm1 module is available

Wednesday, December 13, 2017
If you attended my webinar yesterday on "Exchange Hybrid for the Long Haul - Critical Information to Know" you learned how important it is to keep AAD Connect up-to-date.

Yesterday Microsoft released AAD Connect build 1.1.654.0 which addresses a security vulnerability that allows lower level administrators to gain elevated privileges by resetting the password of the on-prem MSOL_xxxxxx account used by AAD Connect for synchronization. To be honest, this is no more risky than allowing junior admins from resetting the password of any highly privileged account or being able to add themselves to a highly privileged group, like Domain or Enterprise Admins. You should always secure and monitor any highly privileged account or group in your organization.

The AAD Connect Version History explains the security issue that build 1.1.654.0 addresses. It also gets the EXPTA award for the most poorly written release notes ever. Spelling errors, grammar errors, syntax errors, oh my. But I digress...

Microsoft also released a PowerShell script (module, really), AdSyncConfig.psm1, which configures the new recommended permissions on the MSOL_xxxxxx account for those organizations who need to secure the account immediately, but can't upgrade to the latest version of AAD Connect at this time. The script is available on the TechNet Gallery.

The AdSyncConfig module is not quite as straight forward as written, though, so I wanted to document here how to use it. The first problem is that the module is not digitally signed. That means that you'll get the warning, "The publisher of AdSyncConfig.psm1 couldn't be verified" when you download it with Internet Explorer. Edge doesn't complain.


It also means that you will probably have to change your execution policy in PowerShell to run it. The recommended execution policy of RemoteSigned will prevent the module from being imported since it's not digitally signed.

If you can't upgrade to the latest build immediately, here are all the correct steps to use the AdSyncConfig.psm1 module to secure the MSOL_xxxxxx account immediately. There is no downtime associated with these steps.

  • Download AdSyncConfig.psm1 to your AAD Connect computer and open an elevated PowerShell console.
  • Run Get-ExecutionPolicy to view the current policy. Usually it's RemoteSigned or Restricted.
  • Run Set-ExecutionPolicy -ExecutionPolicy Unrestricted in order to import the unsigned module.
  • Run Import-Module AdSyncConfig.psm1 to import the module.
  • Run $Account = Get-ADUser -Filter 'Name -like "msol_*"' to store the account information for the MSOL_xxxxxx account.
  • Run Set-ADSyncRestrictedPermissions -ObjectDN $Account.DistinguishedName -Credential (Get-Credential) to reset the permissions on the MSOL account to the new recommended settings. Be sure to use domain\username format. 
  • Run Set-ExecutionPolicy -ExecutionPolicy RemoteSigned to reset the execution policy.
  • Run Restart-Service adsync to restart the Microsoft Azure AD Sync service.
  • Run Start-ADSyncSyncCycle -PolicyType Delta to force a new delta sync and confirm that synchronization is working properly.

Once you install AAD Connect build 1.1.654.0 or run the steps for the module above, you will see that the MSOL_xxxxxx account has updated permissions for SELF.


Read more ...

How to Trigger an AAD Connect Sync from a Remote Computer

Thursday, January 26, 2017
If you use AAD Connect to synchronize on-premises Active Directory with Azure AD, you may find it more convenient to trigger an AAD sync from a remote domain-joined computer or server. I frequently do this when I make a change to an on-prem AD object from my Windows 10 workstation or Exchange server. Remote PowerShell to the rescue!

Copy the following Sync-AAD.ps1 script to your Windows path (I put it in C:\Windows) on the computer or server where you want to run it.
$AADComputer = ((Get-ADUser -Filter 'Name -like "AAD_*"' -Properties Description).Description).split(" ")[13].trim(".") + "." + (Get-WmiObject win32_computersystem).Domain
$session = New-PSSession -ComputerName $AADComputer
Invoke-Command -Session $session -ScriptBlock {Import-Module -Name 'ADSync'}
Invoke-Command -Session $session -ScriptBlock {Start-ADSyncSyncCycle -PolicyType Delta}
Remove-PSSession $session
Sync-AAD.ps1 output
I haven't found a better way to determine where AAD Connect is installed than the way I'm doing it in the first line. It uses the AD PowerShell module to parse out the AAD Connect computer name listed in the description property of the AAD_***** computer account. This assumes, of course, that the AD PowerShell module is installed on the local computer, and the description property is filled out correctly in AD. AAD Connect sets the description for this account to something like, "Service account for the Synchronization Service with installation identifier 16e45891... running on computer DC1." If that doesn't work for you for some reason, simply change the first line to your AAD computer FQDN, for example:
$AADComputer = "aad.contoso.com"

The second line, $session = New-PSSession -ComputerName $AADComputer,creates a new remote PowerShell connection to the computer where AAD Connect is installed.

The third line invokes a command to import the AAD Connect PowerShell module on the local computer.

The fourth line invokes a command to start the delta AD sync cycle.

The final line removes the remote PowerShell session.

Easy peasy!

Read more ...

How to Create Dynamically Adjusting Exchange Retention Policies

Friday, May 29, 2015
Exchange has supported message retention policies since Exchange 2010. Retention Policies are collections of Retention Tags that dictate how emails are retained in Exchange. Usually this is done to comply with business policies on data retention and/or used as a way to move data from the user's primary mailbox to an archive mailbox.

Retention Policies
The retention policy shown above includes several personal policy tags and one default policy tag that moves emails older than 6 months to the archive. You can customize or create new retention policies for your users based on your company's data retention policies. For example, you can create a retention policy to move all emails to the archive mailbox after 1 year and permanently delete all emails older than 5 years.

Only one mailbox retention policy can be assigned to a mailbox at a time. While you can easily change which retention policy is assigned to a mailbox using the the Exchange Management Shell or the Exchange Admin Center, this can be somewhat tedious.

Note that retention tags are time-based, not size-based. If you're trying to manage your mailbox storage with retention policies the same time-based retention policy may result in widely varying mailbox sizes within the Exchange database store, depending on the user. I developed the following process to dynamically adjust user's retention policy based on mailbox size. The larger the mailbox gets, the more aggressive the retention policy applied.

Start by creating multiple default archive and/or delete retention tags. Make sure to select "applied automatically to entire mailbox (default)" to ensure that it applies to all email items. For example,

  • Default one year move to archive
  • Default 6 months move to archive
  • Default 3 months move to archive
  • Default 7 year delete
  • Default 5 year delete
  • Default 3 year delete
Creating a Default retention tag
Next create multiple retention policies that include the default retention tags you created. For example,
  • High Retention - Default one year move to archive, Default 7 year delete
  • Medium Retention - Default 6 months move to archive, Default 5 year delete
  • Low Retention - Default 3 months move to archive, Default 3 year delete
Apply the High Retention policy to all mailboxes using the following EMS command:
Get-Mailbox -ResultSize unlimited | Set-Mailbox -RetentionPolicy "High Retention"

Note that archive retention tags only apply if the mailbox has an archive mailbox, otherwise the archive tags are ignored.

Copy the following script and save it to one of your Exchange servers in the C:\Scripts folder as Apply-RetentionPolicies.ps1:
$mbx = Get-Mailbox -ResultSize unlimited
$mbx | ForEach-Object -Process {
$size = ( Get-MailboxStatistics $_.Alias ).TotalItemSize
If ( $size -gt "10GB" ) {
  Set-Mailbox $_.Alias -RetentionPolicy "Low Retention Policy"
  }
elseif ( $size -gt "8GB" ) {
  Set-Mailbox $_.Alias -RetentionPolicy "Medium Retention Policy"
  }
else {
  Set-Mailbox $_.Alias -RetentionPolicy "High Retention Policy"
  }
}

Adjust the mailbox sizes in the script to meet your company's retention needs. In the example script above mailboxes greater than 10GB get the Low Retention Policy, mailboxes between 8-10GB get the Medium Retention Policy, and everyone else gets the High Retention Policy.

Next, create a scheduled task that runs the Apply-RetentionPolicies.ps1 script once per day.

Set the "Program/Script" property to:
C:\Windows\System32\WindowsPowerShell\v1.0\powershell.exe
And set the "Add arguments (optional)" to:
-NonInteractive -WindowStyle Hidden -command $ep = (Get-Item env:"ExchangeInstallPath").Value; . $ep\bin\RemoteExchange.ps1; Connect-ExchangeServer -auto; . C:\Scripts\Apply-RetentionPolicies.ps1
Creating a Basic Scheduled Task
The scheduled task must run using the credentials of an account with Organization Management rights.

With this process, as a mailbox gets smaller from a more aggressive retention policy it will automatically get a longer retention policy.

Read more ...

Reporting Outlook Client Versions Using Log Parser Studio

Wednesday, September 3, 2014
Earlier, I wrote an article referencing Chris Lehr's Log Parser script to identify and report which Outlook client versions are being used to access Exchange. You can read that article here.

Today, I'm showing you how to do the same thing with Log Parser Studio using a configuration written by my friend Lars Eber, an Exchange Premier Field Engineer at Microsoft. Log Parser Studio 2.0 is a customizable GUI tool that greatly simplifies creating complex Log Parser 2.2 command-line queries and presents the output natively in an easy to read fashion.


If you don't have Log Parser 2.2 or Log Parser Studio 2.0 installed yet, you will need to do so. Just follow the links to download and install them (you'll need both). Then run LPS.EXE from the C:\LPSV2.D1 folder to run Log Parser Studio.

Download Lars' ExchangeClientVersion.zip configuration from my website and unzip it to a temporary location. In Log Parser Studio, click File > Import > .XML to Library, select the ExchangeClientVersion.XML file you just extracted, and click the Merge Now button.

To run the query, first configure Log Parser with the log folder location. Click the yellow folder icon and browse to the folder where the IIS logs exist. Normally, this is \\servername\c$\Program Files\Microsoft\Exchange Server\V15\Logging\RPC Client Access. Then select the Exchange Client Version Overview query in the library and click the red exclamation point icon to run it.

Log Parser Studio will run the query and provide easy to read results showing the user name, DN, client software, version, client mode (cached or online), client IP address, and the protocol used. Very useful!

Read more ...

Reporting Outlook Client Versions Using Log Parser

Wednesday, May 7, 2014
I'm doing a little cross-pollination today. Chris Lehr, one of my colleagues at ExtraTeam, worked up a Log Parser script that produces a report showing all the clients versions connecting to Exchange.  This is very helpful to show which clients are running Office versions in your organization that should be updated prior to migration.  Check out his blog post here.

Outlook Client Version Report
Clients will always get the best experience using the latest version of Office, currently Office 2013 SP1. The best practice is to always update your clients with the latest cumulative update prior to migration. this is especially true when you're migrating to Office 365, since most updates pertain to Office 365, Exchange Online, and Exchange 2013 compatibility.

If you find that you need to upgrade clients to a new version of Office, I recommend that you install the x86 version of Office to provide the best compatibility with add-ons and third-party products. Some customers think they need to install Office x64 on Windows x64 operating systems, but that's not the case. See 64-bit editions of Office 2013 for details on when it makes sense to install Office x64.

If you're an Office 365 customer, I strongly recommend checking out using the Office 2013 ProPlus software deployment that's most likely part of your Enterprise license. This version of Office 2013 can be installed on up to 5 PCs, iPads, tablets, etc. and is always up-to-date since it's a cloud-managed service.


Read more ...

Fix for Exchange ActiveSync Failures After Migration to Exchange 2013

Monday, April 21, 2014
There’s a bug in Exchange 2013 that causes Exchange ActiveSync to fail for newly migrated users from Exchange 2010. It only affects migrated users who already have a mobile device configured, not new users (i.e., test mailboxes). This issue was discussed in the Exchange Server forums back in August 2013.

The issue occurs because the IIS application pools on the CAS 2013 servers do not automatically detect that the mailbox has been moved to Exchange 2013. When the user’s mobile device connects to CAS 2013, CAS 2013 proxies the user back to CAS 2010 which responds with an error saying the mailbox is corrupt or missing. If you run an Exchange ActiveSync test using ExRCA you will see the X-CalculatedBETarget value reported by CAS2013 is still pointing to the Exchange 2010 server. The problem usually resolves itself in 1-8 hours, depending on the Exchange 2013 build.

The workaround is to manually recycle the MSExchangeAutodiscoverAppPool and MSExchangeSyncAppPool application pools in IIS on all CAS2013 servers.

I wrote a PowerShell script for this called Recycle-AppPools.ps1:
#Recycle-AppPools.ps1
#Jeff Guillet, MCM|MCSM|MVP|CISSP
#Use this script to recycle IIS Application Pools to overcome Exchange 2013 SP1 ActiveSync bug for migrated users

#Get all Exchange 2013 CAS servers
$CASServers = Get-ClientAccessServer | where {$_.WorkloadManagementPolicy -ne $null}

#Loop through each CAS2013 and recycle the IIS App Pools
foreach ($CAS in $CASServers) {
  Write-Host "Recycling App Pools on $CAS..."
  $appPool = Get-WmiObject -Authentication PacketPrivacy -Impersonation Impersonate -ComputerName $CAS -namespace "root/MicrosoftIISv2" -class IIsApplicationPool | Where-Object {$_.Name -eq "W3SVC/AppPools/MSExchangeAutodiscoverAppPool" }
  $appPool.Recycle()
  $appPool = Get-WmiObject -Authentication PacketPrivacy -Impersonation Impersonate -ComputerName $CAS -namespace "root/MicrosoftIISv2" -class IIsApplicationPool | Where-Object {$_.Name -eq "W3SVC/AppPools/MSExchangeSyncAppPool" }
  $appPool.Recycle()
}
You will need to run the script after an EAS user or batch of users have been migrated. There is no outage associated with recycling the app pools and it recycles very quickly. A fix is scheduled for Exchange 2013 CU5.

Read more ...

Script to Force Download of the Lync 2013 Address Book

Tuesday, December 4, 2012
In a previous article I wrote a script that forces Lync 2010 clients to update the Lync Server 2010 address book.

The Lync 2013 client not only changes the location where the address book is stored on the local machine, but changes the address book file name for Lync Server 2013, as well.

The script below sets the GALDownloadInitialDelay key in the registry to force the Lync client to download the address book immediately after signing in.  It then enumerates all the SIP_* sub-folders in the C:\Users\%username%\AppData\Local\Microsoft\Office\15.0\Lync folder and deletes the ABS__sipdomain.cache file which makes up the local Lync 2013 address book and the GAL*.* files that make up the local Lync 2010 address book.

@echo off
echo.
rem Check if Lync is running, exit if it is...
tasklist /fi "IMAGENAME eq lync.exe" | find "lync.exe" >nul
If %errorlevel%==0 goto LyncIsRunningError
rem Add x86 GALDownloadInitialDelay registry entry
reg add HKCU\Software\Policies\Microsoft\Communicator /v GALDownloadInitialDelay /t REG_DWORD /d 0 /f >nul
If %errorlevel%==1 goto ElevationError
rem Add WOW64 GALDownloadInitialDelay registry entry if x64
If %PROCESSOR_ARCHITECTURE%==AMD64 reg add HKCU\Software\Wow6432Node\Policies\Microsoft\Communicator /v GALDownloadInitialDelay /t REG_DWORD /d 0 /f >nul
If "%LOCALAPPDATA%"=="" Set LOCALAPPDATA=%USERPROFILE%\Local Settings\Application Data
dir "%LOCALAPPDATA%\Microsoft\Office\15.0\Lync\sip_*" /b > list.txt
FOR /F "tokens=1" %%i in (list.txt) do (
rem Delete the Lync Server 2010 address book...
If Exist "%LOCALAPPDATA%\Microsoft\Office\15.0\Lync\%%i\gal*.*" del "%LOCALAPPDATA%\Microsoft\Office\15.0\Lync\%%i\gal*.*"
rem Delete the Lync Server 2013 address book...
If Exist "%LOCALAPPDATA%\Microsoft\Office\15.0\Lync\%%i\abs*.cache" del "%LOCALAPPDATA%\Microsoft\Office\15.0\Lync\%%i\abs*.cache"
)
del list.txt
echo Clearing Lync 2013 Address Books...  Done!
echo.
echo Sign back into Lync 2013 to download the current address book.
goto End
:ElevationError
echo ERROR: You must run this command from an elevated Command Prompt.
echo.
goto End
:LyncIsRunningError
echo ERROR: You must exit Lync 2013 before running this command. Right-click the Lync icon and choose Exit.
echo.
:End
Save the script above as UpdateLync2013AddressBook.bat.  Exit out of the Lync client and run the script from an elevated Command Prompt. Then sign back into Lync and the address book will download immediately.

Output from UpdateLync2013AddressBook.bat

Read more ...

Working with Hi-Res Photos in Exchange 2013 and Lync 2013

Saturday, December 1, 2012
Exchange 2013 and Lync 2013 now have the ability to use high-resolution photos for users to view photos of their contacts and to make their own photos available to others.  Usually these photos were stored as part of the user's thumbnailPhoto attribute in Active Directory.  The recommended resolution for photos stored in the thumbnailPhoto attribute is 96 pixels by 96 pixels.  In addition, the thumbnailPhoto attribute has a physical limit of 10KB.

Lync 2013 now features a larger contact photo for meeting participants.  It scales those small 96x96 pixel thumbnailPhotos up to 278x278 pixels, which results in a blurry, but still usable, photo.

96x96 pixel photo displayed in Lync 2013
The new high-res photos used by the Wave 15 products (Exchange 2013, Lync 2013, SharePoint 2013, and Office 2013) are now stored in the user's Exchange 2013 mailbox and are accessed using Exchange Web Services (EWS).  This makes a lot of sense since Exchange is installed in almost all of these environments.  Lync 2013 now allows for photo sizes up to 648 pixels by 648 pixels - a 700% improvement!  Just look at that handsome devil!

648x648 pixel photo displayed in Lync 2013
The following script sample can be used to store a 648 by 648 pixel photo in Ken Myer's Exchange 2013 mailbox:

$photo = ([Byte[]] $(Get-Content -Path "C:\Photos\Ken Myer.jpg" -Encoding Byte -ReadCount 0))
Set-UserPhoto -Identity kenmyer -PictureData $photo -Confirm:$False
Set-UserPhoto -Identity kenmyer -Save -Confirm:$False

Exchange 2013 automatically scales this 648x648 photo for various applications. The following examples show the same hi-res photo in Office 2013 and Lync 2013 scaled to different sizes.

Outlook 2013 contact view
My Picture option in Lync 2013
Notice in the Lync 2013 example above that there's a button to allow users to edit or remove their picture.  That button only lights up in Lync 2013 if the user's mailbox is hosted on an Exchange 2013 server.  There is no "self-service" way to upload pictures with Exchange 2010, although it can be done from SharePoint 2010.

But before you go updating all the photos of employees in your company with new hi-res photos, you should know a few things about backward compatibility.  The Set-UserPhoto cmdlet, which only exists in Exchange 2013 and is used in the script above, not only stores the hi-res photo in the user's mailbox, it also stores a 48x48 pixel version in the thumbnailPhoto AD attribute.  That's half the resolution of the 96x96 recommended size and results in a terrible photo for users on Exchange 2010.

48x48 pixel thumbnailPhoto displayed in Lync 2013
It's interesting to note that Exchange 2010 users always use the 48x48 thumbnailPhoto attribute in AD.  Lync 2013 won't look for a hi-res photo in the Exchange 2013 user's mailbox if the Lync 2013 user is on Exchange 2010.  This gives a less than optimal view for the Exchange 2010 Lync user:


This is really only an issue for customers in an migration scenario, but it's worth noting.  The point is that update Exchange 2013 mailbox users with hi-res photos, you may still want to re-update the users' thumbnailPhoto attributes with better 96x96 pixel photos when you're done.

For more information about high resolution photos used in Lync 2013 see Configuring the Use of High-Resolution Photos in Microsoft Lync Server 2013, but please keep in mind that the script examples in that article have typos in them.  The script above corrects those errors.

You may also want to read GAL Photos in Exchange 2010 and Outlook 2010.

Read more ...

How to Boot Directly into Desktop with Windows Server 2012 with a GUI

Thursday, October 18, 2012

I love Windows Server 2012 RTM, I really do.  But who's bright idea was it to boot to the "Modern UI" (aka, Metro) instead of the Windows Desktop?  There's really no reason for this, so I wrote a PowerShell script that configures Windows Server 2012 with a GUI to boot directly into the Desktop after signing in locally.  It does not affect RDP connections - those already go directly to the Desktop.

This is not a hack.  The script simply changes permissions on an existing registry key to allow the value to be changed, and then changes it.

NOTE: This script does not work on Windows 8 RTM -- It only works on Windows Server 2012 RTM.  Early beta builds of Windows 8 allowed you to toggle booting to the Desktop.  Microsoft removed those hacks in the RTM build of Windows 8, sorry.  :(

You may also want to read my article, How to Enable Autologon for Windows Server 2008 Member Servers and Windows 7 Member Workstations.  Those procedures also work for Windows Server 2012 and Windows 8.

Copy and paste the following text into Notepad and save it as BootToDesktop.ps1 on your Windows Server 2012 computer:

#Take Ownership of the "HKLM:\SOFTWARE\Microsoft\Windows NT\CurrentVersion\Server" registry key
$definition = @"
using System;
using System.Runtime.InteropServices;
namespace Win32Api
{
    public class NtDll
    {
        [DllImport("ntdll.dll", EntryPoint="RtlAdjustPrivilege")]
        public static extern int RtlAdjustPrivilege(ulong Privilege, bool Enable, bool CurrentThread, ref bool Enabled);
    }
}
"@
Add-Type -TypeDefinition $definition -PassThru
$bEnabled = $false
$res = [Win32Api.NtDll]::RtlAdjustPrivilege(9, $true, $false, [ref]$bEnabled)
$key = [Microsoft.Win32.Registry]::LocalMachine.OpenSubKey("SOFTWARE\Microsoft\Windows NT\CurrentVersion\Server", [Microsoft.Win32.RegistryKeyPermissionCheck]::ReadWriteSubTree,[System.Security.AccessControl.RegistryRights]::takeownership)
$acl = $key.GetAccessControl()
$acl.SetOwner([System.Security.Principal.NTAccount]"Administrators")
$key.SetAccessControl($acl)

#Give Full Control of the key to BUILTIN\Administrators

$acl = Get-Acl "HKLM:\SOFTWARE\Microsoft\Windows NT\CurrentVersion\Server"
$rule = New-Object System.Security.AccessControl.RegistryAccessRule("BUILTIN\Administrators","FullControl","Allow")
$acl.SetAccessRule($rule)
$key.SetAccessControl($acl)
$key.Close()

#Set the value of ClientExperienceEnabled to 0 to enable boot to Desktop

Set-ItemProperty -Path "HKLM:\SOFTWARE\Microsoft\Windows NT\CurrentVersion\Server" -Name ClientExperienceEnabled -Value 0

Optionally, you can download the BootToDesktop.ps1 script here.

Now simply run the BootToDesktop.ps1 script from an elevated Windows PowerShell prompt and reboot.  The next time you sign in Windows Server 2012 will go straight into the Desktop.

The PowerShell script does three things:
  • It assigns ownership of the HKEY_LOCAL_MACHINE\SOFTWARE\Microsoft\Windows NT\CurrentVersion\Server registry key to the local built-in Administrators group.  By default this key is owned by the protected TrustedInstaller security principal.
  • Full control is given on the key to the built-in Administrators group.  By default built-in Administrators only have Read access.  Full control gives us the ability to change values in the key.
  • Changes the ClientExperienceEnabled value from 1 to 0, which configures Windows to start directly to the Desktop.


Windows Server 2012 and Windows 8 secure protected registry keys and files using the TrustedInstaller security principal.  TrustedInstaller is a core part of Windows Resource Protection (WRP) technology.  Windows usually assigns ownership of WRP protected items to TrustedInstaller and they normally cannot be modified or deleted.  This script overcomes that and allows you to change the value of the ClientExperienceEnabled value.

Since this is really just a simple registry change, you can safely use it in your server imaging process for all your Windows Server 2012 computers.  It only needs to be run once per server and affects all users who login to that server.
Read more ...

Great New Free Utilities from Microsoft

Tuesday, March 13, 2012
Microsoft has released a number of great new utilities designed to make administration easier, especially in the Exchange space.  Most of these have been released in just the past three weeks.

  • Exchange Client Network Bandwidth Calculator BETA2 (link)
Helps reduce the risks involved in Exchange Server network bandwidth planning.  The Exchange Client Network Bandwidth Calculator has been designed to help anyone planning an Exchange Server deployment to predict the network bandwidth requirements for a specific set of clients.  The prediction algorithms used within this calculator are entirely new and have been derived after significant testing and observation.

  • Log Parser Studio (link)
Log Parser Studio is a utility that allows you to search through and create reports from your IIS, Event, EXADB and others types of logs. It builds on top of Log Parser 2.2 and has a full user interface for easy creation and management of related SQL queries.

Anyone who regularly uses Log Parser 2.2 knows just how useful and powerful it can be for obtaining valuable information from IIS (Internet Information Server) and other logs. In addition, adding the power of SQL allows explicit searching of gigabytes of logs returning only the data that is needed while filtering out the noise. The only thing missing is a great graphical user interface (GUI) to function as a front-end to Log Parser and a ‘Query Library’ in order to manage all those great queries and scripts that one builds up over time.

Log Parser Studio was created to fulfill this need; by allowing those who use Log Parser 2.2 (and even those who don’t due to lack of an interface) to work faster and more efficiently to get to the data they need with less “fiddling” with scripts and folders full of queries.
  • Outlook Configuration Analyzer Tool (OCAT) (link)
The Outlook Configuration Analyzer Tool provides a detailed report of your current Outlook profile. This report includes many parameters about your profile, and it highlights any known problems that are found in your profile. For any problems that are listed in the report, you are provided a link to a Microsoft Knowledge Base (KB) article that describes a possible fix for the problem. If you are a Help Desk professional, you can also export the report to a file. Then, the report can be viewed in the Outlook Configuration Analyzer Tool on another client computer where the tool is installed.

  • CalCheck - The Outlook Calendar Checking Tool (link)
 The Calendar Checking Tool for Outlook is a command-line program that checks Outlook Calendars for problems. To use this tool, the Outlook calendar must reside on a Microsoft Exchange Server. The tool does not work with IMAP, with POP3, or with other non-Exchange mail servers.

The tool opens an Outlook profile, opens the Outlook Calendar, and then checks several things such as permissions, free/busy publishing, and auto booking. Then, the tool checks each item in the calendar folder for problems that can cause items to seem to be missing or that might otherwise cause problems in the Calendar.

And last, but not least...


  • Microsoft Script Explorer for Windows PowerShell Beta 1 (link)
Helps scripters find Windows PowerShell scripts, snippets, modules, and how-to guidance in online repositories such as the TechNet Script Center Repository, PoshCode, local or network file systems and Bing Search Repository.
Read more ...

Script to Force Download of the Lync 2010 Address Book

Thursday, February 24, 2011
I wrote a script (batch file, really) that users can run to force a download of the Lync address book. 

The Lync address book is generated automatically on the Lync server every 24 hours at 1:30AM, local server time.  You can use the Update-CsAddressBook cmdlet on the Lync server to force the server to update the address book.  You will need to wait 5 minutes for the server to run the update.  Look for Lync Server event 21056 from LS Address Book Server to confirm that the address book update has completed, as shown below:


The address book is then downloaded locally by the Lync client in a randomized schedule from 1 to 60 minutes after the the user signs in.  Lync Server MVP Jeff Schertz wrote about this process in great detail in his post, Updating the Lync 2010 Address Book.

My script sets a GALDownloadInitialDelay key in the registry to force the Lync client to download the address book immediately after signing in.  It then enumerates all the SIP_* folders in the C:\Users\username\AppData\Local\Microsoft\Communicator folder and deletes the GalContacts.db and GalContacts.db.idx files which make up the Lync address book.
@echo off
echo Clearing Lync Address Books...
reg add HKCU\Software\Policies\Microsoft\Communicator /v GALDownloadInitialDelay /t REG_DWORD /d 0 /f
If %errorlevel%==1 goto Error
if "%LOCALAPPDATA%"=="" Set LOCALAPPDATA=%USERPROFILE%\Local Settings\Application Data
dir "%LOCALAPPDATA%\Microsoft\Communicator\sip_*" /b > list.txt
FOR /F "tokens=1" %%i in (list.txt) do del "%LOCALAPPDATA%\Microsoft\Communicator\%%i\gal*.*"
echo.
echo Sign out of Lync and sign back in to download the current address book.
goto End
:Error
echo You must run this command from an elevated Command Prompt.
echo.
:End
Save the script above as ClearLyncAddressBook.bat and run it from an elevated Command Prompt.  Then sign out and back into Lync and the address book will download immediately.


Read more ...

Deploying the Lync 2010 Client to different architectures

Thursday, February 3, 2011
The Lync Server 2010 client is a single unified communications client that replaces both the Office Communicator and Live Meeting clients.  This single client performs all the functions of the previous clients, including instant messaging (IM), web conferencing, white boarding, desktop sharing, and enterprise voice.

There are two versions of the Lync 2010 client, one for x86 and one for x64 operating systems.  The difference is the bootloader and the prerequisite software included in the client installer (Microsoft Visual C++ 2008 Redistributable - x86 or x64 and SilverLight).  Somewhat surprisingly, the Lync client itself is always 32-bit.  If you try to deploy the x86 version of the client on an x64 computer (or vice versa), you will get an error message.


This can be somewhat problematic if you are trying to automatically deploy the Lync client using Group Policy or some other automated scripting mechanism to mixed-architecture computers in your environment.

Note: The Outlook Online Meeting add-on will match the 32- or 64-bit version of Office 2007/2010 installed, regardless of the Lync client architecture installed.

The rest of this article discusses how to run the correct architecture Lync client using a single batch file.  This batch file can be called using a computer startup script or a user logon script in Group Policy, or any other automated process.

First, create a network share called Lync Clients for the Lync 2010 client installer packages, with subfolders called x86 and x64.  Then copy the x86 and x64 Lync client installers into the proper folder, as shown below.

Lync Client Share
This sample batch file will run the correct Lync client installer for the computer's given architecture. 
If Exist C:\Windows\LyncInstalled.txt Goto END
Set ARCHITECTURE=x86
If Exist "%SystemDrive%\Program Files (x86)" Set ARCHITECTURE=x64
"
\\server\Lync Clients\%ARCHITECTURE%\LyncSetupVolume.exe"
Echo Time > C:\Windows\LyncInstalled.txt
:END
As mentioned earlier, you can then deploy this script via Group Policy or your favorite deployment mechanism.  Note that the Lync installer must be run as a user with rights to install software.  For this reason, it may be easier to install as a computer startup script.
Read more ...

Introducing LyncAddContacts!

Wednesday, January 5, 2011
The Office Communications Server 2007 Resource Kit Tools featured a nifty tool called LCSAddContacts.  This WSF script allows you to add contacts to LCS or OCS (but not Lync Server) using WMI.  I was hoping to see a version of this tool for Lync Server, but no such luck -- So I wrote one myself.

I'm surprised to find that there is no PowerShell cmdlet that allows you to add contact groups or contacts, and since there are no WMI classes for Lync Server anymore, I needed a way to do this -- so I wrote a tool myself.  I leverage the DBIMPEXP utility from the Lync Server DVD to import and export contacts. 

The purpose of LyncAddContacts is to add the same contact groups and contacts to multiple users programmatically.  For example, you may want to import a contact group called "Company Contacts"  that contains contacts for everyone in the company.  Here's how it works:
  1. Create a template (source) user in Lync with the contact groups and contacts that you want to export.
  2. Run the LyncAddContacts tool to export the source user's contacts
  3. Run the LyncAddContacts tool again in import mode and target the user or OU that you want to import the contacts to.
Prerequisites:
  • The tool must be run on the Lync server from which you will export/import the data.
  • You must be a member of the CSAdministrator security group to run this tool.  This group has rights to export and import contact groups and contacts to all users.
  • You must copy the DBIMPEXP.EXE tool from the \Support folder on the Lync Server 2010 installation media to the same folder where the LyncAddContacts tool will be run.
  • You must have read, write and execute rights to the folder where the LyncAddContacts tool will be run.
Note: This tool must be run under the CScript host due to the amount of output generated.  You will see a syntax pop-up window if the tool runs under WScript.

Usage:

LyncAddContacts uses the following syntax:
CScript LyncAddContacts.vbs /backup filename.xml [FE SQL server host name[\Instance]]
CScript LyncAddContacts.vbs SIPAddress [FE SQL server host name[\Instance]]
CScript LyncAddContacts.vbs /import SIPAddress | distinguished name of OU [FE SQL server host name[\Instance]]
The following examples demonstrate how to use the tool.


Use the /backup switch to backup all user data to the specified filename.  The following example backs up user data on a Lync Standard Edition server:
CScript LyncAddContacts.vbs /backup backup.xml
where backup.xml is the backup filename.

The following example performs the same backup on a Lync Enterprise Edition server:
CScript LyncAddContacts.vbs /backup backup.xml sql.domain.com
where backup.xml is the backup filename and sql.domain.com is the SQL server used by the front-end pool.
Once the backup has been performed, you can begin the export/import process.


First, you must export the source user's contact groups and contacts.  The following example exports this information from a user named "Source" on a Lync Standard Edition server:
CScript LyncAddContacts.vbs source@domain.com
where source@domain.com is the SIP address of the user you want to export.

The following example performs the same export on a Lync Enterprise Edition server:
CScript LyncAddContacts.vbs source@domain.com sql.domain.com
where source@domain.com is the SIP address of the user you want to export and sql.domain.com is the SQL server used by the front-end pool.


Second, you import the contact groups and contacts to either a single target user or a target Organizational Unit in your domain.  The following example imports the data to a user named "Target" on a Lync Standard Edition server:
CScript LyncAddContacts.vbs /import target@domain.com
where target@domain.com is the SIP address of the user you want to import the contact info to.  For Lync Server Enterprise Edition you must add the SQL server used by the front-end pool, as shown above.

The following example imports the same contact groups and contacts to all the SIP enabled users in the Users container in Active Directory:
CScript LyncAddContacts.vbs /import CN=Users,DC=domain,DC=com
Again, for Lync Server Enterprise Edition you must add the SQL server used by the front-end pool. 
In this example, were also specifying the SQL instance LyncServer:
CScript LyncAddContacts.vbs /import "OU=Lync Users,DC=domain,DC=com" sql.domain.com\LyncServer
A nice benefit of this tool is that contacts will not get a notification that so-and-so has added them to their contact list.  This is really useful in preventing unnecessary pop-ups from the Lync client.


Download LyncAddContacts.  View the source code here.


Disclaimer: I hope that the information in this blog is valuable to you. Your use of the information contained in these pages, however, is at your sole risk. All information on these pages is provided "as -is", without any warranty, whether express or implied, of its accuracy, completeness, fitness for a particular purpose, title or non-infringement, and none of the third-party products or information mentioned in the work are authored, recommended, supported or guaranteed by The EXPTA {blog}. Further, EXPTA shall not be liable for any damages you may sustain by using this information, whether direct, indirect, special, incidental or consequential, even if it has been advised of the possibility of such damages.
Read more ...

Testing Speech Grammars

Sunday, December 19, 2010
In an earlier post I wrote about speech grammars in Lync Server and Exchange Unified Messaging.

Here's a simple VBScript that uses the same speech method to hear how speech-enabled programs pronounce words.  This is useful to determine how these programs will pronounce proper names.
sText = InputBox("Enter the text you want the computer to say.", "Text to Speech")
sText = Trim(sText)

If sText <> "" Then
     set sapi = CreateObject("sapi.spvoice")
     sapi.Speak sText
End If
To accomplish the same thing in PowerShell, use the following:
$Voice = New-Object -com SAPI.SpVoice
$Voice.Speak( "Keith Johnson" )
For example, if you enter my name as it's spelled (Jeff Guillet) you will hear how speech enabled applications mispronounce my name.  In the case of Exchange UM directory lookups, this is also how Exchange expects callers to pronounce my name to find a match.  If you enter the phonetic spelling of my name (Jeff GheeA) you will hear it pronounced correctly. 

By testing different phonetic spellings using these scripts, you can determine what to use for the msDS-PhoneticDisplayName attribute in Active Directory.
Read more ...

Reporting Database Whitespace for All Exchange Servers

Thursday, September 9, 2010
The physical size of an Exchange database normally grows as data is added to it.  When data is removed the amount of data is reduced, but the physical database size (the amount of space taken up on the disk) does not shrink.  This empty space in the database file is called whitespace.

For example, if you move half of the mailboxes from DB01 to DB02, DB01 will remain the same physical size on the disk, but half of it will be whitespace.  Normally this is not a big deal, but it might be important to you if you need to reclaim that unused disk space.  Also, some backup software backs up the entire database, including whitespace.  That means you might be wasting backup tapes and time backing up empty data.

Exchange has always reported the database whitespace in the Application event log as Event ID 1221 during scheduled online maintenance, as shown below:


However with Exchange 2010 and its 24x7 ESE scanning, this event is no longer logged since online database maintenance runs all the time by default.  You can view the amount of whitespace in any given database using the following cmdlet in the Exchange Managment Shell:
Get-MailboxDatabase Database1 -Status | FT Name,AvailableNewMailboxSpace
The output looks like this:
 
 
Unfortunately, this cmdlet doesn't work on previous versions of Exchange, so I leveraged some code by Shay Levy to write a Powershell script that collects the data from the 1221 events on each server in the Org and exports it to a CSV file.
 
Click here to download the Get-ExchangeWhitespace script.
 
The script must be run from the Exchange Management Shell (EMS).  It creates a collection of all the Exchange servers (except Edge Transport servers) from AD, and connects to each server's Application log using WMI.  It then collects the data from the 1221 events from the previous day's online maintenance schedule and exports it to a file called 'Exchange Whitespace.csv'.  Despite all these steps, it's really fast to execute.

If you want to reclaim the whitespace in a database, you need to perform an offline defrag.  You will dismount the database and run the Eseutil /D command, as detailed here.  Be aware that this can take quite a long time and you need sufficient free space on the volume to run it.
Read more ...