Showing posts with label Tips. Show all posts

What we've learned working remote over the past 8 months in 2020

Thursday, December 3, 2020

It’s no secret that the IT landscape has changed dramatically over the past 8 months. Due to the pandemic, organizations have had to pivot overnight, and what was hoped to be a short-term problem has turned into the new normal. This applies to the way these organizations deal with their customers, employees, and business partners.

In this article on the ENOW Software Blog, I’ll talk about the changes I’ve seen, and lessons learned from my customers.

Read more ...

Announcing Microsoft Exchange Server vNext!

Tuesday, September 22, 2020

Some really exciting Exchange Server news was announced for on premises customers at the Microsoft Ignite virtual conference today! 

Microsoft will be releasing the next versions of Exchange Server, SharePoint Server, and Skype for Business Server the second half of 2021.  These new on-premises server versions will only be available with the purchase of a subscription license, using a similar subscription model to Microsoft 365.

The name for these new on-premises server products has yet to be announced, but it is likely that Microsoft will drop the year from the version name since the new subscription server will be evergreen. Pricing and availability will be announced closer to the release date.

It's important for on-premises customers to know and stay on top of the Exchange Server product lifecycle policies for support and planning.

Product

End of Mainstream Support

End of Extended Support

Exchange Server 2010

01/13/2015

10/03/2020

Exchange Server 2013

04/10/2018

04/11/2023

Exchange Server 2016

10/13/2020

10/14/2025

Exchange Server 2019

01/09/2024

10/14/2025

As mentioned in the article, Exchange Server 2016 and the End of Mainstream Support, CU19 is the last planned update for Exchange Server 2016 and is due in December 2020. After December 15, 2020, only CU19 or its successors will receive critical updates.

Exchange Server Upgrade Planning

In the near-term, customers who plan to stay on-premises should upgrade to Exchange Server 2019 ASAP to maintain both critical security and non-critical feature updates. This will also put your organization in the best position for when Exchange Server vNext is released in the second half of 2021.

You'll be able to install Exchange Server vNext into an org with Exchange Server 2013, 2016 or 2019. That's one more version than they used to support. And for the first time ever, you'll be able to perform an in-place upgrade from Exchange Server 2019 to Exchange Server vNext. Even in the same DAG. This will make it the easiest Exchange upgrade ever!

The bottom line is, if you're going to be staying on-premises long term - start planning and installing Exchange Server 2019 today!

New hybrid customers or customers who plan to keep some mailboxes on-premises should definitely upgrade to Exchange 2019 and later, Exchange Server vNext when it's released.

Hybrid customers who have completed migrating all their mailboxes to Exchange Online can continue to use their existing Exchange 2016 server for hybrid management. Microsoft hopes to deliver a serverless management solution soon, but it will later than the CU19 release.

Other Exchange and Exchange Online News

Another important bit of news on hybrid is that the new HCW will support establishing a one-to-many on-premises to cloud tenant configuration. This is helpful for divestments and customers with multiple tenants. Just be aware it only works for Exchange 2016/2019 and Hybrid Modern Auth only works with one tenant.

Microsoft is also opening the distribution of the Exchange Server 2019 Capacity Calculator. It previously was available only to Volume License customers. You can get it from https://aka.ms/ExCalc

"Plus Addressing" is now GA in Exchange Online. This lets users create "disposable" email addresses based on their primary email address. This lets users know where their email addresses are being leaked and create Inbox rules to handle them.

View the on-demand session, Exchange, Here, There and Everywhere, delivered by the ever-so-suave Greg Taylor.

. . . . . . . . . . . . . . . . . . . . . . . . . . . . . . . . . 

EXPTA Consulting provides professional upgrade, migration, and hybrid services for on-premises customers of all sizes. We specialize in Exchange, Microsoft 365, Active Directory, and identity solutions and pride ourselves on customer satisfaction.

Examples where we provide turn-key solutions or can work with your IT staff include:

  • Exchange and Active Directory Health Checks
  • Exchange on-premises upgrades and configuration
  • Exchange hybrid configuration and migrations to Exchange Online
  • Hybrid Modern Authentication (MFA) for Exchange on-premises
  • Public Key Infrastructure (PKI) design and deployment
Contact us today for a free consultation.

Read more ...

Roaming Signatures Update for Outlook for Windows

Monday, September 21, 2020

Microsoft announced that it will be rolling out roaming signatures soon in Outlook for Windows. It's expected that this feature will come to Exchange Online for now. Customers using third-party signature solutions will want to prepare for this. Review Outlook roaming signatures options.

(Updated) Outlook for Windows Introduces Roaming Signatures

MC215017, Plan For Change, Published date: Jun 2, 2020

Major update: Announcement

Applies To: All

This message is associated with Microsoft 365 Roadmap ID 60371

When this will happen

We will begin rolling this out to Microsoft 365 Monthly Channel, Targeted, in late September (previously July). (This is Insiders Slow Channel which will soon be called Microsoft Beta.)

We expect to roll this out to the Monthly Channel, Production, in late October (previously August).

How this will affect your organization

The feature is on by default.

Traditionally, signatures were stored locally on a user's Windows device. With this feature, signatures will now be associated with an email account.

Signatures will be stored in the user mailbox and will be available on any devices running Outlook for Windows that has been configured with that email account.

When the feature becomes available, Outlook will read the existing local signatures. Outlook will copy signatures selected as default for New messages or Replies/forwards to the account mailbox, making them available across multiple devices.

What you need to do to prepare

The feature is on by default.

Because this new feature is changing how Outlook manages signatures stored on a local drive, third-party add-ins which provided this functionality will no longer work when this feature is enabled. Learn how to mitigate this for your users.

I know a lot of customers like me are looking forward to this update!

Read more ...

How to Create Dynamically Adjusting Exchange Retention Policies

Friday, May 29, 2015
Exchange has supported message retention policies since Exchange 2010. Retention Policies are collections of Retention Tags that dictate how emails are retained in Exchange. Usually this is done to comply with business policies on data retention and/or used as a way to move data from the user's primary mailbox to an archive mailbox.

Retention Policies
The retention policy shown above includes several personal policy tags and one default policy tag that moves emails older than 6 months to the archive. You can customize or create new retention policies for your users based on your company's data retention policies. For example, you can create a retention policy to move all emails to the archive mailbox after 1 year and permanently delete all emails older than 5 years.

Only one mailbox retention policy can be assigned to a mailbox at a time. While you can easily change which retention policy is assigned to a mailbox using the the Exchange Management Shell or the Exchange Admin Center, this can be somewhat tedious.

Note that retention tags are time-based, not size-based. If you're trying to manage your mailbox storage with retention policies the same time-based retention policy may result in widely varying mailbox sizes within the Exchange database store, depending on the user. I developed the following process to dynamically adjust user's retention policy based on mailbox size. The larger the mailbox gets, the more aggressive the retention policy applied.

Start by creating multiple default archive and/or delete retention tags. Make sure to select "applied automatically to entire mailbox (default)" to ensure that it applies to all email items. For example,

  • Default one year move to archive
  • Default 6 months move to archive
  • Default 3 months move to archive
  • Default 7 year delete
  • Default 5 year delete
  • Default 3 year delete
Creating a Default retention tag
Next create multiple retention policies that include the default retention tags you created. For example,
  • High Retention - Default one year move to archive, Default 7 year delete
  • Medium Retention - Default 6 months move to archive, Default 5 year delete
  • Low Retention - Default 3 months move to archive, Default 3 year delete
Apply the High Retention policy to all mailboxes using the following EMS command:
Get-Mailbox -ResultSize unlimited | Set-Mailbox -RetentionPolicy "High Retention"

Note that archive retention tags only apply if the mailbox has an archive mailbox, otherwise the archive tags are ignored.

Copy the following script and save it to one of your Exchange servers in the C:\Scripts folder as Apply-RetentionPolicies.ps1:
$mbx = Get-Mailbox -ResultSize unlimited
$mbx | ForEach-Object -Process {
$size = ( Get-MailboxStatistics $_.Alias ).TotalItemSize
If ( $size -gt "10GB" ) {
  Set-Mailbox $_.Alias -RetentionPolicy "Low Retention Policy"
  }
elseif ( $size -gt "8GB" ) {
  Set-Mailbox $_.Alias -RetentionPolicy "Medium Retention Policy"
  }
else {
  Set-Mailbox $_.Alias -RetentionPolicy "High Retention Policy"
  }
}

Adjust the mailbox sizes in the script to meet your company's retention needs. In the example script above mailboxes greater than 10GB get the Low Retention Policy, mailboxes between 8-10GB get the Medium Retention Policy, and everyone else gets the High Retention Policy.

Next, create a scheduled task that runs the Apply-RetentionPolicies.ps1 script once per day.

Set the "Program/Script" property to:
C:\Windows\System32\WindowsPowerShell\v1.0\powershell.exe
And set the "Add arguments (optional)" to:
-NonInteractive -WindowStyle Hidden -command $ep = (Get-Item env:"ExchangeInstallPath").Value; . $ep\bin\RemoteExchange.ps1; Connect-ExchangeServer -auto; . C:\Scripts\Apply-RetentionPolicies.ps1
Creating a Basic Scheduled Task
The scheduled task must run using the credentials of an account with Organization Management rights.

With this process, as a mailbox gets smaller from a more aggressive retention policy it will automatically get a longer retention policy.

Read more ...

The Last Missing Piece - Exchange 2013 RTM CU1 Released!

Tuesday, April 2, 2013
Exchange 2013 RTM CU1 was released to the web today, finally allowing customers to upgrade from Exchange 2007 and Exchange 2010.  You can download Exchange 2013 RTM CU1 here.  As you probably know, there is no direct upgrade path from Exchange 2003 -- You must upgrade to 2007 or 2010 first.  Read the full release notes here.

The Exchange Team blog has an excellent write-up about the changes in RTM CU1, including much anticipated information about Planning and Deployment.  I'm providing a short summary about CU1 here:

  • Exchange Server 2013 CU1 includes both bug fixes and feature improvements.
  • Setup takes 20 minutes or more per server, depending on your hardware.
  • To upgrade from Exchange 2007 all servers must first be upgraded to Exchange 2007 SP3 Update Rollup 10.
  • To upgrade from Exchange 2010 all servers must first be upgraded to Exchange 2010 SP3.
  • If you are upgrading Exchange 2013 RTM note that CU1 (and all future cumulative updates) are build-to-build updates.  CU1 setup will uninstall Exchange 2013 RTM before it installs CU1.  Any customization you may have done for RTM may be lost.
  • CU1 requires AD schema updates, enterprise AD changes, and AD permissions changes.  Therefore, it requires setup /PrepareSchema, /PrepareAD, and /PrepareDomain topology updates.  The GUI setup of CU1 will do all these steps automatically. Because of these additional steps, setup will take longer on the first installation.
  • If you have not installed Exchange 2013 RTM yet, you can install Exchange 2013 CU1 directly from the CU1 update from the web.  No need to install RTM first.
  • If your environment does not include Exchange 2010 servers, you will not be able to add any 2010 servers after installing 2013. If you plan to have any 2010 servers you should deploy a 2010 multi-role server first.
  • When you deploy the first Exchange 2013 Mailbox server in an existing Exchange organization, a new default Offline Address Book is created. All users perform a full download of this new OAB when Outlook is launched.  To prevent this, assign the current default OAB to each database before installing 2013.  The methods to do this are detailed in the blog post above and the release notes.
  • You can deploy multi-role (CAS and Mailbox) server(s) or separate CAS and Mailbox servers.  Due to the fact that CAS proxies all web requests, you will be unable to manage a Mailbox server until there is at least one 2013 CAS in the environment.
  • It no longer matters which role you update first. If you have dedicated CAS and Mailbox servers you can upgrade either role first.
  • You can no longer uninstall a single server role (i.e., you cannot convert a multi-role server to a single role server).  You can only uninstall all Exchange 2013 roles and redeploy.
  • Mailboxes moved from legacy Exchange versions to 2013 will appear to increase in size an average of 30% due to more accurate space calculations. User quotas may need to be increased to account for this.
  • An Address Book Policy Routing Agent has been introduced in CU1 to provide Address Book policies (different Address Books, depending on group membership).
  • With Exchange 2013 RTM CU1 groups can once again be owners of groups for membership management, as was the case in Exchange 2007.
  • Exchange 2013 CU1 includes rudimentary access to "modern" Public Folders (the Exchange 2013 variety) using OWA.  Users must add a specific Public Folder to their Favorites in OWA.  This is only for 2013 Public Folders and only provides access to existing Public Folders -- users cannot add or delete 2013 Public Folders in OWA 2013.
  • The Exchange Administration Center (EAC) has been enhanced and now includes Unified Messaging management.
  • Exchange 2013 CU1 will support the Exchange Server 2013 Management Pack for System Center Operations Manager (SCOM), due at a later date.
I'll be posting an article about OWA 2013 and EAC enhancements shortly.

Read more ...

Error 0x8007232B 'DNS Name Does Not Exist' when Activating Windows 8

Friday, August 17, 2012
I have been installing Windows 8 Enterprise RTM on my lab machines using the RTM ISO from MSDN.  I've found that each installation does not activate properly, giving the following error:
Error code:          0x8007232B
Error description:   DNS name does not exist.
I have a valid product key for Windows 8 Enterprise from MSDN, but setup doesn't prompt for this key during installation.


Open System properties and click 'View details in Windows Activation'


Click the 'Activate' button to begin activation


Attempting activation...


Error 0x8000232B - DNS name does not exist.

The same thing happens if you try to activate Windows 8 from the PC Settings | Activate Windows menu in the "modern user interface" (aka Metro):
'Windows can't activate right now. Try activating Windows later. If the issue persists, contact your system administrator or technical support department for assistance.'


This occurs because Windows 8 is using a temporary product key.  You need to install the correct product key to complete Activation using the SLMGR.VBS script installed with Windows.

Here are the steps to perform activation with the correct product key after installation:

  • Open an elevated CMD prompt and run the following command, as shown below:

slmgr.vbs /ipk <product key>

  • You will receive a pop-up window from Windows Script Host indicating the product key has been installed successfully.

Installed product key <product key> successfully.
  • Shortly after that, Windows 8 will automatically activate over the Internet.  Or, if you're impatient like me, just click the Activate button to activate windows immediately.

Windows is Activated
Since you're here, be sure to check out my article about building a super-fast Windows Server 2012 lab server for under $1,000!


Read more ...

Get to know the Test-Message cmdlet

Thursday, June 7, 2012
Exchange 2010 includes a little known cmdlet called Test-Message.  This cmdlet is used to troubleshoot the impact of Inbox rules on a message and gather detailed information about how rules are processing it.  It's also useful for testing the flow of moderated messages and to see the affects of large distribution group expansion without actually sending a message.

The RTM version of Test-Message is documented at http://technet.microsoft.com/en-us/library/dd298101(EXCHG.140).aspx, but there are a couple of additional parameters added in Exchange 2010 SP1 that are not listed there.  The purpose of this article is to show you how to configure the cmdlet and give examples its use.

To use the Test-Message cmdlet, you must add a user account or security group to the "Support Diagnostics" RBAC role in Exchange 2010.  You do this from the Exchange Management Shell by running the following command:

New-ManagementRoleAssignment -Role "Support Diagnostics" -SecurityGroup "Organization Management"

The command above adds the Exchange 2010 Organization Management group to the Support Diagnostics RBAC role.  If you want to add the role to an individual user, use the following command:

New-ManagementRoleAssignment -Role "Support Diagnostics" -User Jeff

Note that the added user must close and restart EMS to see the new cmdlet, since access to cmdlets is granted by RBAC when EMS is started.  You can find out which users have the Support Diagnostics role assigned to them by running the following command:

Get-ManagementRoleAssignment -Role "Support Diagnostics"

Now that we have the access to the Test-Message cmdlet through RBAC, let's see what we can do with it.  The examples below use the Exchange 2010 SP1 version of the cmdlet, which includes two additional non-documented parameters, -Arbitration (optional) and -InboxRules (required).

The simplest test would be:

Test-Message -Sender amy@contoso.com -Recipients jason@contoso.com -InboxRules:$false -SendReportTo jeff@contoso.com

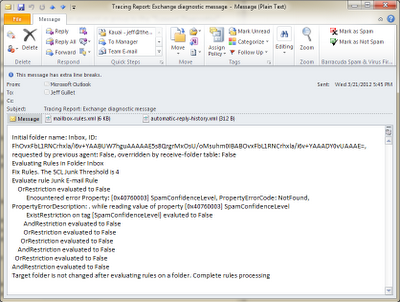
This test will send a system generated message from Amy's mailbox to Jason's mailbox, bypassing Jason's Inbox rules, and then send the resulting report to Jeff's mailbox.  The report looks like this:


Here we can see that the message originated from Amy's Inbox, it evaluated Jeff's Inbox rules, displays the SCL Junk Threshold, and tells you the target folder for the message after the rules have run.  This is an easy way to troubleshoot messages that are deleted or delivered to another folder other than the Inbox.

It's important to note that the Sender parameter can be any SMTP email address, even an external address.  This is useful for testing various rule behaviors.

Note that the message also includes two attachments: mailbox-rules.xml and automatic-reply-history.xml.  Mailbox-rules.xml contains an export of all the rules for the target mailbox.  This can be used to backup the Inbox rule set and/or export to another user's mailbox.  Automatic-reply-history.xml which lists all the recipients where an OOF message fired.

By default, Test-Message adds the header, X-MS-Exchange-Organization-Test-Message: Supress to the message (and yes, "Supress" is mispelled that way).  This header causes Exchange to delete the message before it is delivered to the recipient mailbox.  If you want the message to be delivered to the recipient add the -DeliverMessage parameter.  An Exchange Diagnostic Message will then be delivered with the text, "This message was generated by an Exchange administrator. You can ignore this message, unless your administrator has requested otherwise."

See Tom Kern's article, Test-Message Improvements in Exchange 2010 Sp1 for even more info on the Test-Message cmdlet.
Read more ...