Showing posts with label Windows7. Show all posts

New Remote Desktop Connection Manager 2.7 Released

Wednesday, November 19, 2014


Note: Microsoft has discontinued Remote Desktop Manager (RDCMan 2.7) in March 2020 due to a security vulnerability. Customers are encouraged to use the MSTSC client built-in to Windows instead.
Microsoft released a new version of Remote Desktop Connection Manager (RDCMan) 2.7 to the public today.

RDCMan is a central place where you can organize, group, and manage your various Remote Desktop connections. This is particularly useful for system administrators, developers, testers, and lab managers who maintain groups of computers and connect to them frequently. I probably spend more time in RDC Manager than any other application during the day.

The previous version 2.2 was last released in May 2010, so this is a very welcome update. Previous versions lacked some functions and caused excessive CPU utilization on some computers, especially those with Nvidia GPUs. RDCMan was written by Julian Burger, one of the principal developers on the Windows Live Experiences team.

RDCMan 2.7 version is a major feature release. New features include:

  • Virtual machine connect-to-console support.
  • Smart groups.
  • Support for credential encryption with certificates.
  • Windows 8 remote action support (charms, app commands, switch tasks, etc).
  • Support for Windows 8, Windows 8.1 / Windows Server 2012, Windows Server 2012 R2.
  • Log Off Server now works properly on all versions.
Important Upgrade Notes: You should know that when you upgrade, RDCMan will be unable to read any saved encrypted passwords. You will need to re-enter your saved encrypted passwords after installation.
The workaround is to set the "Store password as clear text" checkbox in RDCMan 2.2 for preexisting groups and/or servers. When you upgrade to version 2.7, RDCMan will read the existing passwords and will encrypt them. "Store passwords as plain text" is no longer an option in version 2.7.


Read more ...

How to Remove Windows 7 / Server 2008 R2 Service Pack 1 Backup Files

Monday, March 7, 2011
So you've updated your Windows 7 and Windows Server 2008 R2 computers with Service Pack 1 (SP1), and everything is running great.  You've tested your applications and haven't run into any compatibility issues, so now you'd like to delete the Service Pack 1 backup files.  Here's how to do it.
Note: The Service Pack Backup Files allow you to uninstall SP1, rolling the operating system back to RTM.  Once the backup files are deleted, you can no longer roll the system back.  Make sure you have given enough time to ensure that the system is behaving properly with SP1 before deleting the backup files.
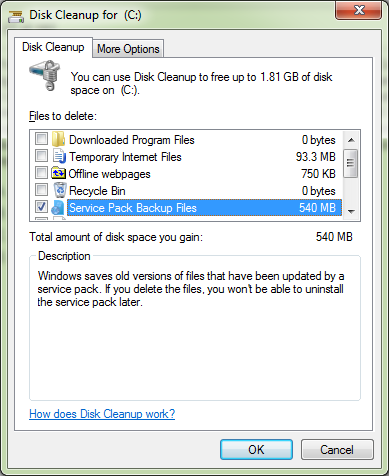
The process of deleting the Service Pack backup files is the same in both Windows 7 and Windows Server 2008 R2.  Deleting the SP1 backup files will reclaim about 540MB on the system drive for Windows 7, and about 1.3GB for Windows Server 2008 R2.
  • Click the Start button and type cleanup in the search bar to run the Disk Cleanup utility.
  • Scroll through the list of Files to Delete, and select Service Pack Backup Files, as shown below:

  • Click OK to delete the Service Pack 1 backup files.  This will take a few moments.
As noted in the comment below, you can also remove the Service Pack backup files using the following command from the command line:
DISM /Online /Cleanup-Image /SPSuperseded
I typically run a disk defragmentation cycle after the SP1 backup files have been removed, since this is a fairly large amount of data to remove.
Read more ...

Windows Server 2008 R2 and Windows 7 SP1 Releases to Manufacturing Today

Wednesday, February 9, 2011

The Microsoft Windows Server Team announced today that Service Pack 1 for Windows Server 2008 R2 and Windows 7 was released to manufacturing (RTM) today.  Along with numerous bug fixes and security improvements, SP1 offers two significant new features: Dynamic Memory and RemoteFX.

Dynamic Memory pools all the memory available on a physical host and then dynamically distributes available memory, as it is needed, to virtual machines running on that host.  With Dynamic Memory Balancing, virtual machines will be able to receive new memory allocations, based on changes in workload, without a service interruption.  This is particularly useful in VDI implementations.

Fellow MVP Mark Wilson describes Dynamic Memory very well:

"Microsoft’s dynamic memory is not the same as VMware’s – it’s all about over-subscription vs. over commitment. Whereas VMware will overcommit memory and then de-duplicate to reclaim what it needs, Microsoft takes the approach of only providing each VM with enough memory to start up, monitoring performance and adding memory as required, and taking it back when applications are closed."
RemoteFX lets you virtualize the Graphical Processing Unit (GPU) on the server side and deliver rich media and 3D user experiences for VDI clients.

Service Pack 1 for Windows Server 2008 R2 and Windows 7 will be available to current customers of the Windows Volume Licensing program, as well as MSDN and TechNet subscribers on February 16, 2011.  On February 22, both will be available to all customers through Windows Update and will also come preinstalled on new servers ordered.
Read more ...

Windows 7 Downgrade Rights

Tuesday, July 20, 2010
Downgrade rights enable customers to continue running Windows Vista or Windows XP after obtaining a Windows 7 license. Downgrading is simple, and this resource makes it straightforward for you to understand the process.


Customers must:
  • Purchase a PC preinstalled with Windows 7.
  • Accept the Windows 7 Software License Terms.
  • Perform the downgrade or authorize an Original Equipment Manufacturer (OEM) to perform it.
  • See additional details and FAQ.
The Downgrade Process
Follow these steps to downgrade to a previous version of Windows:

  • Obtain genuine Windows XP Professional or Tablet PC Edition and a corresponding product key.  The media should come from a prior legally licensed version from the OEM or Retail channels. Additionally an end user, who is licensed separately through Microsoft Volume Licensing (VL) programs, may provide their VL media and key to their system builder to use to facilitate the downgrade on only their systems.
  • Insert Windows XP Professional or Tablet PC Edition media in the CD drive and follow the installation instructions.
  • Type the product key. If the software was previously activated, you will not be able to activate it online. In this case, the appropriate local Activation Support phone number will be displayed. Call the number and explain the circumstances. When it is determined that the end user has an eligible Windows license, the customer service representative will provide a single-use activation code to activate the software. Please note that Microsoft does not provide a full product key in this scenario.
  • Activate the software.
Also see the Step-by-Step Guide and FAQ for Windows 7 for customers.

OEM Versions of Windows 7 Eligible for Downgrade
Only certain OEM versions of Windows 7 include downgrade rights:

  • Windows 7 Professional and Windows 7 Ultimate include downgrade rights to Windows Vista Business and Windows Vista Ultimate.
  • Windows 7 Professional and Windows 7 Ultimate temporarily includes downgrade rights to Windows XP Professional, Windows XP Tablet PC Edition, or Windows XP x64 Edition.
  • Other OEM Windows 7 versions (for instance, Windows 7 Home Basic and Windows 7 Home Premium) do not include downgrade rights.
Read more ...

Download the Image Resizer Powertoy Clone for Windows 7 / Server 2008 R2

Saturday, February 27, 2010
One thing lacking in Windows 7 and Windows Server 2008 R2 is a native picture resizing tool.  I find this surprising since Windows 7 is chock full of image and video eye-candy.

Thankfully, there's an easy to install image resizer for all versions of Windows available on Codeplex.com.  The tool is available in both 32-bit and 64-bit versions.  Image Resizer 2.1 allows you to resize any image by simply right-clicking the image(s) and selecting Resize from the context menu, as shown.


Then you can choose the size and options for the pictures, as shown.


You can perform bulk resizing by selecting more than one photo and resize them.  Can't get much easier than that!
Read more ...

The TechEd 2010 Count Down Gadget

Tuesday, January 19, 2010
Are you going to TechEd 2010 North America?  Can't wait to visit New Orleans with all your fellow IT Pros?  Well, get your geek on with the TechEd 2010 Count Down Gadget for Windows 7 and Windows Vista!


Just download the gadget from any Windows 7 or Vista computer and double-click it to add it to your Windows Sidebar.  But hey, you're an IT Pro.  You already knew that.

Update: The TechEd 2010 Count Down Gadget has been accepted and approved for distribution through the Windows Gallery.

Special thanks goes to Oliver Green with CodeBlog.co.uk.  He did all the smart stuff.  I just changed the graphics.
Read more ...

How to Create a Boot VHD Step By Step

Friday, January 1, 2010
Windows 7 and Windows Server 2008 R2 allow you to create a bootable VHD (virtual hard disk) with its own operating system (also called Native Boot).  This is really useful when you need to run another operating system or platform on the same hardware.
Note: Native Boot is limited to the following operating systems: Windows 7 Enterprise (x86 or x64), Windows 7 Ultimate (x86 or x64), and Windows Server 2008 R2.
For example, my Dell workstation normally runs Windows 7 Ultimate x64.  I wanted to update the BIOS from Dell's support site, but the BIOS installer won't run in x64 operating systems.  I also wanted to update the firmware on my Parrot Minikit Slim bluetooth car kit, but the USB driver for the P5+ USB Stage1 device is only available for x86 computers.

In previous versions of Windows, the solution would be to make a dual-boot system.  The problem with this is that you and Windows will need to contend with similarly named folders (i.e., \Windows and \Program Files).  A bootable VHD is a discreet virtual disk that contains it's own OS.  The single VHD file can reside on your normal disk drive (for example, C: or D:), or even a USB drive.  The VHD will contain its own file structure, but you can still access the physical drives, folders and devices on the parent computer.

The walkthrough I'm documenting here will create a bootable VHD file that runs Windows 7 Enterprise x86.  Let's get started.

 Creating the VHD Drive
  • First, start up and login to the parent operating system (in my case, Windows 7 Ultimate x64).
  • Open Computer Management in Administrative Tools
  • Expand Storage and click Disk Management. You will see your normal physical drives.
  • Right-click Disk Management and select Create VHD
  • Enter the file path and name, size, and format for the VHD as show below:
  • Here, I'm creating a 20GB dynamically expanding VHD named D:\Win7x86.vhd.  A dynamic disk will start off very small (~42KB) and will grow as data is written to it, up to the maximum size specified (20GB).  Microsoft has made huge improvements in the performance of dynamic VHDs in Windows 7 and Windows Server 2008 R2, so they perform nearly the same as fixed size disks.
  • Click OK to create and mount the VHD volume.  The new disk will be listed in the bottom pane of the Disk Management console as an Unknown Disk.
  • Right-click the Unknown Disk and select Initialize Disk, as shown here:
  • Click OK to initialize the disk with an MBR partition.
  • Now right-click the Unallocated disk and create a New Simple Volume.  The New Simple Volume Wizard will run.  Assign the new volume as drive X:, give it the volume name, Win7x86, and quick format it with the NTFS file system.  The new volume will be displayed in Disk Management and the D:\Win7x86.vhd file will grow to about 77MB.
You now have a new 20GB virtual hard disk, drive X:  Next, we will prepare the disk to install Windows 7 Enterprise x86.

Preparing the VHD for the New Operating System
  • First, you need to download and install the Windows Automated Installation Kit (WAIK) for Windows 7 from Microsoft.  Be aware that this is a 1.7GB ISO and can take some time to download.  Burn the ISO to a DVD or mount it using virtual CD-ROM software like UltraISO, PowerISO, etc., and then install WAIK.
  • Open a CMD prompt as Administrator and change to the %SystemDrive%\Program Files\Windows AIK\Tools\ folder.  In my case, this is C:\Program Files\Windows AIK\Tools\amd64.
  • Mount the Windows 7 Enterprise Edition x86 media.  In my case, this is on the DVD drive E:
  • Run the following command to prepare drive X: for the new operating system:

imagex /apply E:\sources\install.wim 1 X:\
  • Imagex will apply the Windows 7 binaries to the VHD drive X:  The 1 specifies that the operating system is Enterprise Edition.  The application will begin, as shown below:
  • Imagex application normally takes about 7-8 minutes, despite what the progress bar shows.  When it completes, you will see several new folders on drive X:
  • Now you need to detach the VHD disk.  In Disk Management, right-click the VHD disk and select Detach VHD, as shown below:
  • You will notice that the D:\Win7x86.vhd file has grown to about 5.5GB.
We now have a VHD with the Windows 7 Enterprise x86 files installed on it.  We need to configure the computer so that it can boot to the VHD and complete the installation of Windows 7.

Adding the VHD to the Boot Menu
  •  Open an elevated CMD prompt and enter the following command:

bcdedit /copy {current} /d "Windows 7 Enterprise x86"
  • This will return the GUID of the Loader Object that you will use to replace in the following commands:
bcdedit /set device vhd=[driveletter:]\vhdpath\vhdfilename

bcdedit /set osdevice vhd=[driveletter:]\vhdpath\vhdfilename

bcdedit /set detectHAL on

The detectHAL command is used to force Windows to auto-detect the hardware abstraction layer. The commands I used are shown below:


Completing the Installation

Now we are ready to boot from the VHD. When you restart the computer you will see a new entry in the boot menu for Windows 7 Enterprise x86, along with the default Windows 7 or Windows Server 2008 R2 option.

Restart the computer and select the new Windows 7 Enterprise x86 option to complete the installation of Windows 7. The first time the new OS starts, the install process will install needed device drivers and restart the computer. The second time your start the OS, miniprep process will walk you through configuring the user name, password, computer name, and the network settings.

Congratulations! You have completed the boot to VHD process.
Read more ...

NTFS Inheritance Rule Change

Tuesday, November 24, 2009

Up until recently, NTFS permissions have followed these inheritance rules:

  • If a file or folder is copied to some other location, it will inherit the new location's NTFS permissions.
  • If a file or folder is moved to some other location on a different disk drive, it will inherit the new location's NTFS permissions.
  • If a file or folder is moved to some other location on the same disk drive, it will retain the original location's NTFS permissions.

One of the NTFS inheritance rules changed in Windows 2008, R2, Windows Vista, and Windows 7. Now if you move a file or folder, it will inherit the new location's NTFS permissions, even if the new location is on the same disk drive. This is a radical shift that you need to taken into account when you're moving files.

You can find a reference to this change in the Notes section in the Microsoft article "Inherited permissions are not automatically updated when you move folders".

Thanks to Murat Yildirimoglu, an MCSE and MCT in Istanbul, Turkey, for the article.

Read more ...

Windows 7 Interoperability Pack Released

Tuesday, October 27, 2009
Microsoft announced today the release of the Platform Update for Windows Server 2008 and Windows Vista, as well as Remote Desktop Connection Client 7.0 and Windows Management Framework.  This was previously known as the Windows 7 Interoperability Pack.

Please see the following Microsoft Knowledge Base articles for more information.
Read more ...

Convert Your Windows 7 ISO to a Universal ISO Disk

Monday, August 31, 2009

When you download Windows 7 ISOs from MSDN or TechNet, you'll notice that there are several versions of the same disk. These downloads include the Home Premium, Professional, and Ultimate editions.

An ISO-9660 image file is an exact representation of a CD or DVD, including the content and the logical format. The Windows 7 binaries for each edition are identical, it's the product key that unlocks the various features that make each edition what it is.

There is a small file called ei.cfg in the \sources folder of each ISO that "locks" them to each edition. If this file is deleted, it unlocks the ISO and allows you to select to edition of the Windows 7 operating system to install, as shown below:

As you can see, this not only allows you to install Home Premium, Professional, or Ultimate editions, it also allows you to install Starter or Home Basic editions. Starter and Home Basic editions are less featured and are designed for emerging markets and low powered netbooks and laptops.

You can edit the ISO to remove the ei.cfg file using any ISO editor, such as PowerISO or UltraISO. Keep in mind that you will have to rebuild (save) the new ISO, which can take some time and disk space.

An even better way to do this is by using a cool little utility called eicfg_remover from code.kliu.org. The utility disables the ei.cfg file by toggling the deletion bit in the UDF table in the ISO to treat it like it no longer exists. This eliminates the need to rebuild the ISO and makes it possible to reverse the patch, restoring it to its original state. Just run eicfg_remover again to do so.

By creating a "universal" Windows 7 disk, you'll save disk space and increase the ISO's versatility.

Read more ...

Windows 7 Feature Matrix

Tuesday, August 11, 2009

Windows 7 is available in 6 different SKUs, but for the most part it boils down to three major editions: Windows 7 Home Premium, Windows 7 Professional, and Window 7 Ultimate / Enterprise.

The Ultimate and Enterprise editions both have the same features, the difference is how Windows 7 is purchased. Ultimate is for the retail (individual user) channel and Enterprise is for volume licensing customers. Enterprise customers with Software Assurance also benefit from the features in the Microsoft Desktop Optimization Pack (MDOP).

Each edition is available for both x86 (32-bit) and x64 (64-bit) platforms.

The following table lists the new features in Windows 7 for each edition (SKU).

Choosing the correct version of Windows 7 is made easier when you look at the features available in each version. Most small and medium-sized customers will choose Windows 7 Professional.

Read more ...

Shutdown Schedule for Windows 7 Beta and Windows 7 RC

Monday, August 10, 2009

Windows 7 RTM (Release to Manufacturing) became available to systems builders and MSDN and TechNet Plus subscribers on August 6, 2009.

You can continue to download Windows 7 RC through August 15, 2009. To avoid interruption, you should rebuild test machines by using a valid Windows operating system before Windows 7 Beta and Windows 7 RC expire. Windows will automatically notify you that the expiration process is about to begin. Two weeks later, your PC will shut down every two hours.

  • For Windows 7 Beta, the bi-hourly shutdowns will begin July 1, 2009. The software will expire August 1, 2009.
  • For Windows 7 RC, the bi-hourly shutdowns will begin March 1, 2010. The software will expire June 1, 2010.

Read more ...

Windows 7 and Windows Server 2008 R2 RTMs

Wednesday, July 22, 2009

Microsoft just announced that Windows 7 and Windows 2008 R2 released to manufacturing (RTM’d).

RTM officially happens only after sign-off occurs. What happens is a build gets designated as a RTM contender after going through significant testing and meeting our quality bar for RTM. Then, it goes though all the validation checks required for RTM including having all languages of that build completed. If all the validation checks have passed – sign-off for RTM can occur. Today after all the validation checks were met, we signed off and declared build 7600 as RTM.
I've been working with Windows 7 and Windows Server 2008 R2 for over 18 months in the Windows TAP (Technology Adoption Program) and as an early adopter. I'm happy to see a lot of changes that I and others in my company requested get implemented. We are delighted to work with the Windows and Server development teams, who produced such awesome products.

Evaluation software will be available for download in the first half of August and the full product available to customers with Software Assurance in the second half of August. General “off the shelf” availability will come in the September timeframe, as planned.

Congratulations, Windows Development Teams! You have two sure fire winners with these new operating systems.

PS - Look for our new book, "Windows Server 2008 R2 Unleashed" to be released soon.


Read more ...

Upgrade to Windows 7 for $49.99!

Saturday, June 27, 2009

Today, Microsoft announced a fantastic deal for current Microsoft customers. You can now pre-order Windows 7 Home Premium Upgrade for $49.99 or Windows 7 Professional Upgrade for $99.99 from select retail partners. The offer ends July 11th in the U.S. and Canada, and on July 5th for Japan or while supplies last

As a way of saying thank you to our loyal Windows customers, we are excited to introduce a special time limited offer! We will offer people in select markets the opportunity to pre-order Windows 7 at a more than 50% discount. In the US, this will mean you can pre-order Windows 7 Home Premium for USD $49.99 or Windows 7 Professional for USD $99.99. You can take advantage of this special offer online via select retail partners such as Best Buy or Amazon, or the online Microsoft Store (in participating markets).

This is a great deal for this fantastic operating system. Take advantage of it!

Read more ...

Windows 7 Pricing and Upgrade Program Information Released

Thursday, June 25, 2009

Today, Microsoft released its pricing model for Windows 7, the much anticipated operating system that will replace Windows Vista.

The estimated retail prices for upgrade packaged retail product of Windows 7 in the U.S. are:

  • Windows 7 Home Premium (Upgrade): $119.99
  • Windows 7 Professional (Upgrade): $199.99
  • Windows 7 Ultimate (Upgrade): $219.99

And the estimated retail prices for full packaged retail product of Windows 7 in the U.S. are:

  • Windows 7 Home Premium (Full): $199.99
  • Windows 7 Professional (Full): $299.99
  • Windows 7 Ultimate (Full): $319.99

This means that Windows 7 Home Premium full retail product is $40.00 less than Windows Vista Home Premium today.

General availability of Windows 7 is scheduled for October 22, 2009 worldwide.

For those who need a new PC now but still want to get Windows 7, the Windows 7 Upgrade Option Program starts tomorrow, June 26th. Anyone who buys a PC from a participating OEM or retailer with Windows Vista Home Premium, Business or Ultimate on it will all receive an upgrade to the corresponding version of Windows 7 at little or no cost. The Windows 7 Upgrade Option Program will be available until January 31, 2010 – and it's global. For more information on taking advantage of the Windows 7 Upgrade Option Program, visit www.windows.com/upgradeoffer.

Read more ...

Video of What's New in Windows 7

Thursday, May 7, 2009

This interesting 6 minute video covers the key new features and improvements in the Windows 7 Release Candidate. This includes areas like performance, networking, security, PC management as well as everyday tasks.

Read more ...

Windows 7 and Windows 2008 R2 RC is Available

Tuesday, May 5, 2009

Today, Microsoft released the Windows 7 and Windows Server 2008 R2 Release Candidate (RC) for general IT users.

What's new in RC?

In addition to improvements in performance, reliability, and compatibility, the Windows 7 RC has two new features that we think you will like:

Windows XP Mode (beta): We know that compatibility is a big issue for many small businesses. Which is why we are excited to announce the availability of Windows XP Mode (beta). This new feature allows Windows 7 Professional users to run many Windows XP productivity applications seamlessly in Windows XP Mode. Utilizing Windows Virtual PC, Windows XP applications can be launched with a single click directly from the Windows 7 desktop. (Please note that Windows XP Mode is currently not included at the time of downloading Windows 7 RC.) Install the Windows XP Mode (beta).

Remote Media Streaming: Remote streaming enables you to securely access your digital media libraries regardless of where you are. Simply associate two Windows 7 PCs with the way you connect to the Internet and allow Internet access to your media on both of them. Windows Media Player displays and plays the media libraries from those remote PCs in the same manner as other shared media libraries on a home network.

There is a lot to be excited about. So go ahead, Install Windows 7 RC today and experience for yourself why this operating system a great choice for your customers - and a great opportunity for your business.


Read more ...

Windows 7 and Windows Server 2008 R2 RC Released

Thursday, April 30, 2009

Microsoft released Windows 7 Release Candidate (RC) build 7100 today. The RC reflects extensive beta tester feedback which the MVP Community directly impacted.

Managed Beta program participants, including MSDN and TechNet subscriberscan download it from Microsoft Connect. If you are not among those who participated in one of the managed Beta programs, you only have to wait until Tuesday, May 5, when the RC will be available through the Customer Preview Program. The final engineering milestone is the release to manufacturing (RTM), typically 3-5 months after the RC.

As a member of the Windows7 Technology Adoption Program (TAP), I've had the chance to work with Windows7 and Windows Server 2008 R2 from the earliest builds and have traveled to Redmond to participate in the Windows7 Summits. As time goes on, I'll be posting my usual tips, tricks and troubleshooting articles on this blog.

Windows 7 beta facts:

  • Over 2000 MVPs participated in the beta on Connect.

  • MVPs contributed and filed over 700 bugs in the first week the beta was released.

  • Engineering fixed over 2000 bugs during the first two weeks.

  • The Windows 7 Forum was the premier destination support beta testers with over 25k posts in the first month

  • Windows 7 Beta forums success continues to be moderated by 100+ MVPs.

  • Windows 7 Beta forums answer rate soars to 88% on a volume of more than 40,000 posts.

  • Highlights of positive feedback from beta testers: Windows 7 beta speed / responsiveness, taskbar, and UX are top rated early features

I can tell you that I've been running Windows 7 on my Asus 1000HE netbook and it's absolutely awesome! It ran right out of the box with 1GB of RAM and even displays the Windows Aero interface. I would venture to say that anything that can run Windows XP will run Windows 7 - and it will run even better! Microsoft has a real winner with this operating system. I can't wait to see the RTM version.

The recommended minimum hardware for Windows 7 Beta can be found at https://www.microsoft.com/windows/windows-7/beta-faq.aspx.

As for Windows 2008 R2, I run it on several host servers, VMs and even a dual-boot Windows 7 / Windows Server 2008 R2 laptop computer. The build quality is outstanding and I love all the new features including mobile broadband support, Agile VPN, and the improvements to Server Manager. Be sure to check out the Best Practices Analyzers in Server Manager.

Read more ...

How to Hide a User Account on the Logon Screen

Saturday, March 28, 2009

Maybe you created a user account on your XP computer so your nephew could use it when he was visiting you. Now he's gone home and you really don't want to see that account choice every time you log on to Windows, but you also don't want to just delete the account because he'll probably be back again next year. Here's how to hide an account from the logon screen:

  • Before editing the registry, always back it up just to be safe.

  • Open the registry editor and navigate to the following key:

HKEY_LOCAL_MACHINE \ SOFTWARE \ Microsoft \
Windows NT \ CurrentVersion \ Winlogon \ SpecialAccounts \
UserList

Note: The SpecialAccounts \ UserList keys may not exist on your computer. If they do not, create them.

  • In the right pane, you'll see a list of items that correspond to the user accounts that exist on the computer but are not shown on the logon screen. You'll probably be surprised at how many there are.

  • Right click an empty space in the right pane, select NEW and DWORD value.
    Right click the new value and rename it to the exact name of the user account you want to hide.

  • Close the registry editor.

Now the account name won't show up on the logon screen. You can unhide the account at any time by deleting the registry key you created. Your nephew can still log onto the account while it's hidden. Just press CTRL+ALT+DEL twice in a row at the logon screen and you'll get the logon dialog box that allows you to type in the username.

Note: This tip works for Windows XP, Windows 7, Windows Server 2008 and Windows Server 2008 R2. The SpecialAccounts key may not exist by default, but if you create it as specified above it works a treat!

Additional Note: I've discovered this tip does not work in Windows Vista because Microsoft removed the "Classic Logon" functionality from this OS. You can still hide the account, but you won't be able to logon as this hidden account by pressing Ctrl-Alt-Del twice. You can, however still switch to this account using user account switching.

Thanks to Deb Shinder for the tip!

Read more ...

How to Install Windows 7 from a USB Stick

Tuesday, March 10, 2009

Helmer Zandbergen is a Dutch IT pro who wrote an excellent article that explains how to how to install Windows 7 from a USB stick in 11 easy steps.

All you need is a PC with USB boot-support (any modern PC), Windows 7 installation files, and a USB stick with at least 4 GB free space.

I used this method to install Win7 on my new Asus Eee PC 1000HE netbook and it works great!

  • Plug in your USB stick
  • Open Command Prompt with admin rights (Start –> enter cmd –> press CTRL-SHIFT+ENTER and click Yes at the UAC prompt)
  • Run Diskpart by typing diskpart and press enter
  • Now type List disk (and press enter). My USB stick is Disk 2.
  • Enter the following commands, where I assume that your USB stick is also Disk 2. If your USB stick is Disk 5, just use Disk 5 instead of my Disk 2! Enter the following commands one by one, each followed by Enter:

Select Disk 2

Clean

Create Partition Primary

Select Partition 1

Active

Format FS=FAT32 (depending on the size of your USB stick this can take a moment)

Assign

Exit

  • Now copy the entire content of your Windows 7 DVD (or Windows 7 source folder, if you extracted the ISO) to the root of your USB stick.
  • Now we still have to make the USB stick bootable. Note: If you are currently running a 64-bit OS and the source (on the USB stick) is 32-bit, you can’t run the following command. Just be sure the source (on the USB stick) and the currently running OS are of the same type!
  • In the Command Prompt (which you didn’t close, I hope) type P: (the drive letter of your USB stick) followed by Enter
  • Type CD\Boot followed by Enter
  • To create a bootsector on the USB stick enter Bootsect /NT60 P: (your USB drive letter) followed by Enter.
  • Reboot your PC and change the boot order (in the BIOS) if needed, so the USB stick is first in the boot order.

Read more ...