Docs.com is a Microsoft online platform where you can publish and discover Word, Excel, PowerPoint, OneNote, Sway, and PDF documents, among others. With Docs.com, you can create an online portfolio of your expertise, discover, download, or bookmark works from other authors, and build your brand with built-in SEO, analytics, and email and social sharing.The SEO and discoverability features of Docs.com are powerful and make it imperative that you secure the data you store on Docs.com. I was easily able to search for and view public documents with sensitive and private information in Docs.com. See the following Ars Technica article to scare the bejeebus out of you: Doxed by Microsoft’s Docs.com: Users unwittingly shared sensitive docs publicly.
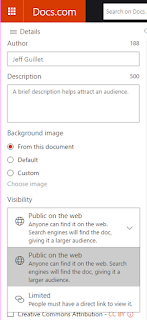
 Whenever you publish a document to Docs.com the default visibility setting is Public, meaning that anyone can find it on the web using the Docs.com search form or from search engines like Bing or Google. When you publish a document, Docs.com warns you,
You are making your document publicly available on the web so search engines can find it. Make sure it doesn't contain private information that you don't want to share.But it also gives you the option to remember this setting and not warn you again. This makes it all too easy to forget that all your future publications will be public by default.
Docs.com is meant to be a service for sharing documents, either publicly (to everyone), or limited (only to those who have the URL). A third option, Organization, allows access to your docs only from users who sign in using organizational credentials for your Office 365 tenant, but this visibility setting is currently only available for schools.
If you're using Docs.com to store sensitive data you're doing it wrong. You should probably be storing it locally, on a secure network drive, or on OneDrive with the correct security settings configured.
There are virtually no administrators controls that can be placed on users' data. All visibility changes and deletions must be performed by the end-user.
To change the visibility settings on a currently published document, sign into your Docs.com profile page. Select the document(s) you want to update and click Edit. Here, you can change the visibility from Public to Limited, or possibly to Organization, if you're a school. Of course, you can always just delete the document, as well.
Keep in mind that changing the visibility of a document or collection from Public to Organization doesn’t immediately remove the index even after the indexed link no longer works. It typically takes several days until links are fully removed from search engine listings.
If you wish to delete your Docs.com account be aware your page on the site and all associated content will be permanently deleted. Make sure you download and save any data you wish to keep from Docs.com first, then go to the Docs.com setup page and click Delete Account at the bottom.
The only administrator control available to your Office 365 tenant is to disable allowing end-users to publish documents to Docs.com using their Office 365 credentials for your tenant. It will not prevent them from publishing data with another credential (Hotmail, Facebook, etc.)
To disable Docs.com in your tenant (it's not enabled by default), log into the Office 365 portal as a tenant administrator and go to the Admin portal. Click Settings > Services and Add-Ins > Docs.com and then turn it off.
This will disallow end-users from publishing additional documents to Docs.com going forward, but it will not delete any published data or accounts.
Do you need additional help with Office 365 or your on-premises environment? Contact EXPTA Consulting today for a free consultation. Visit www.expta.com or on Skype for Business.


No comments:
Post a Comment
Thank you for your comment! It is my hope that you find the information here useful. Let others know if this post helped you out, or if you have a comment or further information.