KEMP Series: How to Configure General Settings on the KEMP Virtual LoadMaster

Friday, January 30, 2015
This is part two in a series of articles detailing load balancing for Exchange using the KEMP virtual load balancer (VLB). In this article we will be configuring the general settings for the VLB before we configure specific settings for L4 or L7 load balancing.

The other articles in this series are:
In the previous article I gave a brief overview of some of the fundamentals of load balancing and described how to download and install a free trial of the KEMP Virtual LoadMaster for your home lab. Now we will configure the general settings using the web interface.

Begin by logging into the VLB management interface from a web browser with the password you configured earlier. Remember the admin username is bal.

System Configuration

Click System Configuration on the left to expand these options. Under Interfaces you will see that the VLB has two NICs, eth0 and eth1. Since we are configuring a one-armed load balancer only eth0 has an IP address, which it got from DHCP. This is the IP address used for incoming traffic that will be load balanced. It is also currently used as the management IP. We will not be using eth1, so that IP is blank.

You will want to change the IP address for eth0 to a static IP. Enter the static IP address in CIDR format (i.e, 192.168.1.60/24) and click the Set Address button. After confirming the change, your browser will be redirected to the new IP address.


You'll notice that the link speed is set to automatic and it shows the current speed and duplex. You have the option to adjust the MTU (1500 is correct for most networks) and you can configure a VLAN if required.

Expand Local DNS Configuration. Here you can set a new hostname for the VLB if you wish (the default name is lb100). Click DNS Configuration to set your DNS server IP(s) and your DNS search domains.


Under Route Management. confirm that the default gateway IP address is correct. If you need to change it remember to click the Set IPv4 Default Gateway button.

Expand System Administration. Here is where you can change your password, update the KEMP LoadMaster license, shutdown or restart the VLB, update the LoadMaster software, and backup or restore the configuration.

Click Date/Time to enter the NTP host(s) to use for accurate time. I recommend using a local Domain Controller and/or pool.ntp.org. You can enter multiple NTP server names or IPs separated by spaces. Click the Set NTP Host button to save the configuration. Then set your local timezone and click the Set TimeZone button to save it.

Expand Miscellaneous Options and click Remote Access. Change the port used for Allow Web Administrative Access from port 443 to a custom port, such as 8443. This will allow you to access the LoadMaster web UI using a URL such as https://192.168.1.60:8443. If you change the UI port, you will be able to load balance SSL port 443 traffic using the same IP, otherwise you will need to configure additional IP address to load balance the same port. Remember to click the Set Port button to save the change. You will need to restart the LoadMaster to affect the port change. Do so under System Administration > System Reboot > Reboot. Once it restarts access the web UI using the new URL:port and login.

Expand System Configuration > Miscellaneous Options > L7 Configuration. Select X-Forward-For for the Additional L7 Header field. This will configure the VLB to forward the client's original IP address to the real server so it can be logged.


Next, change the 100-Continue Handling setting to RFC-7231 Compliant. I found the default value of RFC-2616 Compliant prevents MRS connections in hybrid scenarios with Office 365. Thanks to Brian Reid's article that lead me to this solution.

Configure a value for Least Connections Slow Start and click the Set Slow Start button. This is the number of seconds that the LoadMaster will throttle connections after a node comes online. The default value is 0, which means no throttling. Slow Start prevents the load balancer from overloading a node that comes back online because it has no current connections.

Certificates

If you plan to do SSL offloading or SSL bridging you will need to install the endpoint's SSL certificate on the load balancer. As described in the first part of this series, with this configuration client connections terminate at the load balancer. The load balancer then sends traffic to the real servers as HTTP (offloading) or re-encrypts the traffic to the real servers (bridging).

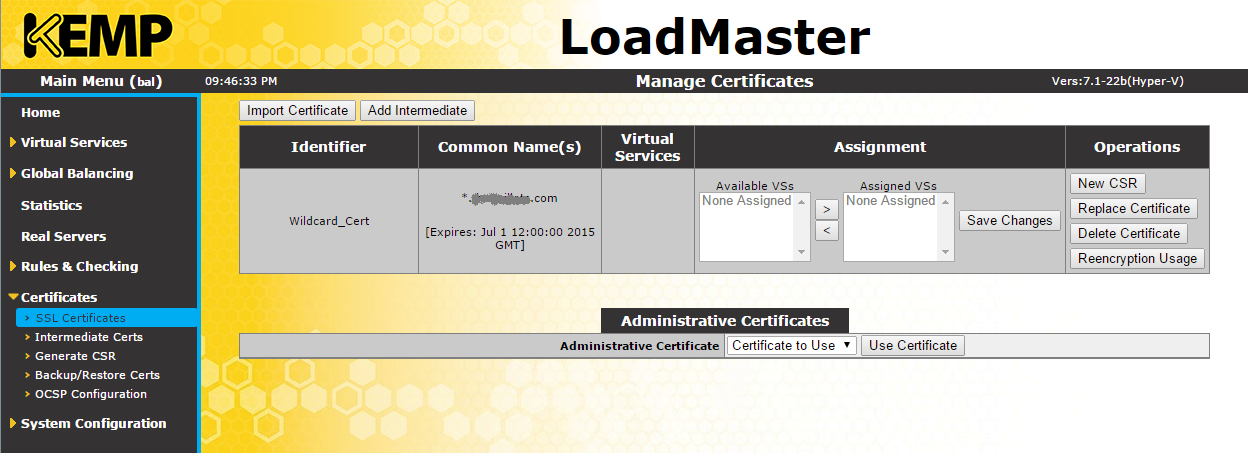
To install an SSL certificate on the VLB click Certificates > SSL Certificates. Under Manage Certificates click the Import Certificate button. Click the Choose File button to browse for the certificate file. Most times this is a PFX file which includes the certificate and private key. Enter the password for the PFX file in the Pass Phrase field and enter a useful Certificate Identifier.


Click Save to import the SSL certificate. You will now see that the SSL certificate is installed.


Almost all third-party trusted CAs use intermediate CAs to issue their certificates. You should install these intermediate certs on the load balancer, too. Click the Add Intermediate button on SSL Certificates.Click the Choose File button and browse for the intermediate CA cert file(s) to install. These certs need to be .cer or .pem files. Once they are installed you will see see them under Certificates > Intermediate Certs.


That does it for configuring general settings. In the next article I'll cover how to configure layer 7 load balancing for Exchange 2013.

Read more ...

KEMP Series: Introduction to Load Balancing for Exchange and Other Workloads

Tuesday, January 27, 2015
Today I'm beginning a series of articles detailing load balancing for Exchange using the Kemp virtual load balancer (VLB). In this series I will cover the following:
I'm using a KEMP virtual load balancer in this series for a number of reasons. First, they offer a free trial version downloadable from their website. Second, it's very easy to configure. And third, a virtual load balancer works great with a home lab setup like my 5th Gen Hyper-V Lab Server.

Why Use a Load Balancer?

A load balancer is required when you have two or more Exchange servers with the Client Access Server (CAS) role installed in the same site for high availability. Load balancers have the intelligence to distribute client traffic amongst the CAS roles in either a round-robin or least connections method. Layer 7 (L7) load balancers also have the intelligence to perform multiple health checks on each node to determine if it's healthy to accept new connections. If the service on one node becomes unavailable, the load balancer will automatically redirect all traffic for that service to a healthy node, if one is available.

Load balancers are also able to load balance many other workloads such as web servers, SharePoint Servers, Lync servers, etc. Typically each service or workload has its own virtual IP (VIP). When clients connect to a service, say OWA, DNS points the namespace to that VIP on the load balancer. The load balancer then directs the traffic to a healthy node offering that service.

Load Balancer Configurations

Here's an explanation of the differences between Layer 7 and Layer 4 load balancing.
Layer 7 Load Balancing
L7 load balancing happens at the application layer. Health checks are performed on the applications (for example OWA, EWS, ActiveSync, etc.). The SSL connection must terminate on the load balancer, the content is inspected, and then re-encrypted back to the real servers. This requires that the L7 load balancer has to have an understanding of the applications being load balanced. It also usually involves some sort of persistence, such as cookie-based or source IP. Because of all this, L7 load balancing is more complex. Exchange 2010 required L7 load balancing due to the different ways that each application protocol handled persistence. Exchange 2013 does not require persistence even when using L7 load balancing.

Layer 4 Load Balancing
L4 load balancing happens at the network layer after routing is compete (Routing occurs at Layer 3). Health checks are performed on the servers, not the applications. Layer 4 load balancers do not decrypt, inspect, and re-encrypt SSL traffic. This means L4 load balancers have higher performance and are less complex, but the load balanced application must support it. Exchange 2013 CAS is designed for L4 load balancing, but also supports L7 load balancing.
Load Balancers are often either configured as one-arm (single NIC) or two-arm (two NICs, one for inbound traffic and another for outbound traffic). See Basic Load-Balancer Scenarios Explained for details on the two. For simplicity we will be configuring our load balancer as one-arm.

Oftentimes load balancers are used to load balance HTTPS traffic. For example, mail.contoso.com for OWA. Here, you have three choices:

1.     Terminate the SSL connection at the load balancer and pass the connection through to the target node unencrypted. This is known as SSL offloading. The SSL certificate is installed only on the load balancer. Exchange virtual directories are configured to use HTTP and SSL Offloading is enabled.
2.     Terminate the SSL connection at the load balancer and then re-encrypt the connection to the target node. This is called SSL bridging. The SSL certificate is installed on the load balancer and another SSL certificate is installed on the target nodes. The load balancer must trust the certificate on the target nodes.
3.     Pass the SSL connection through the load balancer and terminate the SSL connection on the target node. This is called SSL passthrough. The SSL cert is installed only on the target nodes.

Of these options, SSL bridging and SSL passthrough are most common. SSL bridging has the advantage of protocol inspection by the load balancer. Since the session terminates on the load balancer it is able to read or inspect the traffic that going through it. This can be useful for advanced load balancing features or logic, but it adds complexity to the load balancing solution. You'll need to manage separate SSL certificates for the load balancer and target nodes, and it adds CPU overhead because all traffic must be unencrypted, inspected, and re-encrypted. On the flip side, the obvious benefit is the ability to maximize server resource usage by being able to load balance individual services such as OWA, ActiveSync, etc., instead of failing over the entire server when one of the services is affected.

SSL passthrough simply passes all SSL traffic through the load balancer to the target node where it is unencrypted. The load balancer is unable to read or inspect the traffic going through it because it is encrypted, so you won't be able to do anything fancy on the load balancer. As an administrator, you'll only need to manage the SSL certs on the target nodes. On the flip side, if any service used for health check fails, the entire server is taken out of load balancing pool.

In all these three options you should configure the load balancer to NAT the traffic to the real servers. Because of this, the target nodes always see the load balancer as the source IP for load balanced connections. This is also important to know when you are reviewing IIS logs on the target server. For this reason, I usually configure an X-Forward-For header that includes the original source IP. More on that later in the series.

Note: If you prefer to not use NAT on the load balancer, Direct Server Return may be an option to consider. DSR requires additional configuration on load balanced servers and may not be desired due to supportability and additional overhead concerns. Another option when not using NAT is to configure the load balanced servers to use the load balancer as their default gateway. I do not recommend DSR for Exchange and will not be covering it in this series.

Now that we have some of the basics out of the way, let's get started.

Getting Your Free KEMP Virtual Load Balancer Trial

KEMP Technologies offers a fully functional 30-day free trial for their entire LoadMaster family of virtual load balancers. Better yet, if you are a Microsoft Certified Professional (MCP), MVP, or MCM you can register for a free NFR license! This license is good for one year with free renewals as long as the offer is valid. You also get free web support!


For this series I'll be working with the VLM-200. To download the virtual LoadMaster simply click the free trial link, select your hypervisor, country and click download. VLM supports 14 different hypervisors including various versions of Hyper-V, VMware, and Xen.


After you click download you will be redirected to the Free Trial Activation page and your download will begin. To activate your free trial you need to create a KEMP ID from this page. Do that while you're downloading. If you're requesting a LoadMaster NFR license you'll need a KEMP ID, the VLM serial number (get that from the VLM after it's running), and your MCP transcript ID and access code.

The download will consist of a ZIP file that contains the correct files for your hypervisor along with an installation guide. All you need to do is extract the contents and import them into your virtual server management console. For Hyper-V R2 select Import Virtual Machine, browse to the Loadmaster VLM folder, and click Next three times. On the Connect to Network page select your virtual switch, click Next and Finish. The new VLM virtual machine is preconfigured to use 2 virtual CPUs and 1GB of RAM.

Once imported start it up so you can get your trial license. Connect to the VM console to watch it boot up. The VLM is configured for DHCP and should show its management URL and login credentials. The default username is bal and the password is 1fourall. You'll change this later.

KEMP VLM Boot Screen

Licensing the KEMP Virtual LoadMaster
Open your web browser to the URL shown in the console. It's normal to receive a certificate warning, just click through it. Accept the license terms and allow automatic updates. Now you will license your KEMP LoadMaster. Enter your KEMP ID and password and the LoadMaster will license itself as long as it has Internet access.

If it does not have Internet access you will need to select Offline Licensing and complete the form to obtain your license information to paste into the VLM licensing form. When licensing is successful, the VLM will indicate that the license has been installed and when it expires.

Next, the VLM will have you change the default password and log back in to begin configuration.

In the next part of the series, I will show you how to configure general settings on the virtual LoadMaster to load balance Exchange 2013.

Read more ...

Be Careful Installing .NET Updates on Exchange Servers

Monday, January 19, 2015
Windows Update is now offering the the .NET Framework 4.5.2 update as an "Important" update to Windows computers.
  • Microsoft .NET Framework 4.5.2 for Windows 8.1 and Windows Server 2012 R2 for x64-based Systems (KB2934520)
  • Microsoft .NET Framework 4.5.2 for Windows Server 2008 R2 for x64-based Systems (KB2901983)
Both of these updates require a restart. Note that .NET Framework 4.5.2 is only supported and recommended for Exchange 2013 CU7+, but it is being offered as an Important update to all Windows servers. If your servers or patching processes use Windows Update you will still see these updates are being pushed to them. Personally, I have not experienced any issues with .NET Framework 4.5.2 installed on pre-CU7 Exchange servers.

Windows Update on Windows Server 2012 R2
Windows Update on Windows Server 2008 R2

When the .NET Framework update is installed on your Windows servers it will re-optimize all .NET assemblies on the server when it restarts. Perfmon shows ~99% of CPU resources are in use for about 15-20 minutes while this occurs.

98% CPU Utilization After Restart

.NET Runtime Optimization Service Racing
To be fair, this behavior happens with any .NET Framework update, not just this version. It also usually happens with Exchange CUs and security updates.

The main culprits are the mscorsvw.exe process (The .NET Runtime Optimization Service), TiWorker.exe process (Windows Modules Installer Worker), and Ngen.exe (Microsoft Common Language Runtime native compiler), as shown above. Exchange uses .NET assemblies extensively in its own code, so this optimization will affect the server's ability to function properly until this process completes. It will take significantly longer for the server to restart and system performance will be very very poor.

Once the the re-optimization process completes the Exchange server performance will eventually return to normal. This may take some time because other processes such as the IIS Worker processes and Exchange services were starved for resources and need to "warm up". In some cases I have seen Exchange services, such as the Microsoft Exchange Transport service, fail to start. Make sure all your services are running and performance returns to normal before moving on to patch the next server. I even suggest restarting the patched server one more time just to make sure it restarts normally and all services start properly first.

You should also be aware that if the Exchange server is load balanced using "least connections" the load balancer will probably drive all future connections to the server that is recompiling and those users will have a less than stellar experience. I recommend putting servers into maintenance mode on the load balancer prior to updating them and re-enabling them once optimization completes.

Tip: If you need to update .NET Framework on several servers it can take quite a bit of time for all this optimization. The mscorswv.exe process only uses one process thread by default. You can use the DrainNGenQueue.wsf script from the Microsoft .NET Framework Team to improve the performance of this process by allowing it to use multiple threads and up to 6 cores. For more information, see Wondering why mscorsvw.exe has high CPU usage? You can speed it up.


Read more ...