


Just like having a house key hidden somewhere in case you get locked out, it's important to have a breakglass account that you can use to sign in to Office 365 in case DirSync, MFA, or AD FS authentication fails. In this article, I'll provide step-by-step instructions on how to properly create an O365 break glass account and how to manage it.
Before we get started it's important to understand what this account is for and how to secure it. The purpose of the break-glass account is to allow the administrator sign in to Office 365 with the highest level of privileges (i.e., Global Administrator) with the minimal number of security controls, since these security controls are most likely the reason that admins or users cannot sign-in in the first place. That means the only security controls you have for this highly privileged account are a strong password and physical security. We'll talk more about guarding this account later in this article.
Create the breakglass account
First, let's create the breakglass account in Office 365. The breakglass account should always be a tenant account - one that only exists in Azure Active Directory and is not synced from your on-premises AD. Typically, it would look like breakglass@domain.onmicrosoft.com. By using an Azure Active Directory account, you remove the reliance on ADFS, pass-though authentication, or any other third-party authentication mechanism (Okta, Onelogin, etc.) to sign in. The breakglass account also shouldn't require a hard or soft token, such as YubiKey, Duo, or RSA.Go to the Azure AD portal at https://aad.portal.azure.com and sign-in with a Global Administrator account. Create a new breakglass account in Azure AD, making sure that the account's UPN uses the tenant domain (domain.onmicrosoft.com) to bypass any on-premises authentication. Add the new account to the Global Administrator group.

AAD will automatically create a temporary password for this account, as shown above. Copy this password and create the account. Now sign out of the AAD Portal and sign back in with the new breakglass account using the temporary password. If you've configured multi factor authentication (MFA) or self-service password reset (SSPR) for all users, or you've configured the "Require MFA for admins" conditional access baseline policy, you'll be prompted for additional information to sign-in for the first time.

Click Next and complete the MFA enrollment. It doesn't really matter if you use the Authenticator app, phone call, or text to enroll because we'll turn MFA off for this account shortly.
Next you'll be prompted to enter the temporary password and create a new password. Make the new password a complex password. Passwords for cloud accounts can't contain the user ID, and need to be 8-16 characters long, with at least 3 of the following: uppercase letters, lowercase letters, numbers, and symbols. Record this new password to store in a secure place.
TIP: Avoid characters that can be confusing when written down (o, O, 0, 1, l, etc.) - you may not be the one who has to read the password for the breakglass account. Use Notepad or Word to print the password using the Courier New font to print it out, since this font makes it easier to discern characters and numbers.

TIP: Record the username and password on a piece of paper and store it in a sealed business envelope. Make sure the password cannot be read through the envelope when held up to the light. Write "OFFICE 365 BREAKGLASS ACCOUNT" across the front of the envelope and sign the envelope across the flap on the back so you'll know if it is ever opened. Then store this envelope in a secure location that you and other trusted individuals can access, such as a safe or locked drawer. Don't make it so difficult to access that it can't be found and accessed when needed.
Now that we've created the cloud-only breakglass account with a complex secure password, we need to remove any security controls from the account that might prevent the breakglass account from signing in.
Remove Multi-Factor Authentication
Office 365 provides MFA for all tenant admin accounts. It's not enabled by default, but you should ensure it's not configured for the breakglass account. The idea behind removing any MFA policies is to prevent any obstruction from logging into this account to manage the domain.
In the AAD Portal go to Azure Active Directory > Users > Multi-Factor Authentication and locate the breakglass account. Ensure that Multi-Factor Auth Status shows as Disabled.

There are also some conditional access policies that can enable MFA. These are managed from Azure Active Directory > Conditional Access > Policies.

The "Baseline policy: Require MFA for admins" conditional access policy, which is currently in preview, automatically enables MFA for accounts that are members of any Office 365 admin groups. Azure AD Premium customers may also have other custom conditional access policies, like "Require MFA from external networks". Azure AD Premium P2 licenses include the "Require MFA for risky actions" conditional access policy. You should exclude the breakglass account from all of these conditional access policies.
Edit each of these policies to exclude the breakglass account, as shown in the example below. Click Exclude users, add the breakglass account, then click Done and Save. Repeat for each conditional access policy.

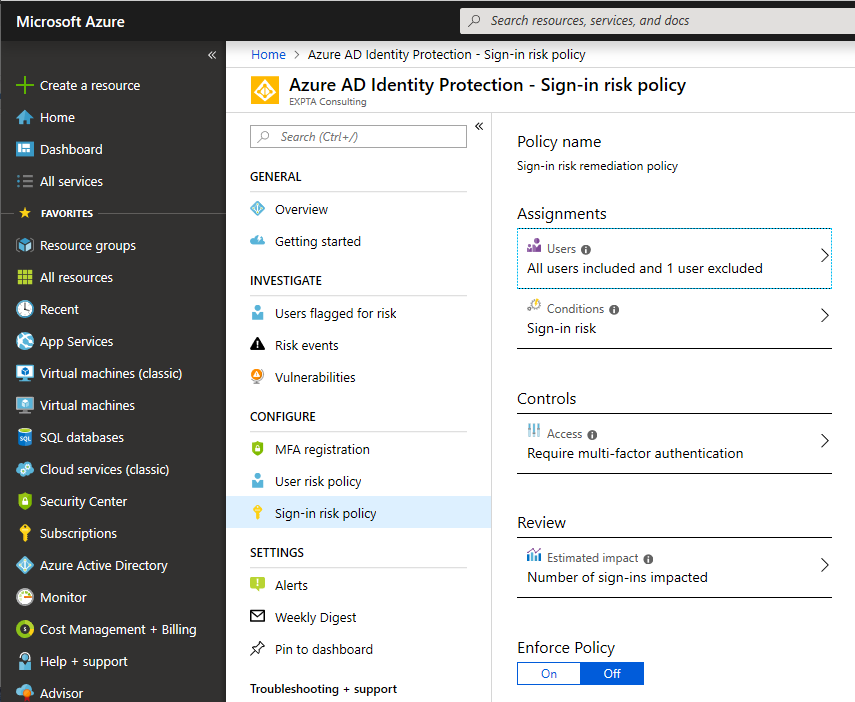
Azure AD Premium P2 users also have Azure AD Identity Protection, which provides other ways to configure MFA. You should exclude the breakglass account here, too. Go to the Azure AD Identity Protection portal at https://portal.azure.com/#blade/Microsoft_AAD_ProtectionCenter/IdentitySecurityDashboardMenuBlade/Mfa. Here, you will see the MFA registration, user risk, and sign-in risk policies.

By default, these policies are not enabled, but you should make sure that the breakglass account is excluded if and when they are enabled. For each policy click Users under Assignments and exclude the breakglass account.

If the Azure AD Identity Protection policies have not been configured yet, you'll need to fully configure them to save the exclusion, even if they're not enforced yet.
Other Tips and Important Considerations
Set the password to never expire for the breakglass account after creating the account. Connect to AAD using the Microsoft Azure Active Directory Module for Windows PowerShell using a Global Administrator account and run the following cmdlet:
Set-MsolUser -UserPrincipalName breakglass@domain.onmicrosoft.com -PasswordNeverExpires $true
If you have Azure AD Premium, do not use Azure AD Privileged Identity Management (PIM) for the breakglass account. You want to be sure that the breakglass account can sign-in using only the complex password which is stored with physical security.
Routinely check the sign-ins and admin audit logs for the breakglass account to confirm it's not being used inappropriately. From the AAD portal go to Users > Breakglass > Sign-ins and Audit logs.
Reset the password on the breakglass account every 6 months or so. Not only does this increase the security of the account, it reinforces your procedures for locating the sign-in information and accessing the account. You don't want to find out that no one remembers the combination to the safe where the breakglass account information is kept when you need it.
If you ever have to use the breakglass account be sure to reset the password when you no longer need to use it and store it away again.
Conclusion
Like other types of insurance, a breakglass account is something you never hope you need to use, but having one can be invaluable when the next outage occurs. And it will.
No comments:
Post a Comment
Thank you for your comment! It is my hope that you find the information here useful. Let others know if this post helped you out, or if you have a comment or further information.