So you've updated your Windows 7 and Windows Server 2008 R2 computers with Service Pack 1 (SP1), and everything is running great. You've tested your applications and haven't run into any compatibility issues, so now you'd like to delete the Service Pack 1 backup files. Here's how to do it.
Note: The Service Pack Backup Files allow you to uninstall SP1, rolling the operating system back to RTM. Once the backup files are deleted, you can no longer roll the system back. Make sure you have given enough time to ensure that the system is behaving properly with SP1 before deleting the backup files.
The process of deleting the Service Pack backup files is the same in both Windows 7 and Windows Server 2008 R2. Deleting the SP1 backup files will reclaim about 540MB on the system drive for Windows 7, and about 1.3GB for Windows Server 2008 R2.
- Click the Start button and type cleanup in the search bar to run the Disk Cleanup utility.
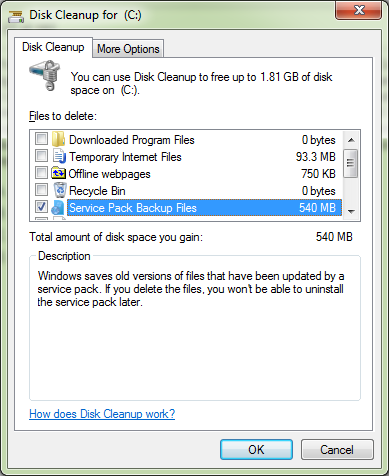
- Scroll through the list of Files to Delete, and select Service Pack Backup Files, as shown below:
- Click OK to delete the Service Pack 1 backup files. This will take a few moments.
As noted in the comment below, you can also remove the Service Pack backup files using the following command from the command line:
DISM /Online /Cleanup-Image /SPSuperseded
I typically run a disk defragmentation cycle after the SP1 backup files have been removed, since this is a fairly large amount of data to remove.


Hi Jeff,
ReplyDeleteYou can also remove those backup files for SP and fixes by running:
DISM /Online /Cleanup-Image /SPSuperseded
Regards,
Michel
Thanks, Michel! That works great and can be used for programatically removing the SP1 backup files, maybe as a startup script for all domain computers.
ReplyDeleteYou have to have the Desktop Experience package installed, in order to get the Disk Cleanup utility. Most won't have that. I do like the "DISM" command version above. Nice tip.
ReplyDelete