How to Integrate Lync Server 2010 with Exchange 2010 SP1+ OWA

Thursday, September 30, 2010
Lync Server 2010 can be integrated with Exchange 2010 SP1 or better, so that Exchange Outlook Web App can also act as a Lync web client.  Once integrated, users will automatically log into Lync when they log into OWA.  The OWA interface changes to include the following new features:
  • Sign In and Sign Out - Users can sign in or sign out of instant messaging from OWA.  Once signed in, the user will automatically sign into IM every time they sign into OWA.
  • Presence - User presence information is available for Lync users, showing a colored chiclet indicating their availability.
  • Contact List - The user's Lync IM contact list is made available in the OWA folder pane.  Users can be added and removed, and contact groups can be managed directly from OWA.
  • Instant Messaging - Lync users can chat with other Lync users using instant messaging directly from OWA.
  • Right-Click Functionality - Right-click menus and actions are updated to include new Lync features.  For example, right-click an email address to chat with the user or add them to an IM contact list.
All of these new OWA features can be seen in the screenshot below:


An instant messaging chat session can be started from OWA by double-clicking a contact in the Contact List or right-clicking an email address and choosing Chat.


This article explains how to configure Lync Server 2010 integration with Exchange 2010 SP1 or better.  I will assume that you have functional Lync Server 2010 and Exchange Server 2010 SP1 or SP2 servers already set up.  Let's get started.

Download and install the Microsoft Office Communications Server 2007 R2 Web Service Provider from http://www.microsoft.com/downloads/en/details.aspx?familyid=CA107AB1-63C8-4C6A-816D-17961393D2B8&displaylang=en on your Client Access Server.  This MSI package contains the installation programs to the local hard drive.  Normally it will put them in C:\Web Service Provider Installer Package, but I've also seen it install to a different drive.  Make note of the location it uses during installation.

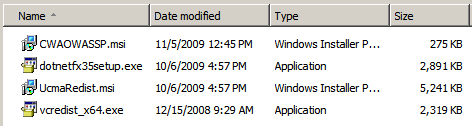
The package will extract the following files:


Next, download and save the OCS 2007 R2 Web Service Provider Hotfix KB 981256 from http://www.microsoft.com/downloads/en/details.aspx?FamilyID=45C94403-39FA-44D3-BE23-07F25A2D25C7 to the same C:\Web Service Provider Installer Package folder.

Download and save the Unified Communications Managed API 2.0 Redist (64 Bit) Hotfix KB 2400399 from http://www.microsoft.com/downloads/en/details.aspx?FamilyID=1F565A42-71D2-4FBD-8AE0-4B179E8F02AB to the same C:\Web Service Provider Installer Package folder.

If your CAS server is running Exchange 2010 SP1 on Windows Server 2008 R2, you need to download and save the UcmaRedist.msp patch in Microsoft Office Communications Server 2007 R2 Hotfix KB 968802 from http://www.microsoft.com/download/en/details.aspx?displaylang=en&id=19178.  The tricky part here is that the file name (UcmaRedist.msp) is the same as the Communications Managed API 2.0 Redist (64 Bit) Hotfix KB 2400399 you just downloaded.  Just rename this file name to something like UcmaRedist-R2.msp.

Now install the following files as Adminstrator in this order:
  1. vcredist_x64.exe
  2. UcmaRedist.msi
  3. UcmaRedist.msp
  4. UcmaRedist-R2.msp, if your CAS is running on Windows Server 2008 R2
  5. CWAOWASSP.msi
  6. CWAOWASSP.msp
  7. dotnetfx35setup.exe, if the .NET Framework 3.5 is not installed on Windows Server 2008.  For Windows Server 2008 R2, install the .NET Framework 3.5.1 feature from Server Manager.
Note that the MSI and MSP packages have a limited GUI during setup and don't indicate that they've installed successfully.

Next we need to configure the Exchange 2010 SP1 Client Access Server for Lync Server integration.  Run the following two commands from the Exchange Management Shell on the CAS:

$cert = (Get-ExchangeCertificate | Where {$_.Services -ilike "*IIS*"}).Thumbprint
Get-ExchangeServer (hostname)| Get-OWAVirtualDirectory | Set-OWAVirtualDirectory -InstantMessagingType OCS -InstantMessagingEnabled:$true -InstantMessagingCertificateThumbprint $cert -InstantMessagingServerName pool.domain.com
Be sure to change pool.domain.com to the FQDN of your Lync Server FE pool.  (hostname) automatically resolves to the hostname of the server you're running the cmdlet from.

Now we need to configure the Lync 2010 server.  Use the Lync Server Topology Builder to add a new Trusted Application Pool, as follows:
  • Open the existing topology.
  • Expand your Lync Server 2010 > your sitename.
  • Right-click Trusted application servers and select New Trusted Application Pool.
  • Enter your CAS server or CAS array's FQDN in the Pool FQDN field, select Single Computer Pool and click Next.  If you're using a hardware load balancer with separate VIPs for OWA and MAPI connections, use the FQDN for the OWA (HTTPS) connections.
  • Select the Front End Pool for the Trusted Application Pool.
  • Click Finish.
  • Right-click the new Trusted Application Server and select Edit Properties.
  • Clear the check box for Enable replication of configuration data to this pool and click OK.
  • Publish the new topology.  If you used the CAS Array or HTTPS VIP FQDN above, you will get a warning about the computer name not existing in Active Directory.  This is safe to ignore.
The final step is to create a new CsTrustedApplication using the Lync Server Management Shell on the Lync 2010 server.  Run the following command from the management shell:

New-CsTrustedApplication -ApplicationID ExchangeOutlookWebApp -TrustedApplicationPoolFqdn cas.domain.com -Port 9999
Enable-CsTopology
Be sure to change the TrustedApplicationPoolFqdn value in the command above to the FQDN of your CAS server or CAS array.  The Port value can be any unused TCP port.

Now login to Outlook Web App and enjoy the new Lync Server goodness!


Read more ...

How to fix MSExchangeTransport Event ID 12014 on Edge and Hub Transport servers

Wednesday, September 29, 2010
By default, Exchange 2007 and 2010 attempt to use Transport Layer Security (TLS) for all SMTP traffic.  TLS uses a certificate on the receiving server to encrypt SMTP traffic between SMTP servers, similar to the way a certificate on the CAS server is used to secure OWA traffic.  If TLS cannot be negotiated, SMTP will usually fallback to non-encrypted SMTP.

In order for a server to send SMTP email via TLS:
  1. The receiving server must have an Exchange certificate in the computer's local Personal store.
  2. The SMTP service must be assigned to use this certificate.
  3. The FQDN used in the Receive Connector must match either the Common Name or one of the Subject Alternative Names (if they exist) on the SMTP certificate.
If any one of these requirements is not met, you will see the following error in the application log of the Edge Transport server:

Log Name:      Application
Source:        MSExchangeTransport
Date:          9/28/2010 9:35:58 AM
Event ID:      12014
Task Category: TransportService
Level:         Error
Keywords:      Classic
User:          N/A
Computer:      mailgate
Description:
Microsoft Exchange could not find a certificate that contains the domain name mail1.expta.com in the personal store on the local computer. Therefore, it is unable to support the STARTTLS SMTP verb for the connector Default internal receive connector MAILGATE with a FQDN parameter of mail.expta.com. If the connector's FQDN is not specified, the computer's FQDN is used. Verify the connector configuration and the installed certificates to make sure that there is a certificate with a domain name for that FQDN. If this certificate exists, run Enable-ExchangeCertificate -Services SMTP to make sure that the Microsoft Exchange Transport service has access to the certificate key.
When you see this error on Edge Transport servers you have to examine the error description to determine where the mismatch occurs.  In the example above, the connector in error is the "Default internal receive connector MAILGATE", which is the receive connector that exists on the Edge server itself.  If the connector in error is on the "EdgeSync - Inbound to domain" connector, the mismatch is on the Hub Transport server's receive connector.

You can fix this by reconfiguring the offending connector to use the Common Name or Subject Alternative Name used on the Exchange certificate.  You can find this value by viewing the certificate from the Certificates MMC, as shown below:
To reconfigure the Edge Server's Receive Connector:
  • On the Edge server, open the Exchange Management Console.
  • Navigate to Microsoft Exchange > EdgeTransport.
  • Click the Receive Connectors tab to view the existing connectors.
  • Double-click the Default internal receive connector SERVER connector to view its properties.
  • In the Specify the FQDN this connector will provide in response to HELO or EHLO field, enter the certificate's Common Name (for example, mailgate.expta.com) as shown below, and click OK.

To reconfigure the Hub Transport's Send Connector:
  • On the Hub Transport, open the Exchange Management Console.
  • Navigate to Microsoft Exchange > Microsoft Exchange On-Premises > Organization Configuration > Hub Transport.
  • Click the Send Connectors tab to view the existing Send Connectors.
  • Double-click the EdgeSync - Inbound to domain connector to view its properties.
  • In the Specify the FQDN this connector will provide in response to HELO or EHLO field enter the Hub Transport certificate's Common Name (for example, ht01.expta.com) and click OK.

Read more ...

Fix for Event ID 2937 MSExchange ADAccess in Exchange 2010 SP1

Sunday, September 26, 2010
I have noticed the following event on Exchange 2010 servers after upgrading Exchange 2010 RTM to Exchange 2010 Service Pack 1:


Log Name:      Application
Source:        MSExchange ADAccess
Date:          9/26/2010 9:12:29 AM
Event ID:      2937
Task Category: Validation
Level:         Warning
Keywords:      Classic
User:          N/A
Computer:      EX1.companyabc.com
Description:
Process w3wp.exe () (PID=1960). Object [CN=Jeff Guillet,CN=Users,DC=companyabc,DC=com]. Property [HomeMTA] is set to value [companyabc.com/Configuration/Deleted Objects/Microsoft MTA
DEL:0a05fe00-f8ce-4016-bba8-dce98cfe6b93], it is pointing to the Deleted Objects container in Active Directory. This property should be fixed as soon as possible.

The process in the event varies, but I've seen:
  • EdgeTransport.exe
  • ExSetupUI.exe (when installing Exchange)
  • Microsoft.Exchange.RpcClientAccess.Service.exe
  • Microsoft.Exchange.ServiceHost.exe
  • MSExchangeMailboxAssistants.exe (when moving a mailbox)
  • powershell.exe (when a user launches the Exchange 2010 management tools)
  • w3wp.exe (when the user accesses OWA)
The event in the example above is most commonly seen, and is caused when the user's homeMTA attribute is pointing to a deleted object in AD.  To fix this for a specific user, run the following command from the Exchange Management Shell (EMS) on the server:
Get-Mailbox jeff | Update-Recipient
Or for all user mailboxes use:
Get-Mailbox | Update-Recipient
To correct the arbitration mailboxes use:
Get-Mailbox -Arbitration | Update-Recipient
These commands will update the user's homeMTA value to the correct value.

I've also seen this warning for the Edge Transport routing group property, as shown below.

Log Name:      Application
Source:        MSExchange ADAccess
Date:          7/12/2010 8:52:23 AM
Event ID:      2937
Task Category: Validation
Level:         Warning
Keywords:      Classic
User:          N/A
Computer:      EX1.companyabc.com
Description:
Process edgetransport.exe () (PID=3500). Object [Exchange Routing Group (DWBGZMFD01QNBJR)]. Property [RoutingMasterDN] is set to value [mailgate
DEL:b2bbdba9-71e4-46ff-a50b-fbea9a6c4534], it is pointing to the Deleted Objects container in Active Directory. This property should be fixed as soon as possible
.
To correct this error:
  • Open ADSIEdit and navigate to CN=Servers,CN=Exchange Administrative Group (FYDIBOHF23SPDLT),CN=Administrative Groups,CN=companyabc,CN=Microsoft Exchange,CN=Services,CN=Configuration,DC=companyabc,DC=com.
  • Right-click the Edge Transport server and copy the distinguishedName value.
  • Navigate to CN=Exchange Routing Group (DWBGZMFD01QNBJR),CN=Routing Groups,CN=Exchange Administrative Group (FYDIBOHF23SPDLT),CN=Administrative Groups,CN=companyabc,CN=Microsoft Exchange,CN=Services,CN=Configuration,DC=companyabc,DC=com and open its properties
  • Paste the copied DN value to the msExchangeRoutingMasterDN attribute
Read more ...

Fix for problems installing UcmaRedist.msi on Windows Server 2008 or R2

Friday, September 24, 2010

You may have problems installing UcmaRedist.msi (the Microsoft Office Communications Server 2007 R2, Microsoft Unified Communications Managed API 2.0 Core Redist 64-bit) on Windows Server 2008 or 2008 R2.  I ran across this myself when installing the Microsoft Office Communications 2007 R2 Web Service Provider for Lync Server 2010.

You receive the following error:
Microsoft Office Communications Server 2007 R2, Microsoft Unified Communications Managed API 2.0 Core Redist 64-bit installation requires Microsoft .NET Framework 3.5. Installation can not continue.
This happens if you have the .NET Framework 4.0 installed.  Uninstall the Microsoft .NET Framework 4 Extended and then the Microsoft .NET Framework 4 Client Profile components from Control Panel > Programs and Features.  Then restart the server and install UcmaRedist.msi.
Read more ...

Configuring Out of Office settings for other users with Exchange 2010 SP1

Friday, September 17, 2010
Exchange 2010 Service Pack 1 offers two handy new cmdlets, Get-MailboxAutoReplyConfiguration and Set-MailboxAutoReplyConfiguration, that allow you to manage Out of Office (OOF) messages for remote users.  Previously, you used to reset the user's password and logon to the user's mailbox or use a tool like MFCMAPI to manage OOF settings for a given user.

To view the MailboxAutoReply configuration of a particular user, use the following command:

Get-MailboxAutoReplyConfiguration jeff
This will provide output similar to the following:
RunspaceId       : 42d921ae-4179-4fa2-b47a-60197a20b1ae
AutoReplyState   : Scheduled
EndTime          : 9/19/2010 11:30:00 PM
ExternalAudience : All
ExternalMessage  : <html xmlns:o="urn:schemas-microsoft- ... </html>
InternalMessage  : <html xmlns:o="urn:schemas-microsoft- ... </html>
StartTime        : 9/17/2010 6:00:00 AM
MailboxOwnerId   : expta.com/Users/Jeff Guillet
Identity         : expta.com/Users/Jeff Guillet
IsValid          : True
Notice that the OOF above has an AutoReplyState of Scheduled, meaning that it the user has scheduled their OOF to turn on and/or turn off at a certain time.  Valid values are Disabled (off), Enabled (on), and Scheduled.

ExternalAudience determines who gets the OOF message and can be either All, Known (users inside the organization), or Unknown (users outside the organization).

The ExternalMessage and InternalMessage properties hold the actual OOF messages in HTML format.  These can be quite long and difficult to read from the cmdlet due to all the HTML formatting.

The following one-liner will display all users in the org whose OOF is not disabled:
Get-Mailbox | Get-MailboxAutoReplyConfiguration | Where {$_.AutoReplyState -ne 'Disabled'} | ft MailboxOwnerId,AutoReplyState,StartTime,EndTime
This command will disable a user's OOF:
Set-MailboxAutoReplyConfiguration jeff -AutoReplyState Disabled
And this command will enable a user's OOF and schedule it to end automatically:

Set-MailboxAutoReplyConfiguration jeff -AutoReplyState Scheduled -EndTime "09/20/2010 06:00"
Note that if you set the AutoReplyState to Enabled, the OOF will not turn off at the scheduled time.  You must set AutoReplyState to Scheduled for that to happen.  This is contrary to what the examples show in Exchange 2010 SP1 Help, Technet, and the cmdlet help, itself.

If you want to change a user's OOF message, you need to export the ExternalMessage or InternalMessage, edit it in your favorite HTML editor, and import the new message back in.  Here's how you do that:
$x = Get-MailboxAutoReplyConfiguration jeff
$x.ExternalMessage | Out-File oof.txt
Edit the HTML in the exported oof.txt file, and then run the following commands to import it:
$oof = Get-Content oof.txt
Set-MailboxAutoReplyConfiguration jeff -ExternalMessage $oof
. . .

If a user has rights to manage another user using the Exchange Control Panel, they can also configure the OOF for that user using ECP inside Outlook Web App (OWA).

From OWA, click All Options to open ECP.  Then manage the other user, like this:


Select the user to manage and click Tell people you're on vacation on the Account menu.  Then configure the OOF message(s) as needed.  Don't forget to save the new configuration.

. . .

In case you're wondering, OOF actually stands for "out of facility".  OOF was a command used in the days of Microsoft’s Xenix mail system.
Read more ...

How Forefront Protection 2010 for Exchange Server handles encrypted emails

Monday, September 13, 2010
Fellow MVP Andrew Cheng raised an interesting question in the Forefront Protection 2010 for Exchange Server forum.  He wanted to know how FPE handles encrypted emails and whether it will delete or block these emails if it's configured to delete encrypted compressed files.

I prototyped this and can say with certainty that configuring Policy Management > Global Settings > Advanced Options > Delete encrypted compressed files will NOT block encrypted emails. As a matter of fact, you can even send encrypted attachments in an encrypted email and the encrypted attachments will not be deleted.
Here are the results of my tests, all were sending emails to an Exchange 2010 user protected by FPE 2010. FPE was configured to delete encrypted attachments, as described above.
  • Send non-encrypted email with non-encrypted ZIP attachment: Received email and attachment
  • Send non-encrypted email with encrypted ZIP attachment: Received email, but attachment was stripped
  • Send encrypted email with non-encrypted ZIP attachment: Received email and attachment
  • Send encrypted email with encrypted ZIP attachment: Received email and attachment
By the way, I used free secure email certificates from Comodo to perform these tests.  I highly recommend them, as they're easy to request and install.  Oh, and did I mention they're FREE?
Read more ...

Reporting Database Whitespace for All Exchange Servers

Thursday, September 9, 2010
The physical size of an Exchange database normally grows as data is added to it.  When data is removed the amount of data is reduced, but the physical database size (the amount of space taken up on the disk) does not shrink.  This empty space in the database file is called whitespace.

For example, if you move half of the mailboxes from DB01 to DB02, DB01 will remain the same physical size on the disk, but half of it will be whitespace.  Normally this is not a big deal, but it might be important to you if you need to reclaim that unused disk space.  Also, some backup software backs up the entire database, including whitespace.  That means you might be wasting backup tapes and time backing up empty data.

Exchange has always reported the database whitespace in the Application event log as Event ID 1221 during scheduled online maintenance, as shown below:


However with Exchange 2010 and its 24x7 ESE scanning, this event is no longer logged since online database maintenance runs all the time by default.  You can view the amount of whitespace in any given database using the following cmdlet in the Exchange Managment Shell:
Get-MailboxDatabase Database1 -Status | FT Name,AvailableNewMailboxSpace
The output looks like this:
 
 
Unfortunately, this cmdlet doesn't work on previous versions of Exchange, so I leveraged some code by Shay Levy to write a Powershell script that collects the data from the 1221 events on each server in the Org and exports it to a CSV file.
 
Click here to download the Get-ExchangeWhitespace script.
 
The script must be run from the Exchange Management Shell (EMS).  It creates a collection of all the Exchange servers (except Edge Transport servers) from AD, and connects to each server's Application log using WMI.  It then collects the data from the 1221 events from the previous day's online maintenance schedule and exports it to a file called 'Exchange Whitespace.csv'.  Despite all these steps, it's really fast to execute.

If you want to reclaim the whitespace in a database, you need to perform an offline defrag.  You will dismount the database and run the Eseutil /D command, as detailed here.  Be aware that this can take quite a long time and you need sufficient free space on the volume to run it.
Read more ...