Showing posts with label RDP. Show all posts

How to enable (and hack) Cisco AnyConnect VPN through Remote Desktop

Tuesday, April 14, 2020


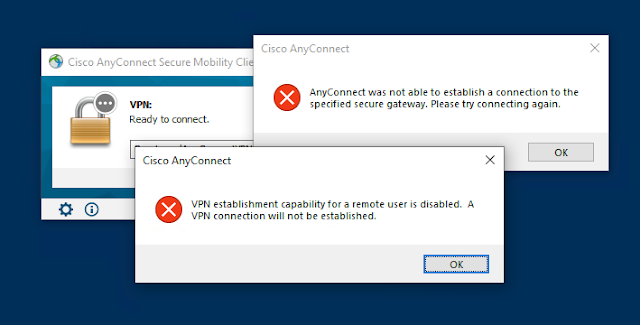
If you get the following error when connecting to a Cisco AnyConnect VPN from Windows, it's because the VPN establishment capability in the client profile doesn't allow connections from a remote desktop session.
VPN establishment capability for a remote user is disabled. A VPN connection will not be established.
The client profile is an XML file that gets pushed out to the AnyConnect client every time the VPN is established. The correct way to fix this is by configuring the Citrix VPN profile on the ASA. Usually this is done by the ASA administrator using the Cisco Adaptive Security Device Manager (ASDM). If you're the ASA administrator read this article for instructions how to configure this.

But what if you're not the ASA administrator or the admin can't/won't to make this change for some reason? We can hack it! I don't normally write blog posts like this, but I honestly can't think of a single good reason to block VPN access from a remote desktop, so I don't consider this bypassing a security setting. Here's how to get around it.

First, open the client profile XML file in Notepad. It's located in the C:\ProgramData\Cisco\Cisco AnyConnect Secure Mobility Client\Profile folder.

Edit the <WindowsVPNEstablishment> tag to use AllowRemoteUsers instead of LocalUsersOnly.
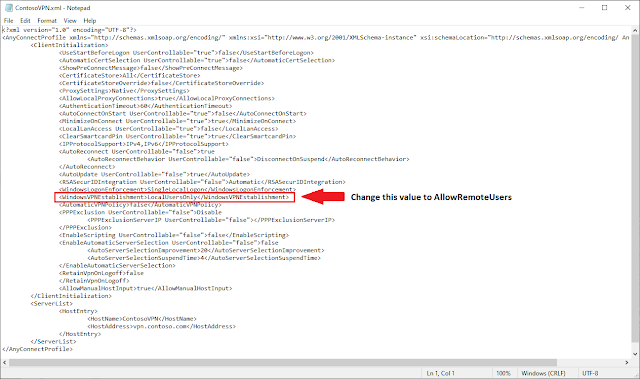


For example, change:
<WindowsVPNEstablishment>LocalUsersOnly</WindowsVPNEstablishment>
To:
<WindowsVPNEstablishment>AllowRemoteUsers</WindowsVPNEstablishment>
Now save the profile to your Desktop or another location with a .BAK extension. For example, if the original profile name is ContosoVPN.xml, save it as ContosoVPN.bak.

Move the modified .BAK file to the C:\ProgramData\Cisco\Cisco AnyConnect Secure Mobility Client\Profile folder. This will normally require admin rights. You should now have two client profile files there, for example ContosoVPN.xml and ContosoVPN.bak.

Now open Event Viewer and navigate to Applications and Services Logs > Cisco AnyConnect Secure Mobility Client. Search for Event ID 3021 from source acvpnui. It should be near the top of the Cisco logs if you just tried to connect to the AnyConnect VPN.
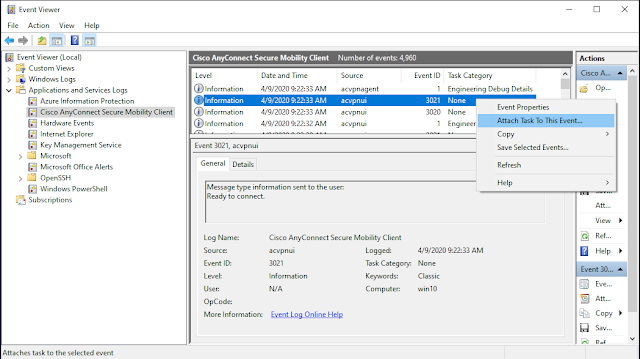


Right-click that event and select Attach Task To This Event. The Create Basic Task Wizard will open.

Click Next.
Click Next again.
Click Next again.
Configure the program to run using the settings below, then click Next.
Program/script:
C:\Windows\System32\cmd.exe
Arguments:
/c cd "C:\ProgramData\Cisco\Cisco AnyConnect Secure Mobility Client\Profile" && copy *.bak *.xml /y
This task tells Windows to copy the modified .BAK profile over the .XML file that the AnyConnect client downloads from the ASA whenever acvpnui logs event ID 3021.

Check the box to open the properties for the task when finished and click Finish.
The task properties will open in a new window.


Now test it out. You should be able to connect to the AnyConnect VPN using a remote desktop (RDP).

Be aware that if things change (ports, IPs, etc.) they will be lost/overwritten by the static BAK file. If that happens you can simply delete the BAK file, attempt a connection, and edit the new XML file with the new settings again.

Read more ...

How to Configure a Port Proxy for RDP Connections

Friday, January 27, 2017
I'm working with a small business customer who uses my Hyper-V home lab server to run their lab. They have a Domain Controller and several application servers running behind an AT&T DSL consumer-grade wireless router and they want to be able to RDP directly to each VM. If you run your own home lab, you might want to do the same.

The trouble is, most consumer routers don't allow you to forward the same port to more than one IP address. You can create a port forwarding rule for TCP 3389 (RDP) to TCP 3389 on one, and only one, IP address. On a "real" router you could forward the external TCP ports 33891-33895 to the internal 3389 port on each of the five internal server IPs, but that's not an option here.

Traditionally, there are several ways of handling this problem, each with it's own limitations:

  • RDP to the one main server and then "leapfrog" to the other computers using RDP from the main server. This can cause confusion about which desktop you're working on, and provides a less than stellar experience.
  • Change the RDP listening port on all the other computers to use another port (for example, TCP 33891-33895). See How to change the listening port for Remote Desktop. The downside to this is that you will always need to specify the custom listening port when connecting both internally (on the LAN) and externally (from the Internet). This can be troublesome, especially in a larger environment where several admins need to use RDP. "What RDP port do I need to use for SERVER1 again?"
  • Install and configure Remote Desktop Gateway services on the server hosting HTTPS services. This has a fair amount of overhead and configuration, requires a valid SSL certificate, and RDP clients need to be manually configured to use the RDG for these connections.

A much more elegant solution is to use the netsh utility to configure a port proxy entry in the TCP stack for each server. With this configuration, each server will continue to listen on TCP port 3389 for normal internal RDP connections. External RDP connections to the proxy port, say TCP 33891, will be forwarded to TCP 3389. Brilliant! Here's how to configure it:

  • Run the following netsh command from an elevated CMD prompt on each server:
netsh interface portproxy add v4tov4 listenport=[ListeningPort] listenaddress=[ServerIP] connectport=3389 connectaddress=[ServerIP]

For example, the following netsh command configures TCP port 33891 to forward to TCP port 3389 for IP address 10.0.0.101:
netsh interface portproxy add v4tov4 listenport=33891 listenaddress=10.0.0.101 connectport=3389 connectaddress=10.0.0.101

  • Now configure port forwarding for each internal server on the DSL/cable router. Create a custom service for each new port - The external (base) port and internal (host) port both use the new custom port (i.e., 33891, 33892, etc.):

  • Then configure port forwarding for each of the new custom services to the IP addresses of the servers:


With this configuration, you can still make internal RDP connections to the each server using the traditional RDP port 3389 (no special configuration of the RDP client is needed). All external RDP connections are made to the same public IP address using one of the new custom ports (i.e., 33891):


Read more ...

Dynamic Memory and RemoteFX in Windows Server 2008 R2 SP1

Thursday, June 17, 2010
When I was at TechEd in New Orleans I got a chance to talk with Vijay Tewari, Principal Program Manager for the Microsoft Virtualization Team, about Dynamic Memory in the upcoming Service Pack 1 for Windows Server 2008 R2. 

In case you're not familiar with Dynamic Memory, this allows you to specify a minimum and maximum amount of RAM that a Hyper-V guest can use.  The VM will start with the minimum amount of RAM you sepcify and the host server will automatically reallocate additional RAM to the VM as needed, up to the maximum amount you have specified.  Dynamic Memory will also automatically reduce the RAM allocated when it is no longer needed.  Pretty sweet!  This provides higher density of VMs on a Hyper-V host since memory can be oversubscribed.  Keep in mind that if the VM's are using more memory than can be provided to them even after movng the memory amongst them, the OS inside the VM will start to page. This will obviously have an adverse performance impact in that VM.  Still, oversubscribing memory has big advantages especially for VDI deployments.  The good news is that now there are other ways to pool and allocate memory and Hyper-V Dynamic Memory is a good solution for desktop and server operating systems.

The other "big thing" in Windows Server 2008 R2 SP1 is RemoteFX.  This technology came into being when Microsoft purchased Calista Technologies in 2008.  RemoteFX allows the VMs on a Hyper-V host to access the host's Graphics Processor Unit (GPU) for superior video output in the guest. This allows remote workers to enjoy the same rich user experience over a network as with a locally executing desktop.  Remote clients only need to support the color depth required to view the output, so you can provide advanced GPU capabilities to all your remote clients using a GPU on the Hyper-V host.  RemoteFX can also use multiple GPUs in the host server to provide scale out.

RemoteFX is a feature that you enable on the Hyper-V host, not the VMs.  Once the RemoteFX feature has been installed a new option to enable the 3D graphics adapter is available within the settings of the guest VM.  This means that even though you've enabled RemoteFX on the host, resources are only allocated for the guests you choose. 

RemoteFX will require new Integration Components in the VM and will also require a new RDP client that supports the new capabilities, which should be available in the same release timeframe.  RemoteFX will also work with Remote Desktop Gateway deployments.  Microsoft recommends 200MB of graphics RAM per VM that uses RemoteFX.

The public beta for Windows Server 2008 R2 SP1 is expected to be released by the end of July 2010.  The same service pack is used for both Windows Server 2008 R2 and Windows 7, simplifying deployment.
Read more ...

Fix for Remote Desktop Gateway authentication error from clients

Friday, November 6, 2009
If you use Remote Desktop Gateway Manager (formerly, Terminal Services Gateway) in Windows Server 2008 R2, you may find that Windows clients are unable to authenticate to the RD Gateway server.

This happens because the default configuration in Windows Server 2008 R2 Remote Desktop Gateway is to request that clients send a statement of health before the connection can be made. If this option is selected and you do not have a Remote Desktop connection authorization policy (RD CAP) for Network Access Protection (NAP) configured, clients will be unable to connect to the RD Gateway. They will repeatedly be prompted for Gateway Server Credentials as shown below:


To fix this issue, ensure that you have a valid statement of health configured in NAP. Alternatively, as in the case of clients that cannot or do not provide a statement of health (I'm looking at you, Windows XP), you can disable requesting statements of healthy entirely. Here's how to do that:
  • Logon to the Remote Desktop Gateway computer and open the RD Gateway Manager (Start > Administrative Tools> Remote Desktop Services > Remote Desktop Gateway Manager)
  • Right-click the RDG server and select Properties
  • Click the RD CAP Store tab and clear the checkbox for "Request clients to send a statement of health", as shown below and click OK.

It may take a moment for the change to go into effect. Occacionally, I've had to restart the Remote Desktop Services service.
Read more ...

Fallback Printer Drivers in RDP and Terminal Server Sessions

Friday, August 29, 2008

Microsoft Remote Desktop Connection provides the ability for users to use the printers installed on their local computer within a Terminal Server session. This behavior is enabled by default, and can be changed in MSTSC (the Remote Desktop Connection client) in Options, Local Resources tab, Printers.

In order for this to work, a printer driver must be installed on the Terminal Server that matches the driver installed on the local computer. This is problematic, since you can't always be sure which printer is installed on connecting computers. If there is no matching printer driver on the server, the user will be unable to print to that printer within the RDP session. You will also see an error in the System Event Log similar to the following when the user
logs into the Terminal Server:

Event Type: Error
Event Source: TermServDevices
Event Category: None
Event ID: 1111
Date: 7/8/2008
Time: 12:51:15 PM
User: N/A
Computer: HOFS01
Description:
Driver HP LaserJet 4250 PCL 5e required for printer !!SERVER1! NetPrinter2 is unknown. Contact the administrator to install the driver before you log in again.

To handle this issue without having to install tons of drivers on your server, you can tell the server to use a "fallback printer driver." If the exact driver is not installed, the server will offer a fallback PCL or PS driver (or both) to use instead. This is configured in Group Policy as shown below. Note that this requires Windows Server 2003 SP1 or later.

For Windows Server 2003, open Group Policy and navigate to Computer Settings, Computer Configuration, Administrative Templates, Windows Components, Terminal Services, Client/Server data redirection, and configure the Configure Terminal Server Fallback Printer Driver Behavior option.

For Windows Server 2008, open Group Policy and navigate to Computer Configuration, Policies, Administrative Templates, Windows Components, Terminal Services, Terminal Server, Printer Redirection and configure the Specify Terminal Server Fallback Printer Driver Behavior option.

Configure the Terminal Server Fallback Printer Driver Behavior to Enabled, Show both PCL and PS if one is not found, as shown below.

When a client logs into the Terminal Server, you will now see the following event in the System Event Log and the client will be able to use their printer.


Read more ...

How to Enable RDP Remotely on XP Computers

Tuesday, March 25, 2008

In a previous article I explained how to enable Remote Desktop access on a remote computer.

I've noticed that these steps do not work on Windows XP computers. It turns out that you need to set two registry keys:
  • HKLM\Software\Policies\Microsoft\Windows NT\Terminal Services\fDenyTSConnections should be changed from 1 to 0 (zero)
  • HKLM\System\CurrentControlSet\Control\Terminal Server\fDenyTSConnections should be changed from 1 to 0 (zero)

The first setting enables the RDP protocol on the computer to listen on TCP port 3389. The second setting allows users to login via Remote Desktop. Both settings go into effect immediately and do not require a restart.

Note: If the second setting is not changed to 0 you will get a logon message saying, "Unable to log you on because of an account restriction." You will also get this same logon message if you attempt to logon via RDP with an account that has a blank password. The account you use must have a password to logon using Remote Desktop.

I wrote a batch file that will easily enable or disable Remote Desktop on a remote machine. The syntax is: RDP [computername] [ON | OFF]. Copy the code below and save it as RDP.BAT somewhere in your system path (I use C:\Windows).

---Begin Code---

@echo off
SET RemoteComputer=%1
SET RemoteComputer=%RemoteComputer:\=%
if /i "%2"=="on" goto EnableRDP
if /i "%2"=="off" goto DisableRDP
goto Syntax

:EnableRDP
REG ADD "\\%RemoteComputer%\HKLM\Software\Policies\Microsoft\Windows NT\Terminal Services" /v fDenyTSConnections /t REG_DWORD /d 0 /f
if ERRORLEVEL==1 goto Error
REG ADD "\\%RemoteComputer%\HKLM\System\CurrentControlSet\Control\Terminal Server" /v fDenyTSConnections /t REG_DWORD /d 0 /f
echo.
echo Remote Desktop has been enabled on %RemoteComputer%
goto End

:DisableRDPREG ADD "\\%RemoteComputer%\HKLM\Software\Policies\Microsoft\Windows NT\Terminal Services" /v fDenyTSConnections /t REG_DWORD /d 1 /f
if ERRORLEVEL==1 goto Error
REG ADD "\\%RemoteComputer%\HKLM\System\CurrentControlSet\Control\Terminal Server" /v fDenyTSConnections /t REG_DWORD /d 1 /f
echo.
echo Remote Desktop has been disabled on %RemoteComputer%
goto End

:Error
echo.
echo ======================================================================
echo Make sure the remote computer is online and you have sufficient rights
echo to modify its registry.
echo ======================================================================
echo.

:Syntax
echo.
echo RDP enables or disables Remote Desktop on a remote computer
echo Visit http://www.expta.com for details
echo.
echo RDP [computername] [ON ^| OFF]
echo.
echo ON - Disable RDP on the remote computer
echo OFF - Enable RDP on the remote computer
echo.

:End
SET RemoteComputer=

---End Code---

Note that if Group Policy is configured to disable Remote Desktop (Computer Configuration Administrative Templates Windows Components Terminal Services Allow users to connect remotel using Terminal Services) the HKLM\Software\Policies\Microsoft\Windows NT\Terminal Services\fDenyTSConnections setting will revert back to 1 after a Group Policy refresh.

Read more ...

Ease up on Silverlight already!

Monday, February 25, 2008
It seems you can't use any Microsoft website anymore without being nagged to install Silverlight.

While I love "the next generation of media experiences and rich interactive applications for the Web" as much as the next guy, I don't know what value it's going to bring to sites like TechNet, MSDN, etc. My chief complaint is the slow performance of Silverlight on RDP sessions. Most administrators perform their work using RDP and the abysmal performance of Silverlight enabled websites (or any website that uses transition effects) prevents administrators from getting their job done.

It might be nice if there were an option in the RDP client to allow Silverlight, just like there is one to allow menu and window animation. Just thinking out loud here...
Read more ...

How to Enable Remote Desktop from a Remote Machine

Monday, November 19, 2007

[Note: Also see my other article that explains how to enable Remote Desktop for Windows XP computers]
Have you ever tried to connect to a server or workstation via RDP, but can’t because Remote Desktop isn’t enabled? Here’s how you can enable Remote Desktop remotely.

The following procedures assume that you have administrator rights on the target machine.
  1. Run Regedit
  2. Select File Connect Network Registry
  3. Enter the name of the remote computer and click OK
  4. At the bottom of the registry tree you will see two hives appear for the remote machine: HKEY_LOCAL_MACHINE and HKEY_USERS
  5. Navigate to HKLM\SYSTEM\CurrentControlSet\Control\Terminal Server
  6. Double-click fDenyTSConnections in the right-hand pane and change the value from 1 to 0
Another way to accomplish the same task is by using WMIC, the WMI command line utility in Windows 2000, XP, Vista and 2003 Server. Here’s the one line command:

wmic /node:TargetComputer PATH Win32_TerminalServiceSetting WHERE AllowTSConnections=0 CALL SetAllowTSConnections 1
The command above is not case sensitive, by the way.

Note that neither of these methods require a restart of the remote machine, however I have seen it sometimes take a minute to take affect. Remember, patience is a virtue. :)
Read more ...

Can't connect to connect to multi-homed server using RDP

Tuesday, October 2, 2007

The problem: You are trying to connect to a server using the Remote Desktop Connection client (RDP) and you get the following error:

Remote Desktop Disconnected
----------------------------------------------
The client could not connect to the remote computer.


Remote connections might not be enabled or the computer might be too busy to accept new connections. It is also possible that network problems are preventing your connection.

Please try connecting again later. If the problem continues to occur, contact your administrator.

If you are using the new Remote Desktop Connection 6.0 Client, the error you get is:

Remote Desktop Disconnected
----------------------------------------------
This computer can't connect to the remote computer.

Try connecting again. If the problem continues, contact the owner of the remote computer or your network administrator.

You checked that Remote Desktop is enabled and you have rights to connect, but it fails every time. What the #$% is going on???
Well, you may have a binding problem with the RDP-Tcp connector. This typically happens with servers with two or more NICs (as is usual with an ISA server). To fix the problem follow these steps:
  1. Logon to the server locally

  2. Click Start, Run, type "tscc.msc /s" (without quotation marks) and click OK

  3. In the Terminal Services Configuration snap-in double-click Connections, then RDP-Tcp in the right pane

  4. Click the Network Adapter tab, select the correct network adapter and click OK

  5. Make sure that you can establish an RDP connection to the server
The change takes effect immediately. No need for a restart.


Read more ...