Exchange Setup Repeatedly Says 'A Restart from a Previous Installation is Pending'

Tuesday, June 29, 2010
You may find when installing Exchange 2007 or Exchange 2010 that the server repeatedly reports:
A restart from a previous installation is pending. Please restart the system and rerun setup.
Exchange Setup reads the following registry key to determine whether a system restart is required after installation or removal of a software update such as a security update, critical update, or hotfix.

HKEY_LOCAL_MACHINE\SOFTWARE\Microsoft\Updates\UpdateExeVolatile

Exchange Setup also checks the following registry key to determine whether a previous software update installation was not completed and the system must be restarted to finish the installation.

HKEY_LOCAL_MACHINE\SYSTEM\CurrentControlSet\Control\Session Manager\PendingFileRenameOperations

If setup still complains that a restart is needed after you've performed a restart, do the following:
  • Open RegEdit.
  • Set the HKLM\SOFTWARE\Microsoft\Updates\UpdateExeVolatile key value to 0 or delete it.
  • Delete the HKLM\SYSTEM\CurrentControlSet\Control\Session Manager\PendingFileRenameOperations key.
  • Rerun Setup.
Read more ...

The New Exchange 2007 SP3 Password Reset Tool

Monday, June 28, 2010
Exchange Server 2007 Service Pack 3 includes a handy new web page that allows users to change their password before logging into Outlook Web Access (OWA).

Previously, new users who are required to change their password at next logon or users whose password has expired cannot log on to OWA.  They will get the less than helpful error from the OWA, "The user name or password that you entered is not valid. Try entering it again", as shown below:

 
In order to logon to OWA, the user must logon to the network, enter their old password and the new password.  Obviously, this causes problems for remote users whose password has expired or for new users who must change their password before logging in for the first time.

Exchange 2007 SP3 introduces a new SSL web page for these users that allows the user to change their password outside of OWA.  The page tells the user, "Your password has expired and you must change it prior to signing in to Microsoft Outlook Web Access."

 
Once the user changes their password, the page redirects the user back to OWA.

This new functionality is not enabled by default, since some organizations do not allow password changes from outside the internal network.  To enable it:
  • Logon to the CAS with administrator rights
  • Run Regedit and navigate to HLKM\SYSTEM\CurrentControlSet\services\MSExchange OWA
  • Create a new DWORD (32-bit) Value called ChangeExpiredPasswordEnabled
  • Assign the ChangeExpiredPasswordEnabled value: 1
  • Restart IIS using IISRESET /NOFORCE from the command line
Word is that Microsoft will implement the password reset tool for Exchange Server 2010 when Exchange 2010 SP1 is released.  It's a pretty handy feature!
Read more ...

Fix for Microsoft Exchange Protected Service Host service failed to start

Monday, June 28, 2010
If you install Exchange Server 2007 SP3 on a Windows Server 2008 R2 all-in-one server, you may get an error during installation of the Hub Transport role.  The error says,
A timeout was reached (30000 milliseconds) while waiting for the Microsoft Exchange Protected Service Host service to connect.

The Microsoft Exchange Protected Service Host service failed to start due to the following error: The service did not respond to the start or control request in a timely fashion.
This happens because there is a dependancy in the Microsoft Exchange Service Host service on IPv6.  Check to ensure that Internet Protocol Version 6 (TCP/IPv6) is enabled on the properties of the network adapter.
Read more ...

Unable to Compact a VHD Due to a File System Limitation Explained

Thursday, June 24, 2010

You may get the following error when attempting to compact a Hyper-V virtual hard disk (VHD):
The system failed to compact disk.vhd. Error Code: The requested operation could not be completed due to a file system limitation
This can be happen for several of reasons. 
  1. Windows Server 2008 R2 does not support hosting VHDs on compressed NTFS volumes. See the article, Virtual Hard Disk (VHD) Architecture Explained.
  2. The NTFS volume where the VHD resides is very heavily fragmented.  See Microsoft KB967351.
Both of these scenarios are fairly well explained, but I also came across another reason this can happen.  You cannot compact a VHD where the VHD contains a VSS backup.

The VHD in question was an Exchange 2010 data volume where I had run an Exchange-aware VSS backup using the native Windows Server Backup utility.  See my article, How to Backup Exchange 2010 RTM at Release Timeframe.

In order to compact the VHD, all VSS shadows must be deleted from the VHD volume within the VM.  This can be done by running the vssadmin utility, as such:
vssadmin delete shadows /all
Now you can compact the VHD to reduce the physical size of the VHD file and regain space on the Hyper-V host.
Read more ...

How to add a "Sign In Again" button to the Exchange 2010 OWA Sign Out page

Wednesday, June 23, 2010

Note: Click here to view how to add the Log On Again button to Exchange Server 2007.


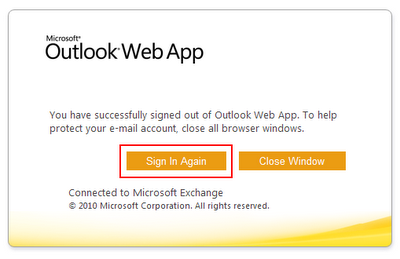
By default when you click "Sign Out" in OWA 2010, Exchange 2010 directs you to a page that explains that you have successfully logged off from Outlook Web Access.  The only button available, "Close Window", closes the existing browser window or tab.  This article explains how to add a "Sign In Again" button to the logoff.aspx page, as shown below:

To add the Sign In Again button, follow these steps on each Exchange 2010 Client Access Server (CAS):
  • Logon to the CAS using a local Administrator account.
  • Using Windows Explorer, navigate to the  %ProgramFiles%\Microsoft\Exchange Server\V14\ClientAccess\Owa\auth folder and make a copy of the logoff.aspx file for backup.
  • Edit the logoff.aspx file using Notepad.
  • Use Find to search for the word logoffclose.  In Exchange 2010 SP1 beta this will be line 123.
  • Insert the following code before this line, as a single line:
<input id="btnCls" type="submit" class="btn" title="Click here to sign in again." value="Sign In Again" onclick="window.navigate('/owa')" onmouseover="this.className='btnOnMseOvr'" onmouseout="this.className='btn'" onmousedown="this.className='btnOnMseDwn'">
  • Save the logoff.aspx file.
  • Copy the new logoff.aspx file to the same file path on all your 2010 CAS servers.
Remember that applying any Exchange 2010 Service Pack or Update Rollup to your CAS servers will overwrite the login changes you made, so create a copy of the edited logoff.aspx file to reapply the Logon Again button after the update.  Also know that Service Packs and Update Rollups could possibly include changes to the logoff.aspx page, so you may need to follow these steps again to edit the new page included in the update.
Read more ...

How to add a "Log On Again" button to the Exchange 2007 OWA Log Off page

Wednesday, June 23, 2010

Note: Click here to view how to add the Sign In Again button to Exchange Server 2010.


By default when you click "Log Off" in OWA 2007, Exchange 2007 directs you to a page that explains that you have successfully logged off from Outlook Web Access.  The only button available, "Close Window", closes the existing browser window or tab.  This article explains how to add a "Log On Again" button to the logoff.aspx page, as shown below:

To add the Log On Again button, follow these steps on each Exchange 2007 Client Access Server (CAS):
  • Logon to the CAS using a local Administrator account.
  • Using Windows Explorer, navigate to the  %ProgramFiles%\Microsoft\Exchange Server\ClientAccess\Owa\auth folder and make a copy of the logoff.aspx file for backup.
  • Edit the logoff.aspx file using Notepad.
  • Use Find to search for the word logoffclose.  In Exchange 2007 SP2 this will be line 115.
  • Insert the following code before this line, as a single line:
<input id="btnCls" type="submit" class="btn" title="Click here to log on again" value="Log On Again" onclick="window.navigate('https://mail.contoso.com/owa')" onmouseover="this.className='btnOnMseOvr'" onmouseout="this.className='btn'" onmousedown="this.className='btnOnMseDwn'">
  • Edit the line above to use your company's URL for OWA. 
  • Save the logoff.aspx file.
  • Copy the new logoff.aspx file to the same file path on all your CAS servers.
Remember that applying any Exchange 2007 Service Pack or Update Rollup to your CAS servers will overwrite the changes you made, so create a copy of the edited logoff.aspx file to reapply the Logon Again button after the update.  Also know that Service Packs and Update Rollups could possibly include changes to the logoff.aspx page, so you may need to follow these steps again to edit the new page included in the update.
Read more ...

TechNet Wiki: The Beginning of Something Big

Monday, June 21, 2010
When I was at TechEd in New Orleans I was introduced to the new TechNet Wiki Beta site.

The TechNet Wiki is a library of information about Microsoft technologies written by the community for the community. Whether you write code, manage servers, keep mission-critical sites up and running, or just enjoy digging into details, we think you will be at home in the TechNet Wiki.
  • This is a community site. For official documentation, see MSDN Library, TechNet Library or contact Microsoft Support.
  • The Wiki is focused on Microsoft technologies. The community will edit or remove topics that get too far off track.
  • We are inspired by Wikipedia.
  • Anyone who joins can participate and contribute content.
The simplest way to participate is to use the information in this Wiki. The community is providing how-to guides, troubleshooting tips and techniques, practical usage scenarios, scripting pointers as well as overview, conceptual and technology overview topics.

I encourage you to check it out, get involved, and make your mark. Join. Help us. Contribute boldly!
Read more ...

How to Securely Deploy iPhones With Exchange ActiveSync in the Enterprise - The Complete Cookbook

Friday, June 18, 2010
Based on a request at TechEd, I consolidated my 7-part series "How to Securely Deploy iPhones With Exchange ActiveSync in the Enterprise" into a single PDF document. Now you can view the entire series in one place or print it out for easier reference.

On a side note, I've tested these procedures on iPhone OS4 and everything works as expected.  No changes need to be made to the existing procedures - it all works fine.

Read more ...

Dynamic Memory and RemoteFX in Windows Server 2008 R2 SP1

Thursday, June 17, 2010
When I was at TechEd in New Orleans I got a chance to talk with Vijay Tewari, Principal Program Manager for the Microsoft Virtualization Team, about Dynamic Memory in the upcoming Service Pack 1 for Windows Server 2008 R2. 

In case you're not familiar with Dynamic Memory, this allows you to specify a minimum and maximum amount of RAM that a Hyper-V guest can use.  The VM will start with the minimum amount of RAM you sepcify and the host server will automatically reallocate additional RAM to the VM as needed, up to the maximum amount you have specified.  Dynamic Memory will also automatically reduce the RAM allocated when it is no longer needed.  Pretty sweet!  This provides higher density of VMs on a Hyper-V host since memory can be oversubscribed.  Keep in mind that if the VM's are using more memory than can be provided to them even after movng the memory amongst them, the OS inside the VM will start to page. This will obviously have an adverse performance impact in that VM.  Still, oversubscribing memory has big advantages especially for VDI deployments.  The good news is that now there are other ways to pool and allocate memory and Hyper-V Dynamic Memory is a good solution for desktop and server operating systems.

The other "big thing" in Windows Server 2008 R2 SP1 is RemoteFX.  This technology came into being when Microsoft purchased Calista Technologies in 2008.  RemoteFX allows the VMs on a Hyper-V host to access the host's Graphics Processor Unit (GPU) for superior video output in the guest. This allows remote workers to enjoy the same rich user experience over a network as with a locally executing desktop.  Remote clients only need to support the color depth required to view the output, so you can provide advanced GPU capabilities to all your remote clients using a GPU on the Hyper-V host.  RemoteFX can also use multiple GPUs in the host server to provide scale out.

RemoteFX is a feature that you enable on the Hyper-V host, not the VMs.  Once the RemoteFX feature has been installed a new option to enable the 3D graphics adapter is available within the settings of the guest VM.  This means that even though you've enabled RemoteFX on the host, resources are only allocated for the guests you choose. 

RemoteFX will require new Integration Components in the VM and will also require a new RDP client that supports the new capabilities, which should be available in the same release timeframe.  RemoteFX will also work with Remote Desktop Gateway deployments.  Microsoft recommends 200MB of graphics RAM per VM that uses RemoteFX.

The public beta for Windows Server 2008 R2 SP1 is expected to be released by the end of July 2010.  The same service pack is used for both Windows Server 2008 R2 and Windows 7, simplifying deployment.
Read more ...

New TechNet Series on the Cloud

Wednesday, June 16, 2010

Microsoft TechNet is kicking off a new "TechNet On:" feature series with an in-depth look at securing and deploying applications in the cloud.  You'll find new articles and videos in three tracks:
Get the information about the cloud to help clear your head!
Read more ...

The Automatic Updates Service May Stop Responding

Wednesday, June 16, 2010
If your Windows Server 2003 or Windows XP computer is configured to check for WSUS updates very frequently (say, every 2 hours) the Windows Automatic Update Service (wuauserv.exe) will consume too much memory over time and will eventually become unresponsive.

Microsoft released a hotfix for this situation, which is available at KB914810.  You should only apply this hotfix to affected systems.  This hotfix requires a restart.
Read more ...

Exchange 2010 SP1 Automation Goodness

Tuesday, June 15, 2010
As you are no doubt aware, Exchange Server 2010 SP1 Beta was released during TechEd 2010.  Since this is a beta, the documentation has not been released, but I wanted to point out a couple of new things in SP1.
First, Exchange Server 2010 SP1 will automatically install prerequisites for new installations.  There's no need to install the required roles and features before you install Exchange 2010.  The only exception to this is the prerequisite for .NET Framework 3.5 SP1, which is required for setup to run.  Simply tick the checkbox for "Automatically install Windows Server roles and features required for Exchange Server", as shown below:

By the way, I've found that quite a few customers didn't know that you can install Exchange directly from the SP1 update bits.  There's no need to install Exchange 2010 RTM and then upgrade it to SP1.

The second new automation feature pertains to Microsoft Forefront Protection 2010 for Exchange Server.  In previous versions of setup, you were required to manually stop and decouple FPE 2010 from Exchange before running the upgrade as described in KB775214.  This is now handled automatically during setup, as shown below:
Read more ...

Microsoft TechEd Online

Monday, June 14, 2010
Did you attend Microsoft TechEd 2010?  Do you wish you did, but didn't?  Well, all the recorded sessions are now available on Microsoft TechEd Online.

Now you can rewatch the sessions you attended or watch the ones you missed.  I'm really impressed how fast Microsoft got these sessions up for us!  What a great resource.
Read more ...

TechEd 2011 will be in Atlanta, GA

Wednesday, June 9, 2010

Microsoft officially announced that TechEd 2011 North America will be in Atlanta, Georgia.  The dates are set for May 16 - 19, 2011.

Once you get home and start implementing all the new technologies and ideas you learned about at this year's TechEd, you can start making plans for next year!
Read more ...

TechEd Update 1

Tuesday, June 8, 2010
Dear reader,

Forgive the fact that I haven't updated since Sunday.  There's a lot of oysters, beer and TechEd goodness going on and I've been a little busy.

We met up with the Krewe at the New Orleans Oyster Festival on Saturday and had the best chargrilled oysters from Oceana and Peacemaker Po'boys from Acme Oyster Co.  Eating that delicious food in 100 degree heat and matching humidity makes a man thirsty, so mass quantities of beer and hurricanes were in order.  Later in the evening, more oysters met their fate on the chargrill at Acme off Bourbon Street.

Monday came around too quickly and the TechEd festivities began.  I was scheduled co-present a session with Ran Morimoto at 4:30pm on "Exchange 2003/2007 Migration to Exchange 2010: Tips, Tricks and Lessons Learned".  I began gathering up my laptop and materials that I'd need for the demo when panic struck.  I forgot to pack the HDMI to VGA cable required to show the demos I've been preparing for a month and a half.  None of the rooms are set up to use HDMI video and I certainly couldn't hold a laptop up for everyone to see.

One of the FANTASTIC events staff worked up a solution where they would add a second network drop at the podium so I could RDP into the laptop from the presentation computer.  Perfect!  I was good to go.

The session went well - very full audience of maybe 150 people.  I had a bit of trouble with a couple of demos, one due to the lousy Internet connectivity here in the convention center and the other due to caching.  Arrggh!  I've worked so hard on these demos I wanted them to be perfect.  Oh well, it was a GREAT experience.

Regardless, our session is so far rated in the top 10 sessions for all sessions and was the #1 unified communications session for the day.  Nice!

I held the Exchange Roundtable at The Rusty Nail near the convention center Monday night.  The bar was, well, "colorful" with lots of local flavor.  I'm glad none of us got mugged on the way there.  It was attended by about 25 people including Exchange product team notables, such as Ross Smith IV, Scott Schnoll, and Kumar Venkateswar.  It was great to have some time to discuss Exchange issues and have some "how it works" discussions.  Thanks to everyone who attended!  I hope to do this again next year.

This morning I was invited to join Paul Robichaux for breakfast at Cafe Beignet with other Exchange notables.  Great beignets and cafe au lait, not to mention the conversations!  Thanks, Paul.

The rest of the day was full of regular attendee sessions and talking with people.  Tonight is the MVP IT Influencers party at the Aquarium of the Americas and the ClusterFunk party.  should be another evening to remember (if I can).
Read more ...

TechEd 2010 Bag and Pen Secrets Revealed!

Sunday, June 6, 2010
Exclusive here on Gizmodo The EXPTA {blog} - The hidden secrets of the TechEd pen and bag are revealed for the first time!!! Hopefully this will save you hours of frustration and may even SAVE YOUR LIFE.

First, the TechEd pen.  It's a pen.  It's a highlighter.  It's both!  But how do I access this highlighter, you ask.  Looking at the seemingly normal pen you will notice a small yellow button.  Press it and the end will pop out.


Now pull on the end that popped out, HARD.  You won't break it or anything.  Pretend it's a hand grenade - just don't lob the pen, you'll probably want to keep that.


Viola!  You may now highlight to your heart's content.

Now, onto the coveted TechEd bag.  I gotta say that I really like this year's bag.  It's sturdy, got lots of pockets, and it's a little more trim than most year's bags.  Great quality as usual, too.  I'm not sure how the neon green 1974 Jordache Jeans thing will look in a few years, but I like it.  I also like the cool aluminum water bottle they give this year (minus that pesky toxic materials warning of yesteryear).


Once you go through all your swag materials, take a close look at the bottom of the bag.  Here, you'll see a small Velcro opening.


This opening reveals the TechEd bag drag shoot!!!


You can use the drag shoot to slow you down as you run between the parties at this year's TechEd! 

Enjoy your conference and I hope to see you here in New Orleans!


Read more ...

TechEd 2010, Here I Come!!!

Friday, June 4, 2010
Well, it's finally here! TechEd 2010 in New Orleans is only a few days away!!!

I'll be flying to NOLA tomorrow morning to meet up with friends who left today.  I've got a day and a half to familiarize myself with the area and get settled in.  I'm looking forward to an excellent dinner tomorrow night on Frenchmen Street in the French Quarter!

Rand Morimoto and I will be presenting, "UNC303: Upgrading from Microsoft Exchange Server 2003/2007 to Exchange Server 2010: Tips, Tricks, and Lessons Learned" on Monday at 4:30pm.  Also, be sure to check out my Exchange Roundtable that same evening after the Exhibition Hall Reception.

Be sure to stop and say "Hi" if you run into me!  I'll see you in New Orleans!!!
Read more ...

VBscript to Tell the Last Time the OAB was Downloaded

Friday, June 4, 2010

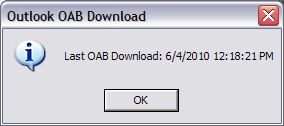
From the "Random Scripts" dumpster, here's a VBscript I wrote that will show you the date and time that the Offline Address Book (OAB) was downloaded by Outlook for the current user on the local machine.
'OABtime.vbs

'Jeff Guillet, 05/15/2010
'This script reads from the registry To find the last time the user downloaded the OAB.
'Converts REG_BINARY value To a 64-bit FILETIME readable value

Const HKEY_CLASSES_ROOT = &H80000000
Const HKEY_CURRENT_USER = &H80000001
Const HKEY_LOCAL_MACHINE = &H80000002
Const HKEY_USERS = &H80000003
Const HKEY_CURRENT_CONFIG = &H80000005
Dim a(7), oRegistry, oMethod, oInParam, oOutParam, objShell

' REG_BINARY Value we're querying from the registry
sMethod = "GetBinaryValue"
hTree = HKEY_CURRENT_USER
' The OABs GUID will be different for each Exchange org, adjust for your org
sKey = "Software\Microsoft\Exchange\Exchange Provider\OABs\20eaa7ed-54a6-404e-ab59-2928e749aabb"
sValue = "OAB Last Modified Time"

Set oRegistry = GetObject("winmgmts:impersonationLevel=impersonate}//./root/default:StdRegProv")
Set oMethod = oRegistry.Methods_(sMethod)
Set oInParam = oMethod.inParameters.SpawnInstance_()

oInParam.hDefKey = hTree
oInParam.sSubKeyName = sKey
oInParam.sValueName = sValue

Set oOutParam = oRegistry.ExecMethod_(sMethod, oInParam)
For iCount = 0 To UBound(oOutParam.Properties_("uValue"))
   a(iCount)=oOutParam.Properties_("uValue")(iCount)
Next

' Obtain local Time Zone bias from machine registry
Set objShell = CreateObject("Wscript.Shell")
lngBiasKey = objShell.RegRead("HKLM\System\CurrentControlSet\Control\TimeZoneInformation\ActiveTimeBias")
If UCase(TypeName(lngBiasKey)) = "LONG" Then
   lngBias = lngBiasKey
ElseIf UCase(TypeName(lngBiasKey)) = "VARIANT()" Then
   lngBias = 0
   For k = 0 To UBound(lngBiasKey)
      lngBias = lngBias + (lngBiasKey(k) * 256^k)
   Next
End If

On Error Resume Next
lngHigh = 0
lngLow = 0
For i = 7 To 4 Step -1
   lngHigh = lngHigh * 256 + a(i)
Next
For i=3 To 0 Step -1
   lngLow = lngLow * 256 + a(i)
Next
If err.number <> 0 Then
   dtmDate = #1/1/1601#
   Err.Clear
Else
   If lngLow < 0 Then
      lngHigh = lngHigh + 1
   End If
   If (lngHigh = 0) And (lngLow = 0 ) Then
      dtmDate = #1/1/1601#
   Else
      dtmDate = #1/1/1601# + (((lngHigh * (2 ^ 32)) + lngLow)/600000000 - lngBias) / 1440
   End If
End If

MsgBox "Last OAB Download: " & dtmDate, vbInformation, "Outlook OAB Download"
Read more ...

Download the Mobile TechEd 2010 Schedule and Twitter Tool!

Friday, June 4, 2010
Kevin Wolf at The Wolf Bytes created a very cool (and free) Scheduling and Twitter tool influenced with the Windows Phone 7 Metro design guide lines.  It's one app, built for five platforms.

After you download the session data, you can view the schedule and build your own custom schedule.  With the Twitter tool, you can view tweets for the main conference hash tag #TechEd as well as build up a favorite list of tags you wish to follow.

The app works on Windows Phone 6.5, iPhone, Android, iPad, and as a Sidebar Gadget.

If you're going to TechEd 2010 in New Orleans, you have to get this free app!
Read more ...

Using Dynamic Signatures in Exchange 2010

Thursday, June 3, 2010
Exchange 2010 offers a new feature called Dynamic Signatures.  Dynamic Signatures are hub transport rules that automatically apply a personalized signature to the bottom of an e-mail based on the sender’s Active Directory (AD) attributes.  You can also configure this feature to apply rich, HTML signatures with specific fonts, company logos, and more.

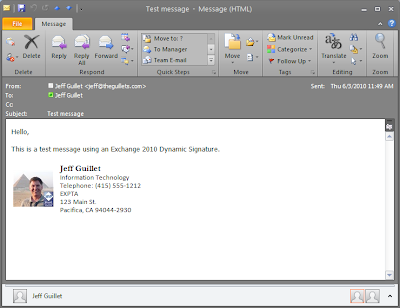
In this article I'll demonstrate how to create a Dynamic Signature based on the user's name, department, phone number, company name and address in AD.  The signature will also include a custom image for each user, as shown below:


Let's get started.  Open the Exchange Management Console and navigate to Hub Transport under Organization Configuration.  Click the Transport Rules tab in the work pane.  Now click New Transport Rule in the Actions pane and configure it as follows:

Begin the Edit Transport Rule wizard by entering a name and description for the rule, as shown below.

Now configure the Conditions for the signature.  I always start by making the new rule apply only to myself, so I can test the rule's functionality before deploying it to everyone.  Once you've confirmed that it functions as expected, you would normally apply this rule "from users that are inside the organization".


For Actions, check "append disclaimer text and fallback to action if unable to apply".  This is where we enter our Dynamic Signature text and variables, as shown below.


Click disclaimer text to enter the text for the Dynamic Signature.  You can use standard HTML or plain text for the signature.  In this demo I'm using HTML, which allows me to specify text formatting and allows me to create a custom link to a photo on a web server.

Tip: You can use an HTML editor like Microsoft Web Expressions or Frontpage to create the basic layout of the signature, and then paste it into the Specify Disclaimer Text box for editing.

The trick to making the signature dynamic is to use variables for attributes in Active Directory.  These variables must be placed between %% symbols.  For example, %%firstname%%.  The following is a list of the supported variables that are available:
  • UserLogonName
  • DisplayName
  • FirstName
  • Initials
  • LastName
  • PhoneNumber
  • OtherPhoneNumber
  • HomePhoneNumber
  • OtherHomePhoneNumber
  • PagerNumber
  • MobileNumber
  • FaxNumber
  • OtherFaxNumber
  • Email
  • Street
  • POBox
  • City
  • State
  • ZipCode
  • Country
  • Title
  • Department
  • Manager
  • Office
  • Company
  • Notes
  • CustomAttribute1 – CustomAttribute15
Enter the the signature text into the Specify Disclaimer Text box as shown below.


The HTML text I'm using in this demo is as follows.


<html>

<body>
<table border="0" width="100%">
<tr>
<td width="85">
<img border="1" src="http://www.expta.com/images/%%Firstname%%%20%%Lastname%%.jpg">
</td><td valign="top"><font face="Garamond">
<b>%%Firstname%% %%Lastname%%</b></font><br>
<font size="2" face="Calibri">%%department%%<br>
Telephone: %%Phone%% <br>
%%Company%% <br>
%%Street%% <br>
%%City%%, %%State%% %%ZipCode%%
</font></td>
</tr>
</table>
</body>
</html>
This code creates a two column, single row table with a graphic in the first cell (in red) and the formatted text in the second cell (in blue). 

Note that the image is a link to a JPG file named Firstname[%20(space)]Lastname.jpg in the images folder on the http://www.expta.com/ server.  Each user will need a JPG file in the images folder on the web server in this Firstname Lastname.jpg format.

Alternatively (and to keep it more simple), you could opt to use a single image for all users, such as a company logo.  Simply change the line in red to a static link, such as:
<img border="1" src="http://www.expta.com/images/logo.jpg">
Now finish the Edit Transport Rule wizard to complete the Dynamic Signature rule and test it out.


As with all the Exchange 2010 wizards, you have the opportunity to copy the Powershell code that will be used to create the transport rule.  This allows you to save and edit the code for future use.
Read more ...

Exchange 2007 Test-ReplicationHealth Shows False Warning for CCR Geo-Clusters

Wednesday, June 2, 2010

The Test-ReplicationHealth cmdlet in Exchange 2007 will show an inaccurate warning for the ClusterNetwork check if your CCR nodes are configured in geographically dispersed clusters.

Exchange 2007 CCR clusters must be located on the same subnet(s) when deployed on Windows 2003 servers.  Clustering enhancements in Windows Server 2008 enable you to create clusters in different subnets, negating the need to do networking acrobatics like stretching VLANs across geographic sites.  Unfortunately, the Test-ReplicationHealth cmdlet still expects that the network adapters are on the same network and will display the following warning if they are not:
Server Check Result Error

------ ----- ------ -----
EXNODE1 PassiveNodeUp Passed

EXNODE1 ClusterNetwork WARNING Warnings:
Network 'EXNODE2 Public' used for client connectivity is up but node 'EXNODE1' does not have a Network Interface Card configured on it. Check that a NIC is configured for this network and is enabled.

Network 'EXNODE2 Private' used for internal cluster communications is up; however, node 'EXNODE1' does not appear to have a configured network interface card (NIC). Check that a NIC is configured and enabled for this network on this node.
Network 'EXNODE1 Private' used for internal cluster communications is up; however, node 'EXNODE2' does not appear to have a configured network interface card (NIC). Check that a NIC is configured and enabled for this network on this node.
Network 'EXNODE1 Public' used for client connectivity is up but node 'EXNODE2' does not have a Network Interface Card configured on it. Check that a NIC is configured for this network and is enabled.


EXNODE1 QuorumGroup Passed
EXNODE1 FileShareQuorum Passed
EXNODE1 CmsGroup Passed
EXNODE1 NodePaused Passed
EXNODE1 DnsRegistrationStatus Passed
EXNODE1 ReplayService Passed
EXNODE1 DBMountedFailover Passed
EXNODE1 SGCopySuspended Passed
EXNODE1 SGCopyFailed Passed
EXNODE1 SGInitializing Passed
EXNODE1 SGCopyQueueLength Passed
EXNODE1 SGReplayQueueLength Passed

VLEM SGReplayQueueLength Passed
This behavior also affects System Center Operations Manager 2007, since SCOM uses the same Test-ReplicationHealth cmdlet to monitor Exchange 2007 replication health.  This will cause the CCR nodes to show in a critical condition for the Exchange 2007 Test Replication Health Monitor - Log Shipping monitor.
Read more ...

Can't Delete IP Address from Hyper-V Virtual Machine

Tuesday, June 1, 2010
I've had a number of problems with Windows Server 2008 Hyper-V guests that hold onto their original IPv4 address after running SysPrep. 

SysPrep is supposed to remove this kind of server-specific information, but for some reason this isn't happening with Server 2008 images.  Removal of machine-specific information is called "generalization" and is supposed to happen when you click the Generalize checkbox in SysPrep.

I've seen this cause the following symptoms:

"The IP address you have entered for this network adapter is already assigned to another adapter (microsoft Virtual machine Bus Network Adapter) which is no longer present in this computer"

For this error, do the following:
  • Open a command prompt and enter set devmgr_show_nonpresent_devices=1
  • Enter start devmgmt.msc to start Device Manager
  • In the Device Manager window, click View and Show hidden devices
  • Under Network Adapters you will see the dimmed conflicting device, probably the Microsoft Virtual Machine Bus Network Adapter.  Delete it and you can continue to configure the existing adapter.
The other issue I've seen is when the network adapter hangs onto the imaged machine's IP address and you cannot delete it.  In this case, you view the properties of the adapter and see the old IP address as an additional IP address.  It looks like you can successfully remove the old IP address, but it still shows up when you view the NIC's properties again.

In this case, you do the following from the Hyper-V host server:
  • Connect to the VM guest session from the host.  You will lose RDP connectivity otherwise.
  • Open Device Manager
  • Expand Network Adapters, right-click the misbehaving NIC and select Uninstall
  • Right-click Network Adapters and select Scan for hardware changes
  • Reconfigure the new adapter
Read more ...

How to Determine a Computer's AD Site from the Command Line

Tuesday, June 1, 2010
The following command will show you which Active Directory site the remote computer is a member of:
nltest [/server:<remote computer name>] /dsgetsite
I always seem to forget this command.  :)
Read more ...

Comprehensive List of Hyper-V Hotfixes

Tuesday, June 1, 2010
Microsoft maintains a website on TechNet that contains a comprehensive list of all the hotfixes that pertain to Windows Server 2008 Hyper-V R2 and Windows Server 2008 Hyper-V.

Hyper-V Update List for Windows Server 2008 R2

Hyper-V Update List for Windows Server 2008

Each update includes a description and a link to download the hotfix or patch.

These sites also highlight one of the great features of TechNet - the Community Content area at the bottom of the page where users can annotate TechNet articles.  You will see that users have listed other updates that they feel are missing from Microsoft's lists.
Read more ...